Ultimate Tall Rainbow Layer Cake With Sprinkles
Tall Rainbow Layer Cake With Sprinkles Recipe
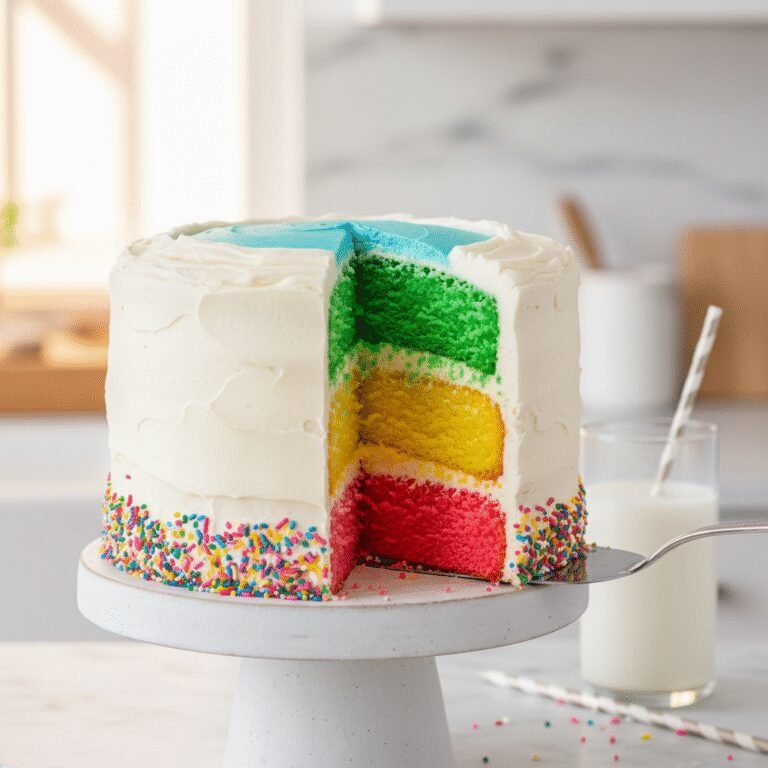
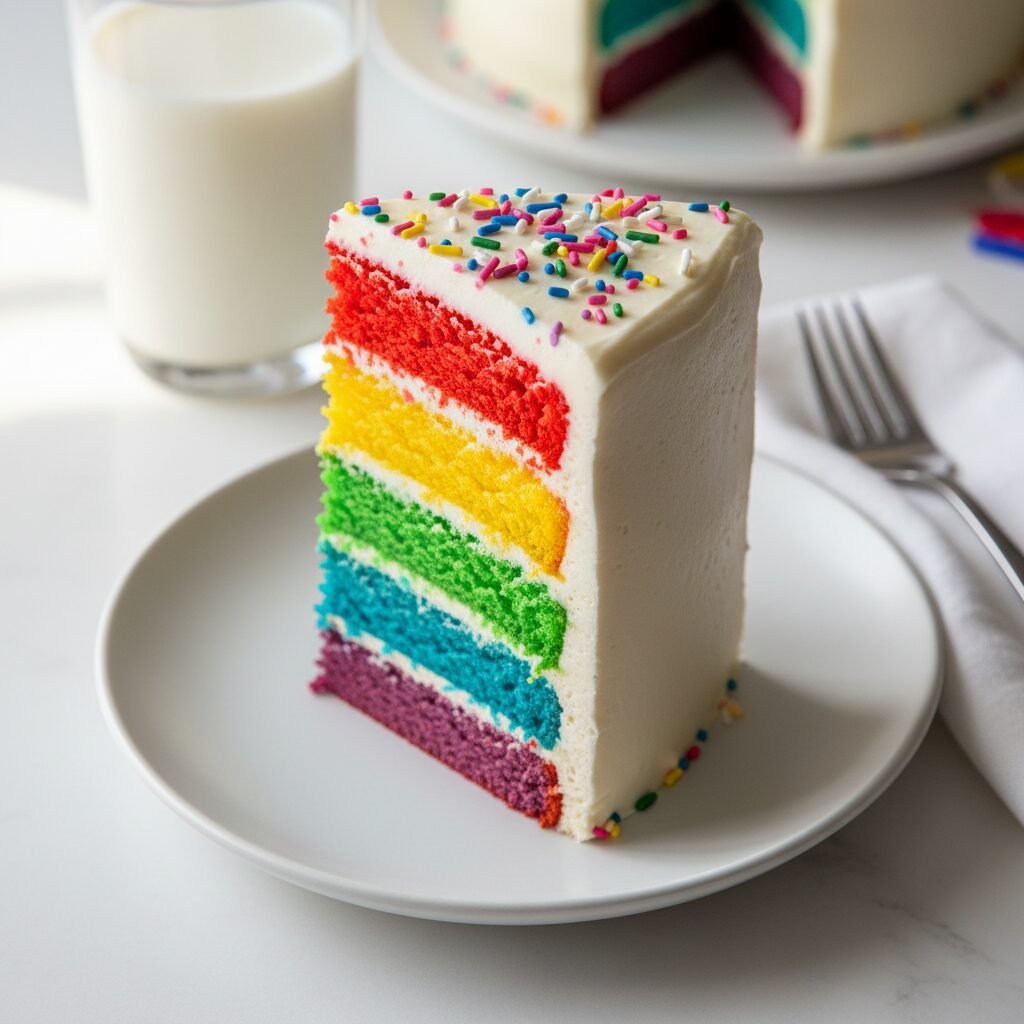
This show-stopping Tall Rainbow Layer Cake is the ultimate celebration dessert, featuring six vibrant, tender layers of vanilla cake coated in a silky smooth buttercream and adorned with festive sprinkles. It is a whimsical, nostalgic masterpiece that tastes just as magical as it looks, perfect for birthdays and special occasions.
1 hour 30 minutes
45 minutes
3 hours 15 minutes
1 tall 8-inch cake (16-20 servings)
Dessert
Baking
American
Vegetarian
There are few things in the culinary world that elicit a gasp of delight quite like slicing into a towering rainbow layer cake. It is the confectionery equivalent of a fireworks display—a riot of color hidden beneath a pristine, unassuming blanket of white buttercream. This Tall Rainbow Layer Cake with Sprinkles is not just a dessert; it is an event. Designed to be the centerpiece of any celebration, from children’s birthday parties to pride events or simply a rainy day that needs a splash of joy, this recipe delivers on both visual impact and gourmet flavor.
Many novelty cakes sacrifice texture for appearance, resulting in dry, dense sponges that rely heavily on the frosting for moisture. However, this recipe utilizes a “white velvet” buttermilk base that ensures a tender, moist crumb that melts in your mouth. We use egg whites instead of whole eggs to keep the batter pale, allowing the gel food coloring to pop with neon intensity rather than becoming muddy. The structure is sturdy enough to support the weight of six generous layers but remains light and fluffy on the fork.
To finish, we cloak the cake in a classic, whipped vanilla bean American buttercream that offers the perfect sugary crunch and creamy finish. The final touch—a cascade of rainbow sprinkles—adds texture and a nostalgic whimsy that makes you feel like a kid again. Whether you are a seasoned baker looking for a technical challenge or a parent wanting to create a core memory for your child, this guide will walk you through every step of engineering this architectural and edible marvel.
History & Origins
The concept of the layer cake is a relatively modern innovation in the timeline of baking history, evolving significantly in the mid-19th century with the development of chemical leaveners like baking powder and baking soda. Before this, cakes were leavened with yeast or mechanically whipped eggs, making the creation of uniform, stackable layers a difficult feat. As cast-iron stoves with temperature control became standard in American households, the multi-layered butter cake became a symbol of domestic prowess and hospitality.
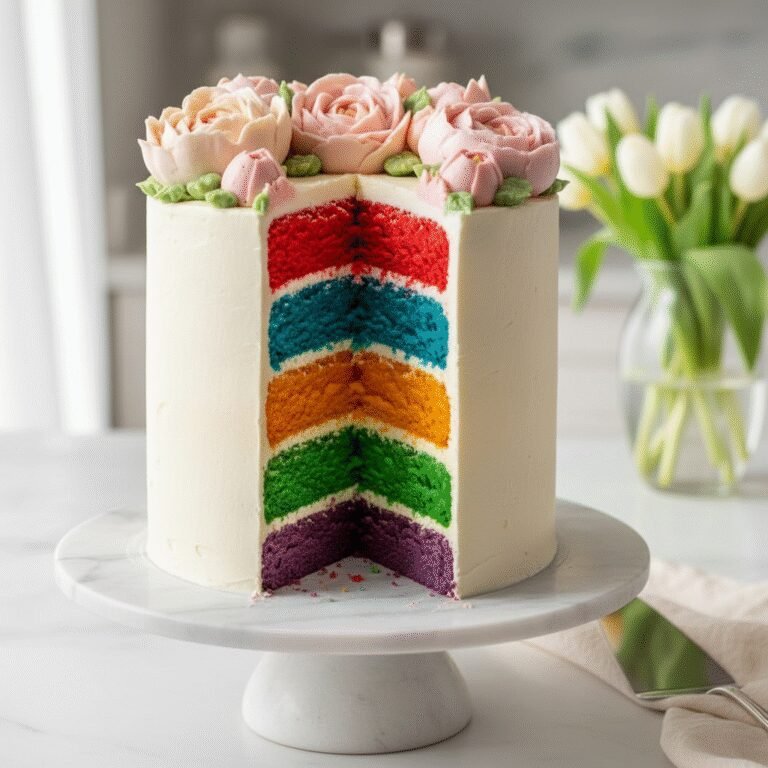
However, the specific phenomenon of the rainbow layer cake has a more distinct and recent cultural trajectory. While tinted cakes have appeared in vintage cookbooks—often pink and green checkerboard patterns or the marble cakes of the Victorian era—the distinct, six-layer ROYGBIV configuration exploded in popularity during the early 2010s. Much of this viral fame can be traced back to the food blogging sphere, specifically a feature by Martha Stewart of a cake created by blogger Kaitlin Flannery (Whisk Kid). The image of that perfect spectrum slice captivated the internet, launching a decade-long obsession with “surprise inside” desserts.
Culturally, the rainbow cake has also transcended its role as a birthday treat to become a potent symbol of the LGBTQ+ community. Serving a rainbow cake is often an act of solidarity, celebration, and pride. Over the years, the recipe has evolved from using standard liquid dyes, which often altered the batter’s consistency, to high-concentration gel pastes that allow for vibrant, psychedelic hues without compromising the chemistry of the bake. This recipe honors that modern tradition, combining the nostalgia of the classic American birthday cake with the bold aesthetics of the digital age.
Why This Recipe Works
Achieving a six-layer cake that stands tall without leaning, while maintaining a moist crumb, requires a precise balance of ingredients and physics. This recipe works because it abandons the traditional yellow cake base for a reverse-creaming method (or a modified creaming method) using high-ratio shortening and butter. By using egg whites and clear vanilla extract, we eliminate the yellow tint found in yolks, providing a neutral white canvas. This is crucial because yellow batter turns blue food coloring green and violet food coloring gray. With a white base, your colors remain true and vibrant.
Furthermore, the structural integrity of this cake is bolstered by the use of cake flour rather than all-purpose flour. Cake flour has a lower protein content, which inhibits gluten development, ensuring the layers are tender. However, to support the height, we ensure the batter is thick and the layers are baked in separate pans (or in batches) to ensure even rising. We also employ a high ratio of sugar to liquid, which keeps the cake moist for days—a necessary feature for a cake that takes time to assemble. Finally, the use of gel food coloring rather than liquid drops is the secret to success; liquid drops add water to the batter, which can cause the cake to shrink or become dense. Gel paste provides intense pigment with zero liquid, preserving the delicate emulsion of the batter.
Why You’ll Love This Recipe
- ✓Six distinct, vibrant layers creating a perfect rainbow spectrum.
- ✓Tender ‘white velvet’ crumb that stays moist for days.
- ✓Stable vanilla buttercream that crusts perfectly for smooth piping.
- ✓High visual impact perfect for Pinterest and Instagram.
- ✓Customizable sweetness and color intensity.
- ✓Detailed stacking instructions to prevent sliding or leaning.
Equipment You’ll Need
- ✓3 to 6 round 8-inch cake pans
- ✓Stand mixer with paddle attachment
- ✓Kitchen scale (digital)
- ✓6 small mixing bowls (for colors)
- ✓Gel food coloring (Red, Orange, Yellow, Green, Blue, Purple)
- ✓Offset spatula
- ✓Cake turntable
- ✓Bench scraper
- ✓Piping bags and tips
Ingredients
- ✓3 cups (345g) cake flour, sifted
- ✓1 tbsp baking powder
- ✓1/2 tsp salt
- ✓1 cup (226g) unsalted butter, room temperature
- ✓2 cups (400g) granulated sugar
- ✓5 large egg whites, room temperature
- ✓1 tbsp clear vanilla extract
- ✓1 1/2 cups (360ml) whole milk, room temperature
- ✓1/2 cup (120g) sour cream, room temperature
- ✓Gel food coloring (Super Red, Orange, Lemon Yellow, Leaf Green, Royal Blue, Violet)
- ✓FOR THE BUTTERCREAM:
- ✓2 cups (450g) unsalted butter, softened
- ✓7-8 cups (900g) powdered sugar, sifted
- ✓1 tbsp vanilla extract
- ✓4-5 tbsp heavy cream
- ✓Pinch of salt
- ✓1 cup Rainbow sprinkles (jimmies or quins)
Instructions
- Preheat oven to 350°F (175°C). Grease and flour six 8-inch cake pans (or bake in batches if you have fewer pans). Line bottoms with parchment paper.
- In a medium bowl, whisk together the sifted cake flour, baking powder, and salt. Set aside.
- In the bowl of a stand mixer fitted with the paddle attachment, beat the butter and sugar on medium-high speed until pale and fluffy, about 3-5 minutes.
- Reduce speed to medium and add egg whites one at a time, mixing well after each addition. Scrape down the sides of the bowl.
- Mix in the sour cream and clear vanilla extract until fully combined.
- Reduce mixer speed to low. Add the dry ingredients in three additions, alternating with the milk, starting and ending with the flour. Mix just until combined—do not overmix.
- Weigh the total amount of batter and divide it evenly into 6 small bowls. (It helps to use a scale for accuracy).
- Tint each bowl of batter with a different gel food color to create your rainbow: Red, Orange, Yellow, Green, Blue, and Purple. Fold gently to combine without deflating the batter.
- Pour each colored batter into a prepared cake pan and smooth the tops with a spatula.
- Bake for 18-22 minutes, or until a toothpick inserted into the center comes out clean. Do not overbake to preserve the color.
- Allow cakes to cool in pans for 10 minutes, then turn out onto wire racks to cool completely. Level the tops of the cakes with a serrated knife if they have domed.
- Make the buttercream: Beat the butter on medium-high speed until creamy (5 mins). Gradually add powdered sugar, one cup at a time, mixing on low. Add vanilla, salt, and heavy cream. Whip on high for 3-5 minutes until white and fluffy.
- Assembly: Place the purple layer on a cake board. Spread a layer of buttercream on top. Repeat with Blue, Green, Yellow, Orange, and finally Red on top.
- Apply a thin ‘crumb coat’ of frosting over the entire cake to seal in crumbs. Chill for 20 minutes.
- Apply the final thick layer of buttercream, smoothing the sides with a bench scraper for a professional finish.
- Immediately press sprinkles into the bottom third of the cake or cover the top completely, depending on your design preference.
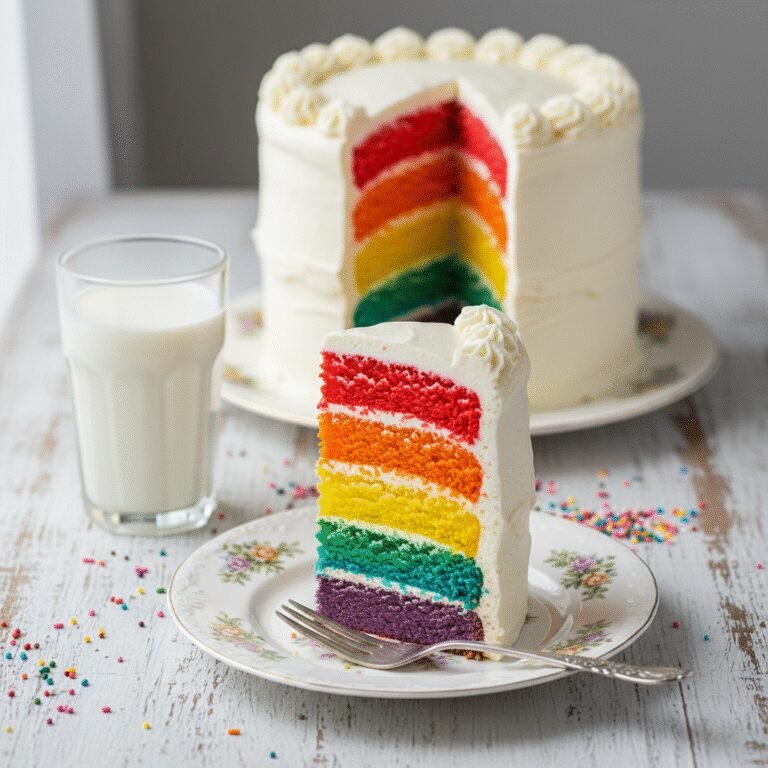
- Slice with a warm knife to reveal the clean rainbow layers.
Expert Cooking Tips
- ✓Use a kitchen scale to divide the batter. Even layers are critical for the visual effect of a rainbow cake.
- ✓Use gel food coloring instead of liquid drops. Gel provides intense color without adding excess water that can alter the batter’s consistency.
- ✓Do not overmix the batter once the flour is added. Overmixing develops gluten, leading to a tough, dense cake.
- ✓Chill the cake layers before stacking. Cold cake is firmer and easier to handle, reducing the risk of layers breaking.
- ✓Use a crumb coat. This thin initial layer of frosting traps crumbs so your final outer layer is perfectly clean and white.
- ✓Room temperature ingredients are non-negotiable. Cold butter or milk will cause the batter to curdle and bake unevenly.
- ✓If you don’t have 6 pans, bake in batches. Keep the remaining batter covered at room temperature while the first batch bakes.
Substitutions and Variations
This recipe is quite adaptable to various dietary needs, though structural integrity is key. For a **Gluten-Free** version, substitute the cake flour with a high-quality 1:1 gluten-free baking flour blend that contains xanthan gum; note that the texture may be slightly denser. If you are **dairy-free**, use high-quality plant-based butter sticks (not tub margarine) and unsweetened almond or soy milk; replace the sour cream with a dairy-free yogurt or coconut cream. For the **egg whites**, you can use pasteurized egg whites from a carton for convenience (ensure they are 100% whites), or aquafaba (chickpea liquid) whipped to soft peaks for a vegan alternative, though this changes the structure significantly. If you cannot find **cake flour**, you can make a substitute by measuring 1 cup of all-purpose flour, removing 2 tablespoons, and replacing them with 2 tablespoons of cornstarch, sifting multiple times.
Common Mistakes to Avoid
The most common mistake with rainbow cakes is **over-baking**, which causes the vibrant colors to brown or fade. Keep a close eye on the oven and pull them as soon as a toothpick is clean. Another error is **uneven coloring**; ensure you mix the gel paste thoroughly so there are no streaks, but do it gently to avoid deflating the air. **Stacking warm cakes** is a recipe for disaster; the butter in the frosting will melt, causing the layers to slide off one another—always cool completely. Finally, **skipping the leveling step** will result in a domed, wobbly tower. Use a serrated knife or a cake leveler to ensure every layer is perfectly flat before assembly.
Serving Suggestions
This cake is a massive centerpiece, so slicing it requires a bit of strategy. Because of the height, you can cut thin slices that still provide a generous serving. Use a sharp chef’s knife dipped in hot water and wiped dry between cuts for those clean, sharp lines that look great in photos. Serve this cake with a glass of cold milk to balance the sweetness, or a flute of champagne for adult celebrations. It pairs beautifully with fresh berries on the side to cut through the rich buttercream. For a party, serve on simple white plates to let the rainbow colors be the star of the show.
Storage and Reheating Tips
Due to the butter content in the frosting and cake, this dessert is best stored at room temperature if it will be eaten within 24 hours, protected by a cake dome. For longer storage, keep it in the refrigerator for up to 5 days. The cold will harden the buttercream and the cake crumb, so it is imperative to let slices sit at room temperature for at least 30-60 minutes before eating to restore the soft, velvety texture. You can also freeze individual slices wrapped tightly in plastic wrap and foil for up to 3 months. Thaw in the fridge overnight and bring to room temperature before serving.
Nutrition Facts (Estimated)
| Serving Size | 1 slice |
| Calories | 650 |
| Fat | 30g |
| Saturated Fat | 18g |
| Unsaturated Fat | 10g |
| Trans Fat | 0.5g |
| Cholesterol | 85mg |
| Sodium | 320mg |
| Carbohydrates | 88g |
| Fiber | 1g |
| Sugar | 55g |
| Protein | 6g |
Frequently Asked Questions
Can I use all-purpose flour instead of cake flour?
Yes, but the cake will be slightly denser and less tender. To mimic cake flour, for every cup of all-purpose flour, remove 2 tablespoons of flour and replace with 2 tablespoons of cornstarch. Sift well.
Do I really need six cake pans?
Not necessarily, but it makes the process much faster. If you only have two or three pans, bake the batter in batches. Wash and cool the pans under cold water between batches before re-greasing and filling.
Why did my colors turn out dull?
This usually happens if you use liquid food coloring or ‘natural’ food coloring, which often isn’t potent enough for baking. High-quality gel pastes (like Americolor or Wilton) are required for vibrant, neon hues.
Can I make the cake layers ahead of time?
Absolutely. You can bake the layers, let them cool, wrap them individually in plastic wrap, and freeze them for up to a month. Assemble the cake while the layers are still frozen; it’s actually easier to frost!
How do I stop the cake from leaning?
Ensure every layer is leveled flat before stacking. Use a dowel driven through the center of the cake if you are transporting it. Also, ensure your buttercream isn’t too soft.
Can I use cream cheese frosting?
Cream cheese frosting is delicious but much softer than American buttercream. If you use it, you must keep the cake refrigerated, and it may not support the weight of six layers as effectively without dowels.
What order should the colors go in?
To mimic a real rainbow, stack them (from bottom to top): Purple, Blue, Green, Yellow, Orange, Red. This way, when you slice it, the red is on top.
Why is my cake dry?
Overbaking is the main culprit. The layers are thin, so they bake quickly (18-20 mins). Also, ensure you measured flour correctly (spoon and level method) to avoid a heavy batter.
Conclusion
Creating this Tall Rainbow Layer Cake is more than just following a recipe; it is an artistic endeavor that yields one of the most joyful desserts imaginable. While the process requires patience—mixing six colors, baking multiple batches, and stacking with precision—the reward is instantaneous the moment you cut that first slice. The collective ‘oohs’ and ‘aahs’ from your guests make every minute of prep time worth it. Whether you are celebrating a milestone birthday, showing your pride, or simply baking to spread happiness, this rainbow cake is a guaranteed showstopper. So grab your gel colors, preheat your oven, and get ready to bake the world a little brighter!