The Ultimate Tall Rainbow Layer Cake: A 4-Layer Celebration of Color
Tall Rainbow Layer Cake Four Layer Cake Recipe
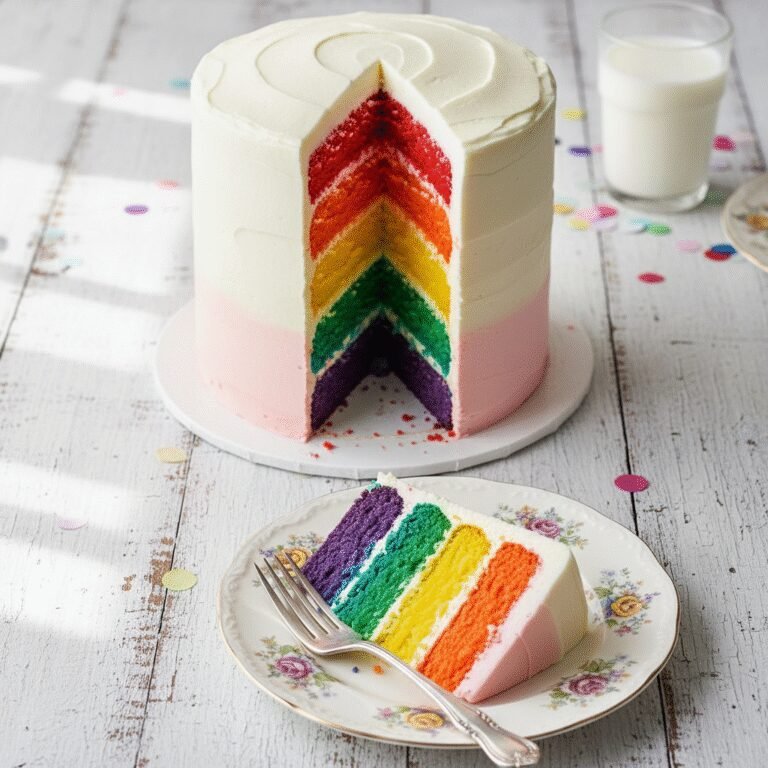
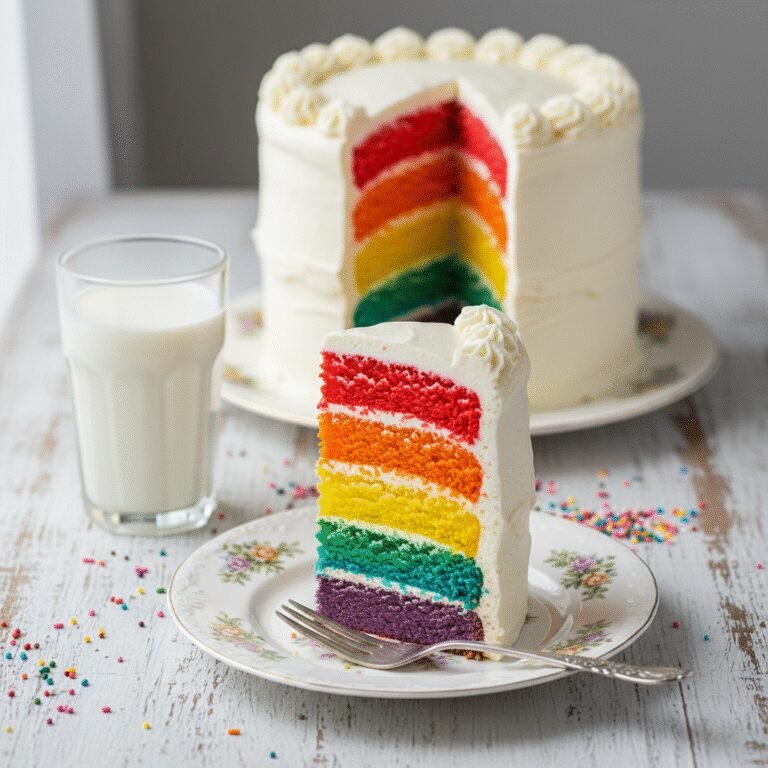
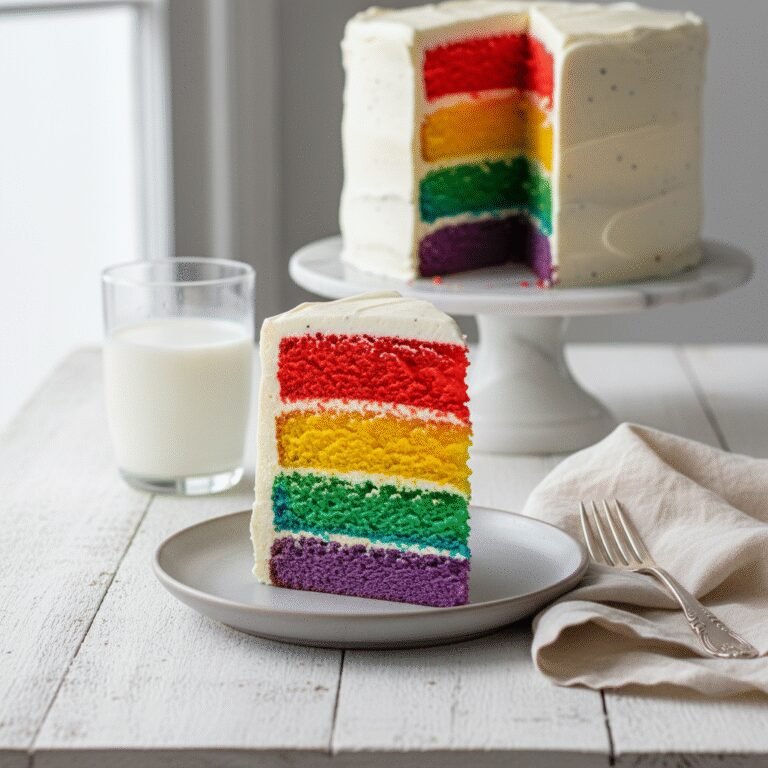
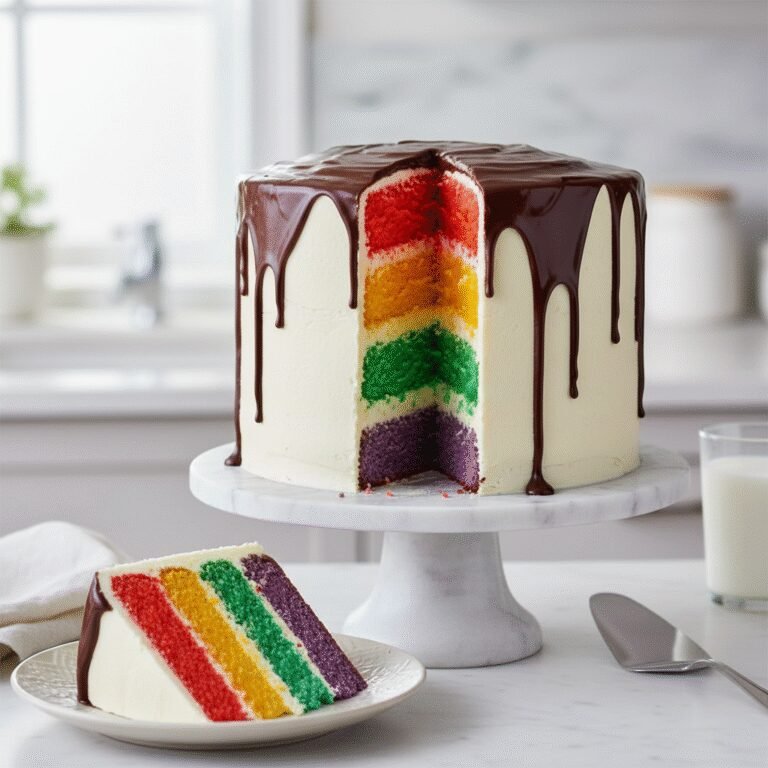
This show-stopping four-layer rainbow cake is the ultimate birthday centerpiece, featuring vibrant, moist vanilla sponge layers stacked high with creamy vanilla buttercream. It is surprisingly easy to assemble and guaranteed to bring a smile to everyone’s face with its stunning, colorful interior.
45 minutes
35 minutes
2 hours 30 minutes
12-16 servings
Dessert
Baking
American
Vegetarian
There is something undeniably magical about the moment you slice into a seemingly simple white cake to reveal a kaleidoscope of vibrant colors hidden within. This Tall Rainbow Layer Cake is not just a dessert; it is an experience, a centerpiece, and a celebration on a plate. Designed to be the star of any birthday party, Pride celebration, or festive gathering, this four-layer masterpiece combines the nostalgia of a classic vanilla birthday cake with a modern, visual twist that lights up the room. While many rainbow cakes can be dry or dense due to over-handling the batter to achieve those colors, this recipe has been meticulously calibrated to ensure that every single crumb is tender, moist, and flavorful. We utilize a specific ‘white cake’ base that omits egg yolks, ensuring that the food coloring remains true to its hue—your blues stay blue rather than turning teal, and your pinks remain bright rather than muddy. The towering height of four substantial layers makes for an impressive presentation that rivals any professional bakery. Covered in a cloud of whipped vanilla buttercream and perhaps a cascade of sprinkles, this cake tastes exactly like a happy memory. It is sweet, buttery, and rich, with a texture that melts in your mouth. Despite its intricate appearance, the method is straightforward enough for home bakers to tackle with confidence. Whether you are looking to impress guests or simply want to inject a massive dose of joy into your weekend baking, this Tall Rainbow Layer Cake is the perfect project to unleash your creativity and satisfy your sweet tooth.
History & Origins
The concept of colored cakes has a surprisingly deep history, though the neon-bright iterations we know today are a relatively modern phenomenon. In the 19th century, ‘colored’ cakes were achieved using natural ingredients; spinach for green, beet juice for red (the ancestor of the Red Velvet cake), and saffron for yellow. However, these were subtle tints rather than the bold hues we see now. The mid-20th century brought the advent of artificial food colorings, allowing for more experimentation in home kitchens during the psychedelic 1960s and 70s, where tie-dye aesthetics began to bleed into culinary arts. However, the true explosion of the Rainbow Layer Cake as a cultural icon occurred in the internet age. In the late 2000s and early 2010s, food blogging was in its ascendancy. A specific moment often cited in the ‘Rainbow Cake’ timeline is when a student blogger named Kaitlin Flannery (known as Whisk Kid) was invited onto The Martha Stewart Show in April 2010 to demonstrate her six-layer rainbow cake. The image of that cake—perfectly level, vividly colored layers masked by pristine white frosting—went viral on Pinterest and Tumblr, sparking a global baking trend. It became a symbol of skill and patience for home bakers. Since then, the rainbow cake has evolved beyond just a baking challenge; it has been adopted globally as a symbol of LGBTQ+ pride, representing diversity and inclusion. Today, it remains a staple in the repertoire of celebration cakes, proving that we truly do eat with our eyes first.
Why This Recipe Works
This recipe succeeds where many others fail because it prioritizes structural integrity without sacrificing texture. A tall, four-layer cake requires a batter that is sturdy enough to stack but soft enough to enjoy eating. We use the ‘reverse creaming’ method (mixing butter into the dry ingredients before adding liquids) which coats the flour particles in fat, inhibiting gluten formation. This results in a plush, velvety crumb that bakes up flat—essential for layering—minimizing the need to trim waste off the top of your cakes. Furthermore, this recipe specifically calls for egg whites rather than whole eggs. The absence of yellow egg yolks provides a neutral, white canvas, allowing the gel food coloring to pop with true vibrancy. Using gel paste coloring instead of liquid drops is another critical success factor detailed here; liquid coloring adds excess water to the batter, which can throw off the chemistry and lead to a dense or rubbery cake. Gel maintains the batter’s consistency while delivering intense pigment. Finally, the ratio of buttercream to cake is calculated to provide stability. The frosting acts as the ‘cement’ holding this skyscraper together, and our American Buttercream recipe is stiff enough to hold the weight of the layers while remaining creamy and spreadable.
Why You’ll Love This Recipe
- ✓Produces four distinct, vibrant colorful layers
- ✓Uses egg whites for a pure white base that makes colors pop
- ✓Reverse creaming method guarantees a flat, level bake
- ✓Moist, tender crumb that stays fresh for days
- ✓Impressive height creates a bakery-style presentation
- ✓Highly customizable colors for any theme or holiday
Equipment You’ll Need
- ✓4 8-inch round cake pans
- ✓Stand mixer with paddle attachment
- ✓Digital kitchen scale
- ✓Offset spatula
- ✓Gel food coloring (Pink, Yellow, Green, Blue)
- ✓Piping bags
- ✓Cake turntable
- ✓Wire cooling racks
- ✓Mixing bowls
Ingredients
- ✓3 cups (375g) cake flour, sifted
- ✓2 cups (400g) granulated sugar
- ✓1 tablespoon baking powder
- ✓1/2 teaspoon salt
- ✓1 cup (2 sticks/226g) unsalted butter, room temperature, cut into cubes
- ✓1 cup (240ml) whole milk, room temperature
- ✓1/2 cup (120ml) sour cream, room temperature
- ✓5 large egg whites, room temperature
- ✓2 teaspoons pure vanilla extract
- ✓Gel food coloring (Neon Pink, Lemon Yellow, Leaf Green, Sky Blue)
- ✓For the Buttercream: 2 cups (450g) unsalted butter, softened
- ✓7 cups (875g) powdered sugar, sifted
- ✓1/4 cup (60ml) heavy cream
- ✓1 tablespoon pure vanilla extract
- ✓Pinch of salt
Instructions
- Preheat your oven to 350°F (175°C). Grease four 8-inch round cake pans, line the bottoms with parchment paper, and grease the parchment. Dust with flour and tap out the excess.
- In the bowl of a stand mixer fitted with the paddle attachment, mix the cake flour, granulated sugar, baking powder, and salt on low speed for 30 seconds to combine.
- Add the cubed, softened butter and mix on low speed until the mixture resembles coarse sand or moist crumbs. This coats the flour in fat and prevents over-development of gluten.
- In a separate medium bowl, whisk together the egg whites, milk, sour cream, and vanilla extract until well combined.
- With the mixer on low speed, slowly pour in half of the milk mixture. Increase speed to medium-high and beat for exactly 2 minutes to build structure. Scrape down the sides and bottom of the bowl.
- Add the remaining milk mixture in two batches, beating on medium speed for 30 seconds after each addition. Scrape the bowl again. The batter should be smooth and velvety.
- Weigh the total amount of batter and divide it evenly into four separate bowls. This ensures perfectly even layers.
- Add a small amount of gel food coloring to each bowl to create your four colors: Pink, Yellow, Green, and Blue. Fold gently until the color is uniform. Do not overmix.
- Pour each colored batter into a prepared cake pan and smooth the tops with a spatula.
- Bake for 25-30 minutes, or until a toothpick inserted into the center comes out clean or with just a few moist crumbs. Rotate pans halfway through baking if your oven has hot spots.
- Allow the cakes to cool in the pans for 10 minutes, then carefully turn them out onto wire racks to cool completely before frosting.
- To make the frosting: Beat the softened butter in a clean mixer bowl on medium-high speed for 5 minutes until pale and creamy. Gradually add the powdered sugar, one cup at a time, mixing on low.
- Add the heavy cream, vanilla, and salt. Increase speed to high and whip for 3-4 minutes until the frosting is light, airy, and fluffy.
- To assemble: Place the blue layer (or your desired bottom color) on a cake board or serving plate. Spread a generous layer of buttercream on top. Repeat with the green, yellow, and pink layers.
- Apply a thin layer of frosting all over the cake (the crumb coat) to seal in the crumbs. Refrigerate for 20 minutes to set.
- Apply the remaining frosting in a thick, smooth layer over the top and sides. Decorate with sprinkles or piped swirls as desired.
- Slice and serve to reveal the rainbow!
Expert Cooking Tips
- ✓Use a digital scale to divide the batter. Even layers are crucial for the visual effect of this cake.
- ✓Ingredients must be at room temperature. Cold milk or eggs will cause the butter to seize and the batter to curdle.
- ✓Use ‘Gel’ or ‘Paste’ food coloring, not liquid. Liquid coloring adds too much moisture and isn’t concentrated enough for vibrant layers.
- ✓Do not overbake. Check the cakes a few minutes before the timer goes off; they should spring back when lightly touched.
- ✓Chill the cake layers before stacking. Slightly cold cakes are firmer and easier to handle, reducing the risk of breaking.
Substitutions and Variations
If you cannot find cake flour, you can make a substitute by measuring 1 cup of all-purpose flour, removing 2 tablespoons, and replacing them with 2 tablespoons of cornstarch. Sift together twice before using. For a dairy-free version, substitute the butter with high-quality plant-based butter sticks and use almond or soy milk and a dairy-free sour cream alternative. The egg whites are essential for the white base, but if you don’t mind a slightly yellow tint to your colors (which might turn blue into teal), you can use 3 whole large eggs instead of 5 egg whites. For the frosting, shortening can replace half the butter for a more heat-stable icing, often favored in warmer climates.
Common Mistakes to Avoid
The most common mistake is overmixing the batter after adding the wet ingredients, which leads to a dense, tough cake rather than a fluffy one. Another frequent issue is using liquid food coloring from the grocery store aisle; you will need to add so much liquid to get a bright color that the cake won’t rise properly. Always use professional-grade gel. Failing to level the cakes is another pitfall; even though this recipe bakes relatively flat, if you have domes, trim them off with a serrated knife, or your cake will be unstable and lean to one side. Finally, rushing the cooling process is a disaster waiting to happen—frosting a warm cake will cause the buttercream to melt and the layers to slide off.
Serving Suggestions
This cake is a spectacle in itself, so it looks best served on a simple white pedestal or plate to let the colors shine. Because it is a tall, four-layer cake, the slices can be quite large. I recommend cutting thin slices to serve more people. It pairs beautifully with a glass of cold milk to cut through the sweetness, or a glass of champagne for adult celebrations. For a birthday party, serve with a side of vanilla bean ice cream.
Storage and Reheating Tips
The high sugar and fat content in this cake keeps it moist for several days. Store the frosted cake at room temperature in a cake keeper for up to 3 days. If you live in a hot or humid climate, store it in the refrigerator, but bring it to room temperature for at least an hour before serving, as cold buttercream is hard and waxy. You can also freeze the individual baked cake layers (wrapped tightly in plastic wrap) for up to a month before assembly. Leftover slices can be frozen in an airtight container for up to 2 months.
Nutrition Facts (Estimated)
| Serving Size | 1 slice |
| Calories | 650 |
| Fat | 32g |
| Saturated Fat | 18g |
| Unsaturated Fat | 12g |
| Trans Fat | 1g |
| Cholesterol | 85mg |
| Sodium | 380mg |
| Carbohydrates | 85g |
| Fiber | 1g |
| Sugar | 55g |
| Protein | 6g |
Frequently Asked Questions
Can I make this cake ahead of time?
Yes! You can bake the layers up to 2 days in advance, wrap them tightly in plastic wrap, and store them in the fridge. Assemble and frost the day of or the day before serving.
Why did my blue layer turn green?
This happens if your cake batter is too yellow (from butter or egg yolks). Using egg whites and a pale butter helps, but adding a tiny drop of purple food coloring to the blue batter can help counteract the yellow tones.
Can I use all-purpose flour instead of cake flour?
You can, but the cake will be slightly denser and less tender. I highly recommend using the cornstarch substitution method mentioned in the substitutions section if you don’t have cake flour.
How do I get the frosting so smooth?
After whipping your buttercream, switch to a paddle attachment and run the mixer on the lowest speed for 2 minutes to knock out large air bubbles. Use a metal bench scraper and a turntable for the final smoothing.
Do I need 4 pans?
It is best to have 4 pans so you can bake them all at once (or in two batches without the batter sitting too long). If you only have 2 pans, bake two colors, wash the pans, cool them, and then bake the next two.
Does the food coloring affect the taste?
If you use high-quality gel paste (like Americolor or Wilton), it is tasteless. Cheap liquid dyes can sometimes have a bitter chemical aftertaste if used in large quantities.
Can I make this a 6-layer cake?
Yes, you can divide the batter into 6 bowls and use 6 pans, but the layers will be thinner. You will need to reduce the baking time to approx 15-20 minutes.
What if my cake is dry?
Dry cake is usually caused by over-measuring flour (scooping instead of weighing) or overbaking. Always weigh your flour and check the cake for doneness early.
Is this recipe gluten-free?
Not as written. You can try using a high-quality 1:1 Gluten-Free baking flour blend, but the texture may vary slightly.
How do I cut such a tall cake?
Use a long, sharp chef’s knife. Dip the knife in hot water and wipe it dry between cuts for clean slices that show off the layers perfectly.
Conclusion
Baking this Tall Rainbow Layer Cake is more than just following a recipe; it is about creating a moment of joy. The process of mixing the colors, watching the layers rise, and finally revealing the hidden spectrum inside is incredibly rewarding. Whether you are a seasoned baker or a novice looking for a challenge, this four-layer beauty delivers on both taste and visual impact. It is the ultimate way to say ‘celebration’ without saying a word. So grab your gel colors, preheat your oven, and get ready to bake the world a little brighter, one slice at a time.