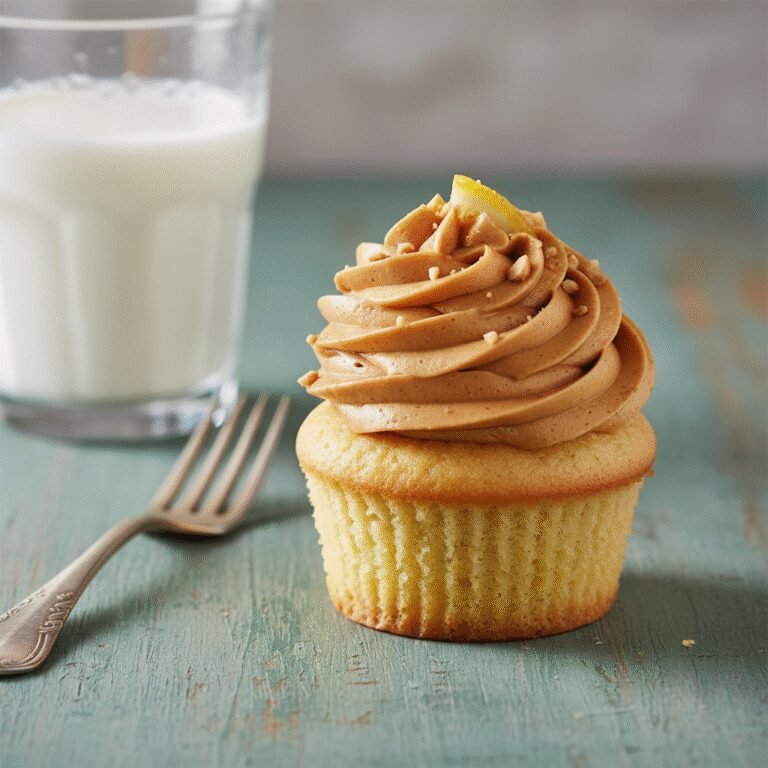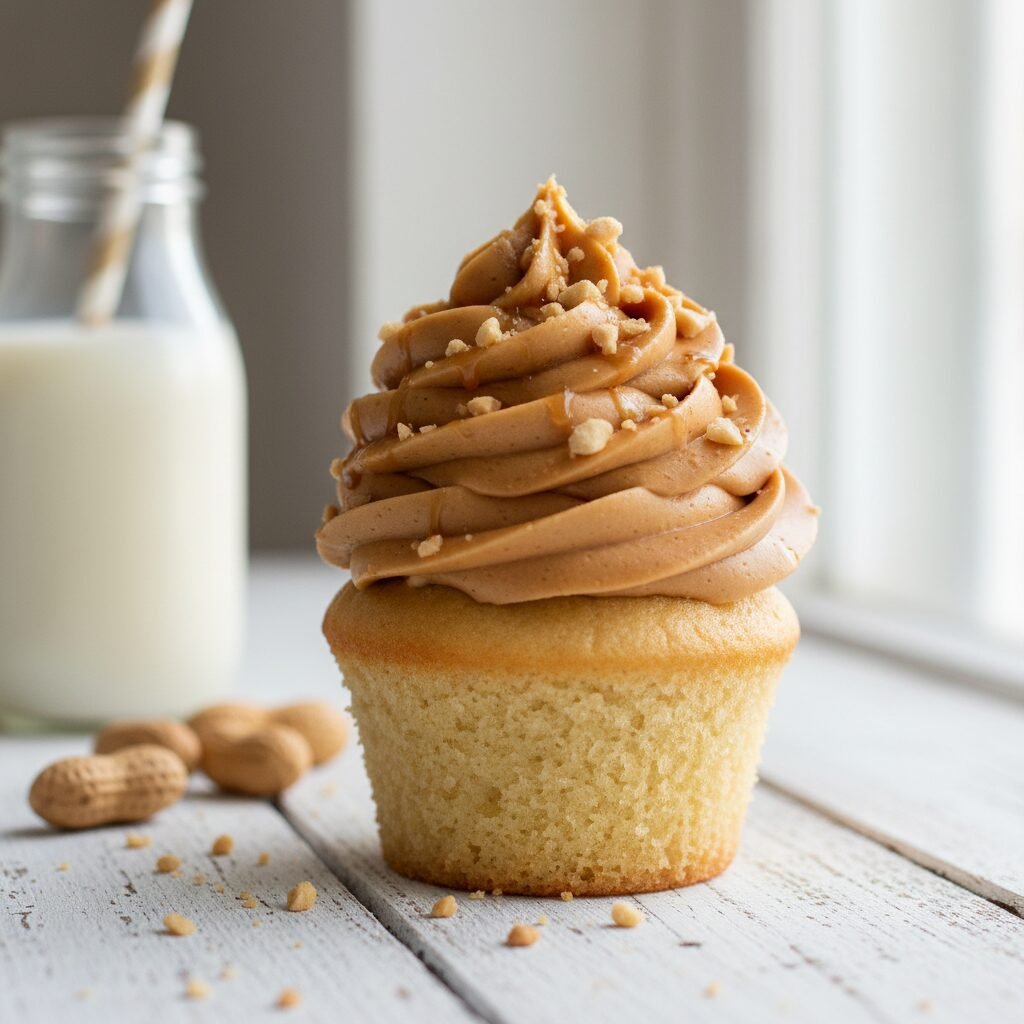
The Ultimate Moist Vanilla Cupcake With Creamy Peanut Butter Frosting
Moist Vanilla Cupcake With Peanut Butter Frosting Recipe
Discover the holy grail of cupcakes: an impossibly moist, tender vanilla base crowned with a luxurious, sweet-and-salty peanut butter frosting. Perfect for birthdays, bake sales, or a decadent treat, this recipe balances fluffy texture with rich flavor in every bite.
20 minutes
18 minutes
40 minutes
14 Cupcakes
Dessert
Baking
American
Vegetarian
There is something undeniably nostalgic and comforting about a classic vanilla cupcake. It is the canvas upon which our fondest childhood memories are painted—birthday parties, school celebrations, and sunny afternoons in the kitchen. However, finding the perfect recipe that yields a cupcake that is both light as air and moist enough to stay fresh for days can be a lifelong pursuit for many home bakers. Enter this recipe for the Ultimate Moist Vanilla Cupcake with Creamy Peanut Butter Frosting. This is not just another dry, crumbly muffin masquerading as a dessert. This is a meticulously tested formula designed to produce a bakery-style dome, a tender crumb that melts in your mouth, and a flavor profile that marries the floral elegance of pure vanilla bean with the savory, nutty punch of peanut butter.
The magic lies in the balance of ingredients. While many recipes rely solely on butter for flavor, we utilize a specific blend of butter and oil to ensure the cake remains soft even after refrigeration. The addition of sour cream introduces a subtle tang that cuts through the sweetness while tenderizing the gluten strands, resulting in a texture that is plush and velvety. But the true showstopper here is the frosting. It is not merely a topping; it is a cloud of whipped perfection. By whipping air into the peanut butter and butter mixture before adding the sugar, we achieve a frosting that is stable enough to pipe beautiful swirls yet light enough to dissolve instantly on the tongue. Whether you are a seasoned baker looking to upgrade your repertoire or a novice wanting to impress, this pairing of classic vanilla and rich peanut butter is guaranteed to become a permanent fixture in your recipe box.
History & Origins
The history of the cupcake is as delightful as the treat itself, dating back to the late 18th century. The first mention of a cake to be baked in small cups was found in Amelia Simmons’ 1796 cookbook, ‘American Cookery’, where she described ‘a light cake to bake in small cups’. This was a revolutionary concept at a time when cakes were typically massive, dense loaves that took hours to bake in hearth ovens. The term ‘cupcake’ itself was first explicitly documented in 1828 in Eliza Leslie’s ‘Receipts’. Interestingly, the name had a dual meaning: it referred to the vessel in which it was baked (often pottery cups or ramekins before the invention of the muffin tin) and the method of measuring ingredients by volume (the cup) rather than weight, which was standard in European baking.
As the industrial revolution advanced, so did baking technology. The introduction of the ‘muffin tin’ in the 20th century solidified the cupcake’s shape and popularity. Meanwhile, peanut butter was undergoing its own evolution. While the Aztecs mashed roasted peanuts into a paste centuries prior, the modern incarnation of peanut butter was popularized in the United States around the 1890s, initially as a protein source for patients with poor teeth. It wasn’t until the early 1900s, with the invention of churning machines, that peanut butter became a creamy staple in American pantries. The marriage of the vanilla cupcake—a symbol of American baking ingenuity—and peanut butter—a beloved national staple—represents a culinary intersection of convenience, comfort, and innovation that defines modern American dessert culture.
Why This Recipe Works
This recipe succeeds where others fail because it respects the chemistry of baking. First, we address the issue of moisture. Butter is essential for flavor, but it is solid at room temperature, which can lead to a denser cake. Vegetable oil, on the other hand, remains liquid, ensuring the cupcake stays moist. By using a 50/50 split, we get the buttery taste with the lasting moisture of oil. Second, we use cake flour instead of all-purpose flour. Cake flour has a lower protein content (usually around 7-8%), which means less gluten formation. Less gluten equals a more tender, delicate crumb that doesn’t turn chewy.
Third, the inclusion of sour cream and buttermilk is critical. These acidic dairy products react with the baking soda (if used) and help break down tough gluten strands, but more importantly, they add a richness and depth of flavor that milk alone cannot provide. The acidity also helps to keep the crumb white and bright. For the frosting, the ‘Why This Works’ factor is temperature and ratio. We ensure the butter and peanut butter are at the exact same room temperature before mixing. If one is colder, the mixture will curdle or separate. We also use a higher ratio of heavy cream than standard buttercream recipes, which aerates the peanut butter, transforming a heavy, sticky paste into a fluffy, pipeable mousse that complements the light cake rather than crushing it.
Why You’ll Love This Recipe
- ✓Stays moist for up to 4 days due to the oil-butter blend.
- ✓Perfectly domed tops ideal for professional-looking decoration.
- ✓The frosting is fluffy and creamy, not gritty or overly dense.
- ✓Uses simple pantry staples available at any grocery store.
- ✓Versatile base that can be adapted for other flavors.
Equipment You’ll Need
- ✓Stand mixer or electric hand mixer
- ✓12-cup muffin tin
- ✓Cupcake liners
- ✓Sifter or fine-mesh sieve
- ✓Rubber spatula
- ✓Wire cooling rack
- ✓Piping bag and large star tip (e.g., Wilton 1M)
Ingredients
- ✓1 3/4 cups cake flour (spooned and leveled)
- ✓1 cup granulated sugar
- ✓1 1/2 tsp baking powder
- ✓1/2 tsp baking soda
- ✓1/2 tsp fine sea salt
- ✓1/2 cup unsalted butter, softened to room temperature
- ✓1/4 cup vegetable oil (or canola oil)
- ✓2 large eggs, room temperature
- ✓1/3 cup full-fat sour cream, room temperature
- ✓1/2 cup buttermilk, room temperature
- ✓2 tsp pure vanilla extract
- ✓For the Frosting: 1 cup creamy peanut butter (commercial brand like Jif or Skippy, not natural style)
- ✓1/2 cup unsalted butter, softened
- ✓2 cups powdered sugar, sifted
- ✓1 tsp vanilla extract
- ✓3-4 tbsp heavy whipping cream
- ✓Pinch of salt
Instructions
- 1. Preheat your oven to 350°F (175°C). Line a standard muffin tin with paper cupcake liners. If you have enough batter for 14, prepare a second tin or bake in batches.
- 2. In a medium bowl, whisk together the cake flour, baking powder, baking soda, and salt. Sifting these dry ingredients is crucial to avoid lumps and ensure an airy texture. Set aside.
- 3. In the bowl of a stand mixer fitted with the paddle attachment (or a large bowl with a hand mixer), beat the softened butter and granulated sugar on medium-high speed for about 3-4 minutes. The mixture should look pale, fluffy, and aerated.
- 4. Lower the speed and pour in the vegetable oil and vanilla extract. Mix until combined.
- 5. Add the eggs one at a time, beating well after each addition. Scrape down the sides and bottom of the bowl to ensure everything is incorporated.
- 6. In a small bowl or jug, whisk together the sour cream and buttermilk until smooth.
- 7. With the mixer on low speed, add the dry ingredients in three parts, alternating with the wet milk mixture in two parts (Dry-Wet-Dry-Wet-Dry). Mix only until the flour streaks disappear. Do not overmix.
- 8. Fill the cupcake liners about 2/3 full. Do not overfill, or they will spill over and sink in the middle.
- 9. Bake for 16-19 minutes, or until a toothpick inserted into the center comes out clean or with just a few moist crumbs. The tops should spring back when lightly touched.
- 10. Allow the cupcakes to cool in the pan for 5 minutes, then transfer them to a wire rack to cool completely before frosting.
- 11. While cupcakes cool, make the frosting. Beat the softened butter and creamy peanut butter together on medium-high speed until completely smooth and creamy (about 2 minutes).
- 12. Reduce speed to low and gradually add the sifted powdered sugar, one cup at a time. Once incorporated, add the vanilla, salt, and 2 tablespoons of heavy cream.
- 13. Increase speed to high and whip for 3 minutes until fluffy. Add more cream, one teaspoon at a time, until you reach your desired piping consistency.
- 14. Pipe the frosting onto the cooled cupcakes using a star tip for a classic swirl. Top with crushed peanuts or sprinkles if desired.
Expert Cooking Tips
- ✓Room temperature ingredients are non-negotiable. Cold eggs or milk will seize the butter, causing the batter to break and the cupcakes to be dense.
- ✓Measure flour correctly. Do not scoop the flour directly with the measuring cup, as this packs it down. Spoon the flour into the cup and level it off with a knife.
- ✓Don’t overmix the batter once the flour is added. Overmixing develops gluten, leading to tough, rubbery cupcakes.
- ✓Use commercial peanut butter for the frosting. Natural peanut butter separates and can make the frosting oily and unstable.
- ✓If your frosting is too soft to pipe, chill it in the refrigerator for 10-15 minutes to firm up slightly before using.
Substitutions and Variations
Baking is a science, but there is room for adaptation if necessary. If you do not have cake flour, you can make a DIY version by measuring 1 cup of all-purpose flour, removing 2 tablespoons, and replacing them with 2 tablespoons of cornstarch. Sift this mixture twice before using. For a dairy-free version, substitute the butter with a high-quality vegan butter block (not tub margarine), the buttermilk with almond milk mixed with a teaspoon of vinegar, and the sour cream with a dairy-free yogurt. The texture may vary slightly but will still be delicious. In the frosting, you can swap the heavy cream for milk or a plant-based alternative, though you may need less liquid. If you have a peanut allergy, this frosting recipe works wonderfully with almond butter, cashew butter, or even cookie butter (Biscoff spread) for a different flavor profile.
Common Mistakes to Avoid
The most common mistake is overbaking. Cupcakes continue to cook slightly from residual heat after being removed from the oven. If you wait until the toothpick is bone dry, they may be dry by the time they cool. Pull them out when there are still a few tiny moist crumbs attached. Another error is frosting warm cupcakes. Even if they feel cool to the touch on top, the center might still be warm. This will melt the butter in the frosting, causing it to slide off or become a greasy puddle. Always wait at least an hour before decorating. Lastly, using ‘natural’ peanut butter that requires stirring is a major mistake for this frosting; the oil separation will prevent the buttercream from emulsifying properly, leading to a split, greasy mess.
Serving Suggestions
These cupcakes are a versatile dessert suitable for any occasion. For a sophisticated touch, drizzle the finished cupcakes with a salted caramel sauce or a dark chocolate ganache zig-zag. They pair beautifully with a cold glass of milk, a hot cup of black coffee, or a scoop of vanilla bean ice cream on the side. If serving for a kid’s party, top with colorful sprinkles or a mini peanut butter cup. For an elegant dinner party, garnish with a single edible gold leaf or a candied peanut. Display them on a tiered cake stand to create a stunning centerpiece.
Storage and Reheating Tips
To keep these cupcakes fresh, store them in an airtight container at room temperature for up to 2 days. The sugar and fat content act as preservatives. If you need to keep them longer, they can be refrigerated for up to 4 days, but be sure to let them come to room temperature before eating, as the butter in the cake and frosting will firm up in the fridge. For long-term storage, freeze the unfrosted cupcakes wrapped tightly in plastic wrap for up to 3 months. You can also freeze frosted cupcakes by flash-freezing them on a baking sheet until the frosting is hard, then transferring them to a freezer-safe container. Thaw overnight in the refrigerator and bring to room temperature before serving.
Nutrition Facts (Estimated)
| Serving Size | 1 Cupcake |
| Calories | 420 |
| Fat | 24g |
| Saturated Fat | 10g |
| Unsaturated Fat | 12g |
| Trans Fat | 0g |
| Cholesterol | 45mg |
| Sodium | 210mg |
| Carbohydrates | 48g |
| Fiber | 1g |
| Sugar | 32g |
| Protein | 5g |
Frequently Asked Questions
Can I use all-purpose flour instead of cake flour?
Yes, but the texture will be slightly denser and more bread-like. For the best results, use the DIY cake flour substitute mentioned in the substitutions section (remove 2 tbsp flour per cup and add 2 tbsp cornstarch).
Why did my cupcakes sink in the middle?
Sinking usually happens if the oven door was opened too early, causing a temperature drop, or if the batter was over-leavened (too much baking powder/soda). It can also happen if the center wasn’t fully cooked before removing from the oven.
Can I reduce the sugar in the recipe?
Sugar provides moisture and tenderness, not just sweetness. Reducing it significantly will alter the texture, making the cupcakes drier and more bread-like. It is best to stick to the recipe for the cake and perhaps use less frosting if you want less sugar.
My frosting is too runny, how do I fix it?
Add more powdered sugar, 1/4 cup at a time, until it thickens. Also, ensure your kitchen isn’t too hot and that your butter wasn’t melted rather than softened.
Can I make this recipe into a layer cake?
Absolutely. This batter creates enough for two 8-inch round cake pans or three 6-inch pans. You will need to increase the baking time to approximately 25-30 minutes.
Is it necessary to use both butter and oil?
We highly recommend it. Butter provides the classic flavor, while oil coats the flour proteins better to prevent gluten formation and keeps the cake moist for days. Using only butter can lead to a drier cake once cooled.
Can I use natural peanut butter?
No, natural peanut butter is too oily and inconsistent. Use a stabilized commercial brand like Jif or Skippy for a smooth, fluffy frosting structure.
How do I know when the butter is perfectly softened?
You should be able to press your finger into the butter and leave an indent without it feeling greasy or sliding around. If it’s shiny or melting, it’s too soft.
Conclusion
Mastering the perfect vanilla cupcake is a rite of passage for any home baker, and this recipe with its decadent peanut butter frosting is sure to become your signature bake. The contrast between the light, airy vanilla sponge and the dense, creamy, savory-sweet frosting creates a harmony of textures and flavors that is impossible to resist. Whether you are baking for a crowd or treating yourself to a quiet afternoon snack, the effort put into measuring and mixing these quality ingredients will be rewarded with every bite. So, preheat your oven, grab your mixer, and get ready to bake the best cupcakes of your life. Happy baking!