Velvety Perfection: The Best Moist Red Velvet Cupcakes with Cream Cheese Frosting
Moist Red Velvet Cupcake With Cream Cheese Frosting Recipe
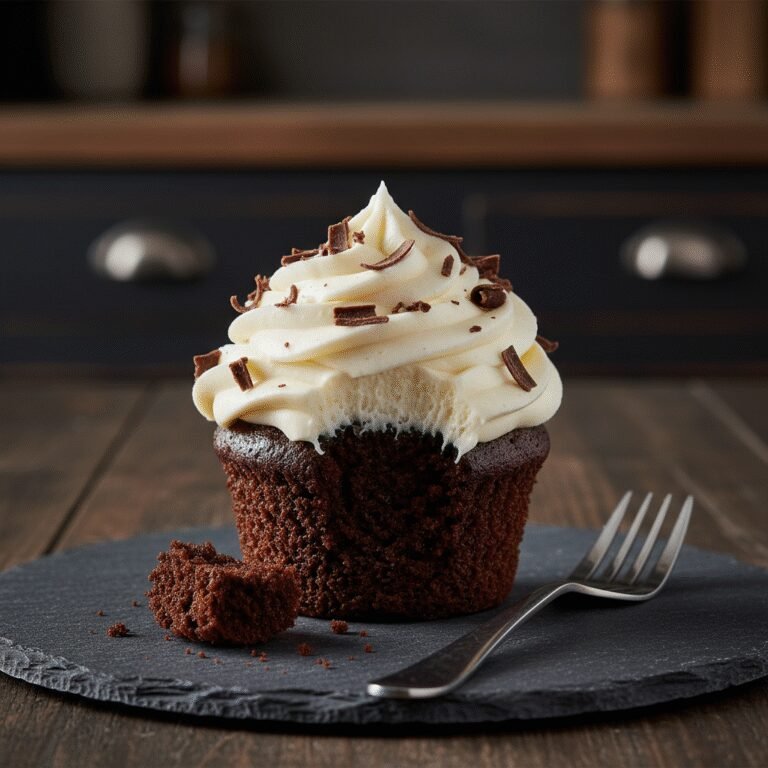
Experience the ultimate indulgence with these incredibly moist red velvet cupcakes, crowned with a tangy, sweet cream cheese frosting. Perfectly balanced with a hint of chocolate and a tender, velvety crumb, they are the quintessential treat for any celebration.
20 minutes
20 minutes
40 minutes
14 cupcakes
Dessert
Baking
American
Vegetarian
There is something undeniably captivating about a red velvet cupcake. It isn’t just the striking crimson hue that demands attention; it is the unique texture—a soft, velvety crumb that seems to melt in your mouth—and the flavor profile that dances the line between vanilla and chocolate. For years, home bakers have searched for the ‘Holy Grail’ of red velvet recipes: one that avoids the common pitfalls of being too dry or lacking in flavor. I am thrilled to tell you that your search ends here. This recipe is the culmination of countless kitchen experiments, designed to produce a cupcake that stays moist for days and delivers that classic, slightly tangy flavor profile characteristic of the best Southern bakeries.
What makes red velvet so special is its ability to feel fancy without being overly complicated. It is the star of Valentine’s Day, the highlight of Christmas dessert tables, and a birthday favorite for many. But beyond the color, the magic lies in the pairing. A red velvet cupcake without cream cheese frosting is like a day without sunshine; the two are inextricably linked. The rich, buttery, and slightly tangy frosting cuts through the sweetness of the cake, creating a harmonious balance that keeps you coming back for ‘just one more’ bite. Whether you are a seasoned pro or a baking novice, this guide will walk you through the science and steps to achieve bakery-quality results right in your own kitchen.
History & Origins
The history of red velvet cake is as rich and layered as the cake itself, often shrouded in culinary myth and marketing genius. The term ‘velvet’ cake dates back to the Victorian era, used to describe cakes with a particularly soft and fine crumb, typically achieved by using almond flour, cocoa, or cornstarch to break down the protein in flour. During the late 1800s and early 1900s, Devil’s Food cake was a popular precursor, utilizing cocoa powder. Before the alkaline processing of cocoa (Dutch-processed) became the standard, raw cocoa powder contained anthocyanins. When this raw cocoa reacted with acidic ingredients like buttermilk and vinegar, it turned a reddish-brown hue. This natural chemical reaction is the origin of the ‘red’ in red velvet, though it was much more subtle than the vibrant neon red we see today.
The cake’s modern vibrancy can be traced back to the Great Depression. As families struggled to afford cocoa and butter, the Adams Extract company in Texas looked for a way to boost sales during a difficult economic time. They marketed a red velvet cake recipe that used red food coloring and butter extract, selling it alongside bottles of their dye with tear-off recipe cards in grocery stores. This solidified the bright red color as a deliberate choice rather than a chemical byproduct. Another famous claim to the recipe comes from the Waldorf-Astoria Hotel in New York City, which served a version known as the ‘Waldorf-Astoria Cake’ in the 1930s. However, the dessert fell out of fashion until its massive resurgence in the 1990s, largely credited to the Magnolia Bakery in New York and its appearance in pop culture, cementing red velvet as an iconic American classic.
Why This Recipe Works
This recipe succeeds where others fail because it prioritizes moisture and the correct chemical reactions. Many red velvet recipes rely on butter as the primary fat. While butter offers flavor, it contains water which evaporates during baking, sometimes leading to a drier crumb. This recipe utilizes vegetable oil (or a neutral oil) as the fat source. Oil is 100% fat and remains liquid at room temperature, ensuring the cupcakes stay incredibly soft and moist for days, rather than drying out as they cool.
Furthermore, the ‘velvet’ texture is achieved through the interaction of acidic ingredients and leavening agents. We use buttermilk and a touch of white vinegar. The acidity in these ingredients reacts vigorously with the baking soda, creating carbon dioxide bubbles that leaven the cake, resulting in a fluffy, airy structure. This acidity also tenderizes the gluten in the flour, preventing the cake from becoming tough. Finally, we use just the right amount of cocoa powder—enough to provide that elusive hint of chocolate flavor without turning it into a full-blown chocolate cupcake, maintaining the integrity of the classic red velvet profile.
Why You’ll Love This Recipe
- ✓Incredibly moist texture that stays soft for days.
- ✓Perfect balance of mild chocolate and tangy buttermilk flavors.
- ✓Silky smooth, pipeable cream cheese frosting.
- ✓Vibrant red color without altering the taste.
- ✓Simple, one-bowl method for the wet ingredients.
Equipment You’ll Need
- ✓Standard 12-cup muffin tin
- ✓Cupcake liners
- ✓Stand mixer or electric hand mixer
- ✓Large mixing bowl
- ✓Medium mixing bowl
- ✓Whisk
- ✓Rubber spatula
- ✓Wire cooling rack
- ✓Piping bag and large star tip (optional)
Ingredients
- ✓1 1/4 cups All-Purpose Flour (spooned and leveled)
- ✓3/4 cup Granulated Sugar
- ✓1/2 teaspoon Baking Soda
- ✓1/2 teaspoon Salt
- ✓1 tablespoon Unsweetened Natural Cocoa Powder
- ✓3/4 cup Vegetable Oil (or Canola Oil)
- ✓1/2 cup Buttermilk, room temperature
- ✓1 large Egg, room temperature
- ✓1 tablespoon Red Food Coloring (liquid or gel)
- ✓1/2 teaspoon White Distilled Vinegar
- ✓1 teaspoon Pure Vanilla Extract
- ✓8 oz Full-Fat Cream Cheese, block style, softened (Frosting)
- ✓1/2 cup Unsalted Butter, softened (Frosting)
- ✓3 cups Powdered Sugar (Frosting)
- ✓1 teaspoon Vanilla Extract (Frosting)
- ✓Pinch of salt (Frosting)
Instructions
- Preheat your oven to 350°F (175°C). Line a standard muffin tin with cupcake liners. This recipe yields about 14 cupcakes, so have a second pan ready or bake in two batches.
- In a medium bowl, sift together the flour, baking soda, salt, and cocoa powder. Whisk to ensure the cocoa is evenly distributed and there are no lumps. Set aside.
- In a large bowl (or the bowl of a stand mixer), combine the vegetable oil, granulated sugar, buttermilk, egg, red food coloring, vinegar, and vanilla extract. Whisk vigorously until the mixture is smooth and fully combined.
- Slowly add the dry ingredients to the wet ingredients. Mix on low speed or whisk by hand just until the flour streaks disappear. Do not overmix, or the cupcakes will be tough.
- Divide the batter evenly among the cupcake liners, filling them about 2/3 full. Do not overfill, as they need room to rise.
- Bake for 18-21 minutes, or until a toothpick inserted into the center comes out clean or with just a few moist crumbs attached. The tops should spring back when gently touched.
- Remove from the oven and let the cupcakes cool in the pan for 5 minutes, then transfer them to a wire rack to cool completely. They must be absolutely cool before frosting.
- While the cupcakes cool, make the frosting. In a large bowl using a handheld or stand mixer fitted with a paddle attachment, beat the softened cream cheese and butter together on medium-high speed until smooth and creamy (about 2-3 minutes).
- Add the powdered sugar, vanilla extract, and a pinch of salt. Start the mixer on low to avoid a sugar cloud, then increase to high speed and beat for 3 minutes until fluffy and white.
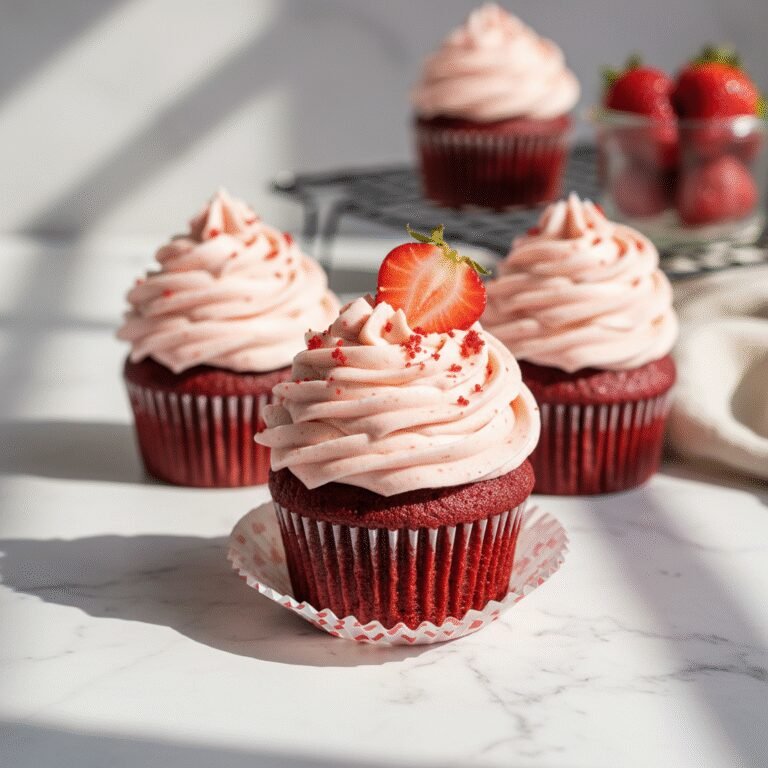
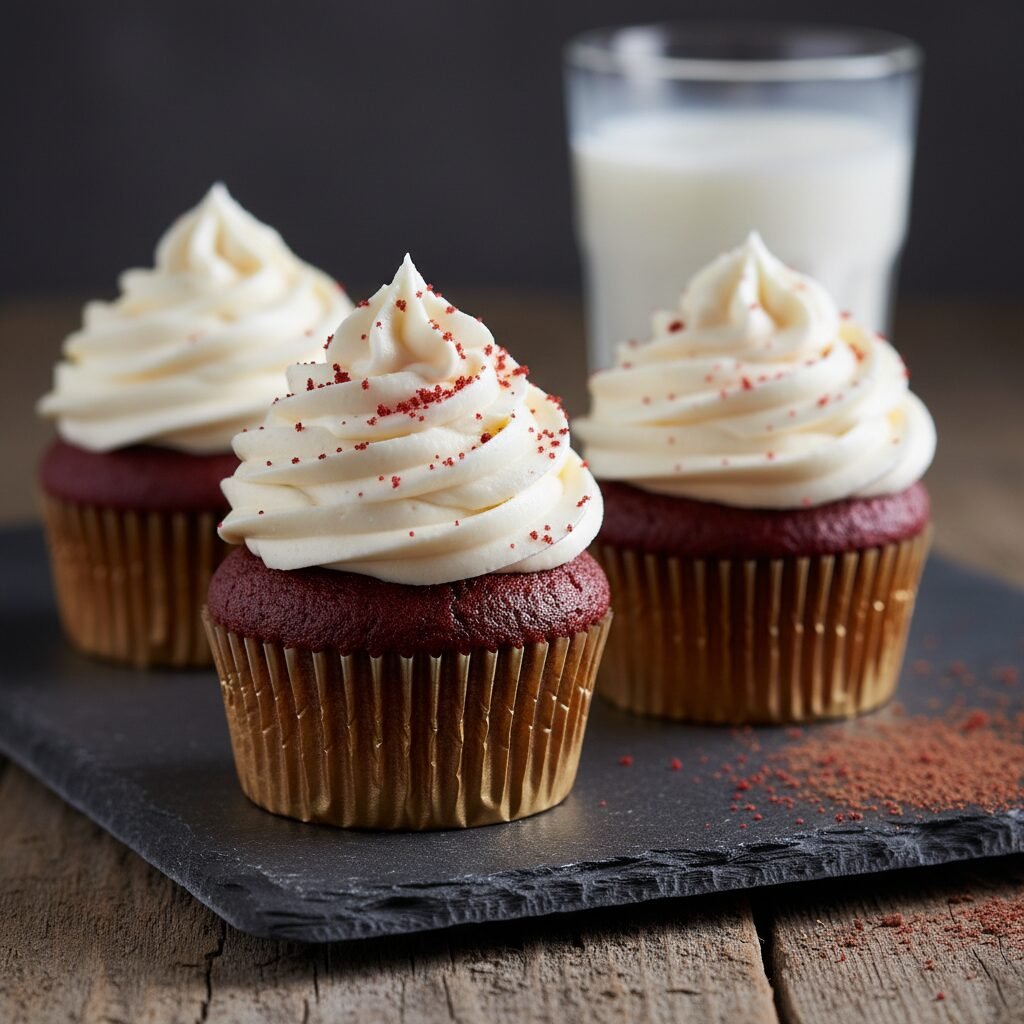
- Pipe or spread the frosting generously onto the cooled cupcakes. Garnish with red sprinkles or cake crumbs if desired.
Expert Cooking Tips
- ✓Room Temperature Ingredients: Ensure your egg, buttermilk, cream cheese, and butter are at room temperature. This ensures a smooth emulsion and a better rise.
- ✓Don’t Overmix: Once the flour hits the liquid, stop mixing as soon as it is combined. Overmixing develops gluten, leading to dense cupcakes.
- ✓Use Gel Coloring: If you want a really intense red color without adding too much liquid, use concentrated gel food coloring instead of the liquid drops found in grocery stores.
- ✓Measure Flour Correctly: Spoon the flour into your measuring cup and level it off with a knife. Scooping directly from the bag packs the flour and leads to dry cupcakes.
- ✓Cool Completely: If you frost a warm cupcake, the butter in the frosting will melt, and your beautiful swirl will slide right off.
Substitutions and Variations
If you don’t have buttermilk, you can make a quick substitute by adding 1/2 tablespoon of white vinegar or lemon juice to 1/2 cup of whole milk and letting it sit for 5 minutes until curdled. For the oil, melted coconut oil works well, though it may impart a slight coconut flavor; canola or grapeseed oil are perfect neutral alternatives. If you prefer to avoid red food dye, you can use beet powder or reduced beet puree, though this will change the flavor profile slightly to be earthier and the color will be a more muted, rusty red. For the frosting, if you find it too sweet, add a tiny splash of heavy cream and beat it longer to aerate it, or add a pinch more salt to cut the sugar.
Common Mistakes to Avoid
The most common mistake with red velvet is overbaking. Because the cake is dark, it’s hard to see browning. Rely on the toothpick test and the spring-back test. Another mistake is using cold cream cheese for the frosting; this results in lumpy frosting that is impossible to smooth out. Conversely, if the butter is *too* soft or melted, the frosting will be soupy and won’t hold its shape. Finally, do not skip the vinegar; it is essential for the chemical reaction with the baking soda that gives the cake its velvety texture.
Serving Suggestions
These cupcakes are best served at room temperature. If they have been refrigerated, take them out 20-30 minutes before serving to allow the frosting to soften and the cake to relax. They pair beautifully with a glass of cold milk or a hot cup of coffee to balance the sweetness. For a festive touch, crumble one extra cupcake and sprinkle the red crumbs over the white frosting for a classic bakery look.
Storage and Reheating Tips
Because of the cream cheese frosting, these cupcakes should be stored in the refrigerator. Place them in an airtight container to prevent them from drying out or absorbing fridge odors; they will keep for up to 4-5 days. You can freeze unfrosted cupcakes for up to 3 months (wrap them individually in plastic wrap). You can also freeze frosted cupcakes; flash freeze them on a baking sheet until the frosting is hard, then wrap individually. Thaw in the fridge overnight before eating.
Nutrition Facts (Estimated)
| Serving Size | 1 cupcake |
| Calories | 420 |
| Fat | 24g |
| Saturated Fat | 10g |
| Unsaturated Fat | 12g |
| Trans Fat | 0g |
| Cholesterol | 55mg |
| Sodium | 210mg |
| Carbohydrates | 48g |
| Fiber | 1g |
| Sugar | 32g |
| Protein | 4g |
Frequently Asked Questions
Why are my cupcakes dry?
Dry cupcakes are usually the result of overbaking or measuring too much flour. Make sure to use the spoon-and-level method for flour and check the cupcakes a few minutes before the timer goes off.
Can I use butter instead of oil in the cake?
You can, but the texture will change. Butter provides flavor but less moisture. Oil ensures the cupcakes stay soft and moist for longer. A mix of half butter and half oil is a good compromise if you want the buttery taste.
Do I really need the vinegar?
Yes! The vinegar reacts with the baking soda to provide lift and fluffiness. It also helps preserve the red color of the anthocyanins in the cocoa powder.
Why did my cupcakes sink in the middle?
Sinking usually happens if the oven door was opened too early, causing a temperature drop, or if the batter was overmixed, incorporating too much air that collapsed during cooling.
Can I make this as a cake instead?
Absolutely. This recipe can be doubled to make two 8-inch or 9-inch round cakes. You will need to increase the baking time to approx 30-35 minutes.
What kind of cocoa powder should I use?
Use natural unsweetened cocoa powder (like Hershey’s). Dutch-processed cocoa is alkaline and won’t react as strongly with the vinegar and buttermilk, which could affect the rise and color.
My frosting is too runny, what do I do?
If your kitchen is hot or the butter was too soft, the frosting can get runny. Put the bowl in the fridge for 20 minutes, then re-whip. You can also add a bit more powdered sugar to stiffen it up.
Can I leave these out on the counter?
Food safety guidelines recommend refrigerating cream cheese frosting after 2 hours. However, they are safe to display for a party for a few hours, but long-term storage should be in the fridge.
Conclusion
Mastering the perfect Red Velvet Cupcake is a feather in the cap of any home baker. With this recipe, you achieve that elusive balance of a tender, moist crumb and the rich, tangy decadence of homemade cream cheese frosting. It is a dessert that feels special, looks stunning, and tastes like pure comfort. Whether you are baking for a loved one, a holiday party, or just a Tuesday night treat, these cupcakes are guaranteed to impress. Don’t forget to share your creations on Pinterest and tag us—we love seeing your beautiful bakes!