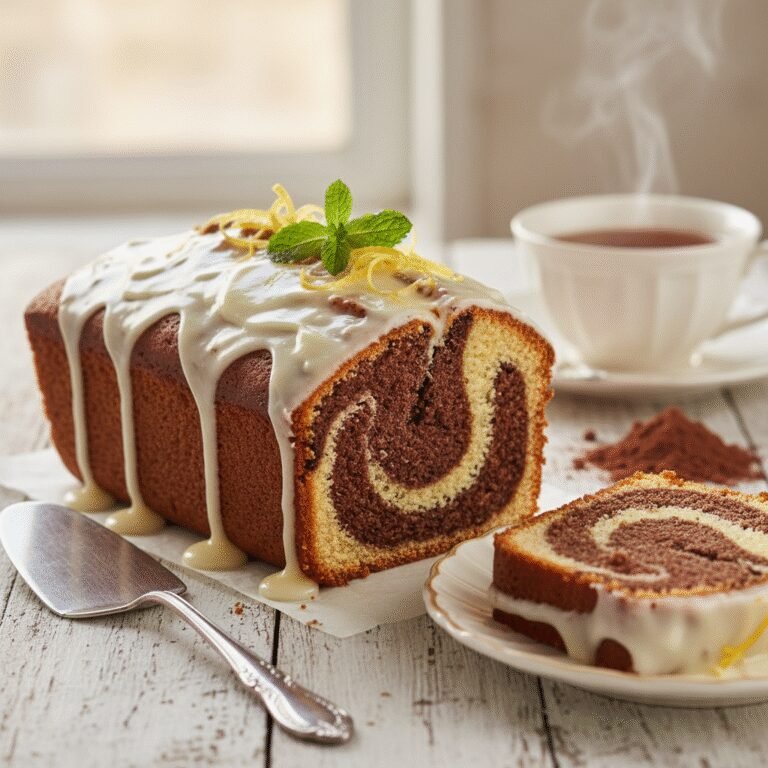
Ultimate Moist Marble Pound Cake With Vanilla Bean Glaze
Moist Marble Pound Cake With Vanilla Glaze Recipe
Experience the best of both worlds with this incredibly moist Marble Pound Cake, featuring artistic swirls of rich chocolate and sweet vanilla batter. Topped with a silky vanilla bean glaze that crackles with every bite, this recipe transforms a nostalgic classic into an elegant dessert centerpiece perfect for any occasion.
25 minutes
60 minutes
1 hour 40 minutes
1 Loaf (10-12 slices)
Dessert
Baking
American
Vegetarian
There is something undeniably comforting about a classic pound cake, but when you introduce the mesmerizing swirl of a marble cake, you elevate a simple tea-time treat into a work of edible art. This Moist Marble Pound Cake with Vanilla Glaze is the answer to the age-old dilemma of having to choose between chocolate and vanilla. Why settle for one when you can indulge in both? This recipe has been meticulously tested to ensure that the cake is not just visually stunning, but also technically perfect. Unlike many pound cakes that can turn out dry or overly dense, this version relies on the addition of full-fat sour cream and a precise balance of butter and sugar to create a crumb that is velvety, tender, and undeniably moist. The vanilla portion offers a pure, aromatic sweetness that perfectly contrasts with the deep, fudgy intensity of the chocolate swirl. The magic doesn’t stop at the cake itself. We finish this loaf with a thick, opaque vanilla bean glaze that sets into a delicate shell, adding a textural contrast to the soft interior. Whether you are serving this alongside your morning coffee, presenting it as a stunning dessert for a holiday gathering, or simply satisfying a midweek craving, this marble pound cake promises to deliver a bakery-quality experience right in your own kitchen. It is a recipe that commands attention on the plate and vanishes quickly, leaving behind only crumbs and the memory of its buttery perfection.
History & Origins
The history of the marble pound cake is a fascinating journey that merges two distinct baking traditions: the British pound cake and the German marble cake. The original pound cake dates back to the early 1700s in Northern Europe and eventually made its way to America with the first cookbook authored by an American, Amelia Simmons, in 1796. The name was literal; the recipe called for one pound each of flour, butter, eggs, and sugar. While this ratio guaranteed a rich cake, it was often heavy and dense compared to modern standards. The concept of ‘marbling’ batter, however, has its roots in 19th-century Germany. Known as ‘Marmorkuchen’, these early marble cakes did not initially use chocolate. Instead, bakers would darken half of the batter with molasses and spices like allspice and cinnamon to create the contrasting color. It wasn’t until the late Victorian era, as chocolate became more accessible and affordable to the general public, that the chocolate-vanilla combination we know and love today became the standard. Jewish immigrants bringing their baking traditions to the United States played a significant role in popularizing the chocolate marble cake in American delis and bakeries throughout the 20th century. Today, the marble pound cake stands as a testament to this culinary evolution, blending the structural integrity of the English pound cake with the whimsical, artistic flair of German baking techniques.
Why This Recipe Works
This recipe succeeds where many others fail because it addresses the two biggest complaints about pound cake: dryness and lack of distinct flavor in the chocolate swirl. First, the moisture factor is tackled by incorporating full-fat sour cream. The acidity in the sour cream tenderizes the gluten strands in the flour, resulting in a softer crumb, while the extra fat content ensures the cake stays moist for days, unlike recipes that rely solely on milk. Secondly, we use the ‘creaming method’ where room-temperature butter and sugar are beaten until pale and fluffy. This creates a mechanical leavening system, trapping air bubbles that expand during baking to provide lift and a lighter texture despite the cake’s density. For the chocolate swirl, this recipe avoids the common mistake of simply adding dry cocoa powder to the finished batter, which can dry out the chocolate sections. Instead, we bloom the cocoa powder in a small amount of boiling water or hot milk before folding it into the batter. This ‘blooming’ process intensifies the chocolate flavor and ensures the consistency of the chocolate batter matches the vanilla batter, preventing the two from baking at different rates or separating weirdly. Finally, the glaze acts as a seal, locking in the moisture immediately after the cake cools.
Why You’ll Love This Recipe
- ✓Features a stunning, high-contrast chocolate and vanilla swirl.
- ✓Uses sour cream for an ultra-moist, tender crumb that stays fresh for days.
- ✓The vanilla bean glaze adds a professional bakery finish and extra sweetness.
- ✓Sturdy enough to slice cleanly but melts in your mouth.
- ✓Perfect for breakfast, brunch, or a sophisticated dessert.
Equipment You’ll Need
- ✓9×5 inch Loaf Pan
- ✓Stand Mixer or Hand Mixer
- ✓Large Mixing Bowls
- ✓Whisk
- ✓Rubber Spatula
- ✓Small Saucepan (for melting butter/blooming cocoa)
- ✓Wire Cooling Rack
- ✓Parchment Paper
Ingredients
- ✓1 3/4 cups All-Purpose Flour (spooned and leveled)
- ✓1 tsp Baking Powder
- ✓1/2 tsp Salt
- ✓1 cup Unsalted Butter, softened to room temperature
- ✓1 cup Granulated Sugar
- ✓4 Large Eggs, room temperature
- ✓2 tsp Pure Vanilla Extract
- ✓1/2 cup Full-Fat Sour Cream, room temperature
- ✓1/4 cup Unsweetened Cocoa Powder (Dutch-process preferred)
- ✓2 tbsp Hot Water or Hot Milk (to bloom cocoa)
- ✓1 cup Powdered Sugar (for glaze)
- ✓2 tbsp Whole Milk (for glaze)
- ✓1/2 tsp Vanilla Bean Paste or Extract (for glaze)
Instructions
- Preheat your oven to 350°F (175°C). Grease a 9×5 inch loaf pan generously with butter or non-stick spray and line it with parchment paper, leaving an overhang on the sides for easy removal.
- In a medium bowl, whisk together the flour, baking powder, and salt until well combined. Set aside.
- In the bowl of a stand mixer fitted with the paddle attachment (or using a hand mixer), cream the softened butter and granulated sugar on medium-high speed for about 4-5 minutes. The mixture should look pale, fluffy, and aerated.
- Add the eggs one at a time, beating well after each addition. Scrape down the sides and bottom of the bowl with a rubber spatula to ensure everything is incorporated. Stir in the vanilla extract.
- Reduce the mixer speed to low. Add half of the flour mixture, followed by the sour cream, and then the remaining flour mixture. Mix just until the flour streaks disappear. Do not overmix.
- Remove about 1 cup of the batter and place it into a separate small bowl. This will become your chocolate batter.
- In a small cup, mix the cocoa powder with the hot water (or hot milk) until it forms a smooth paste. Fold this chocolate paste into the reserved 1 cup of batter until fully combined and uniform in color.
- To assemble, spoon large dollops of the vanilla and chocolate batters alternately into the prepared loaf pan. Once all batter is in the pan, take a butter knife or a skewer and gently swirl the batters together in a figure-eight motion. Do not over-swirl, or the colors will muddy.
- Bake for 55-65 minutes, or until a toothpick inserted into the center comes out clean or with just a few moist crumbs. If the top starts browning too quickly after 40 minutes, tent loosely with aluminum foil.
- Remove from the oven and let the cake cool in the pan for 15 minutes. Then, use the parchment overhang to lift the cake out and transfer it to a wire rack to cool completely.
- While the cake cools, prepare the glaze. Whisk together the powdered sugar, milk, and vanilla bean paste until smooth and pourable. If it is too thick, add a teaspoon more milk; if too thin, add more sugar.
- Once the cake is completely cool, drizzle the glaze over the top, allowing it to drip down the sides. Let the glaze set for 15 minutes before slicing.
Expert Cooking Tips
- ✓Room temperature ingredients are non-negotiable. Cold eggs or sour cream can cause the batter to curdle and result in a dense cake.
- ✓Weigh your flour or use the spoon-and-level method. Scooping directly with the measuring cup packs the flour and leads to a dry cake.
- ✓Don’t over-swirl. Less is more when it comes to marbling. A few gentle figure-eights are enough to create the beautiful pattern.
- ✓Tent with foil. Pound cakes have a long bake time. Check at the 40-minute mark; if the top is dark golden but the center is jiggly, cover loosely with foil to prevent burning.
- ✓Let it cool completely before glazing. If the cake is warm, the glaze will melt and soak into the cake rather than sitting on top.
Substitutions and Variations
If you do not have sour cream, full-fat Greek yogurt is an excellent 1:1 substitute that provides similar moisture and acidity. For the flour, you can use cake flour for an even lighter crumb, but increase the amount by 2 tablespoons per cup. If you only have salted butter, omit the 1/2 teaspoon of added salt in the recipe. Dutch-process cocoa powder is recommended for a darker color and smoother flavor, but regular unsweetened natural cocoa powder works fine in a pinch. For a dairy-free version, use high-quality plant-based butter and a thick coconut yogurt, though the texture may vary slightly.
Common Mistakes to Avoid
The most common mistake is rushing the creaming process. Beating the butter and sugar for the full 4-5 minutes is crucial for aeration. Another error is opening the oven door too frequently, which can cause the cake to sink in the middle due to temperature fluctuation. Using cold ingredients prevents them from emulsifying properly, leading to a greasy or heavy texture. Finally, slicing the cake while it is still hot is tempting, but it causes the steam to escape rapidly, drying out the cake and making the slices crumble.
Serving Suggestions
This cake is versatile enough to be served plain, but it pairs beautifully with fresh berries (strawberries or raspberries) and a dollop of freshly whipped cream. For a warm dessert, toast a slice lightly and serve it with a scoop of vanilla bean ice cream. It is also the perfect companion for a strong cup of dark roast coffee or an Earl Grey tea in the afternoon.
Storage and Reheating Tips
Store the cake in an airtight container at room temperature for up to 3-4 days. The high fat content helps it keep well. For longer storage, wrap the cake tightly in plastic wrap, then in aluminum foil, and freeze for up to 3 months. Thaw overnight on the counter before serving. Avoid storing it in the refrigerator as the cold air will dry out the crumb and harden the butter, altering the texture.
Nutrition Facts (Estimated)
| Serving Size | 1 Slice |
| Calories | 420 |
| Fat | 22g |
| Saturated Fat | 13g |
| Unsaturated Fat | 8g |
| Trans Fat | 0.5g |
| Cholesterol | 95mg |
| Sodium | 180mg |
| Carbohydrates | 52g |
| Fiber | 1.5g |
| Sugar | 28g |
| Protein | 6g |
Frequently Asked Questions
Why did my chocolate swirl turn out dry?
This usually happens if you add dry cocoa powder directly to the batter. Cocoa acts like flour and absorbs moisture. By mixing the cocoa with hot water or milk to create a paste before adding it to the batter, you ensure the hydration levels remain balanced.
Can I bake this in a Bundt pan?
Yes, but you may need to double the recipe depending on the size of your Bundt pan (standard Bundts are 10-12 cups, while a loaf pan is roughly 4-5 cups). Adjust baking time accordingly, likely increasing it to 65-75 minutes.
How do I know when the cake is truly done?
Use a wooden skewer rather than a toothpick, as it reaches deeper. Insert it into the thickest part of the center. It should come out clean or with a few moist crumbs attached. If you see raw batter, it needs more time.
My cake sank in the middle. What happened?
This is often caused by underbaking or opening the oven door too early. It can also be caused by over-leavening (too much baking powder) or over-beating the eggs, incorporating too much air that collapses during cooling.
Can I use oil instead of butter?
Butter is recommended for flavor and structure in a traditional pound cake. While oil makes cakes moist, you will lose the buttery taste and the dense, velvety crumb characteristic of a pound cake. Stick to butter for this specific recipe.
Why is my glaze too runny?
Glaze consistency depends on humidity and measurement accuracy. If it’s too runny, simply whisk in more powdered sugar, a tablespoon at a time, until it reaches a thick, pourable consistency reminiscent of honey.
Can I make this gluten-free?
Yes, you can use a high-quality 1:1 gluten-free all-purpose flour blend that contains xanthan gum. The texture might be slightly different, but it will still be delicious.
How do I get the glaze to look white and opaque?
To get a white, opaque glaze, use less liquid and more sugar. A thicker glaze stays white, while a thin glaze turns translucent. You can also add a tiny drop of white food coloring if you want a stark white finish.
Conclusion
Baking this Moist Marble Pound Cake with Vanilla Glaze is more than just following a recipe; it is about creating a moment of indulgence for yourself and your loved ones. The visual appeal of the swirls combined with the classic, rich flavors makes it a timeless favorite that never goes out of style. Whether you are an experienced baker or a novice, the reward of slicing into that loaf to reveal your unique marble pattern is unmatched. So preheat your oven, grab your favorite mixing bowl, and get ready to bake the best pound cake you have ever tasted.