Moist Chocolate Loaf Cake With Vanilla Glaze Recipe
Moist Chocolate Loaf Cake With Vanilla Glaze Recipe
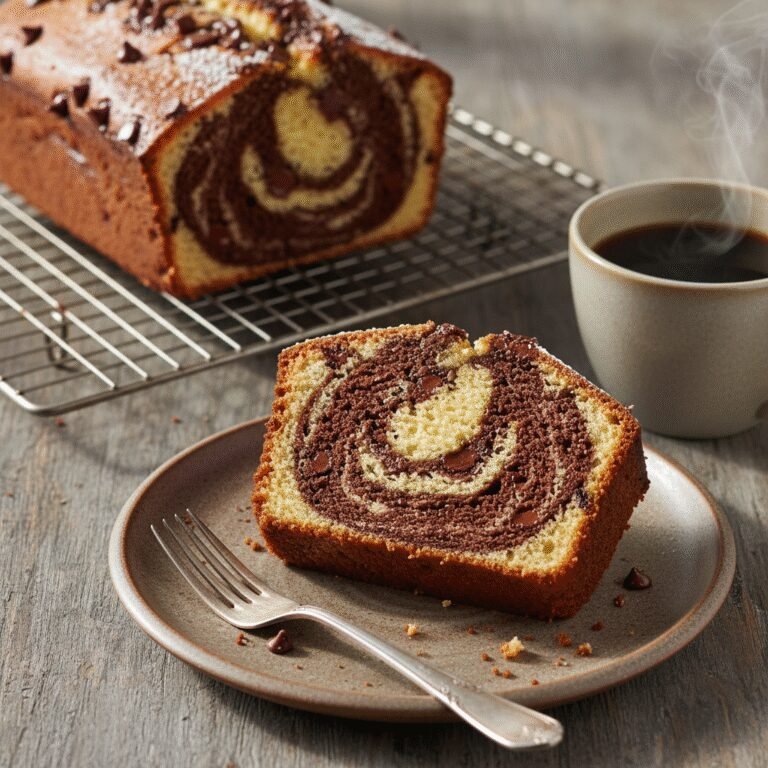
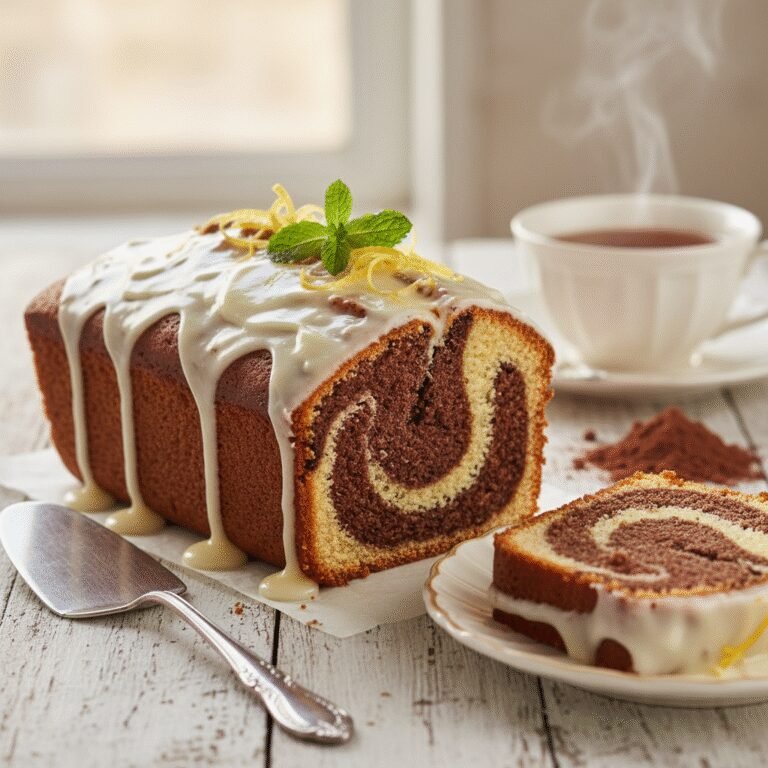
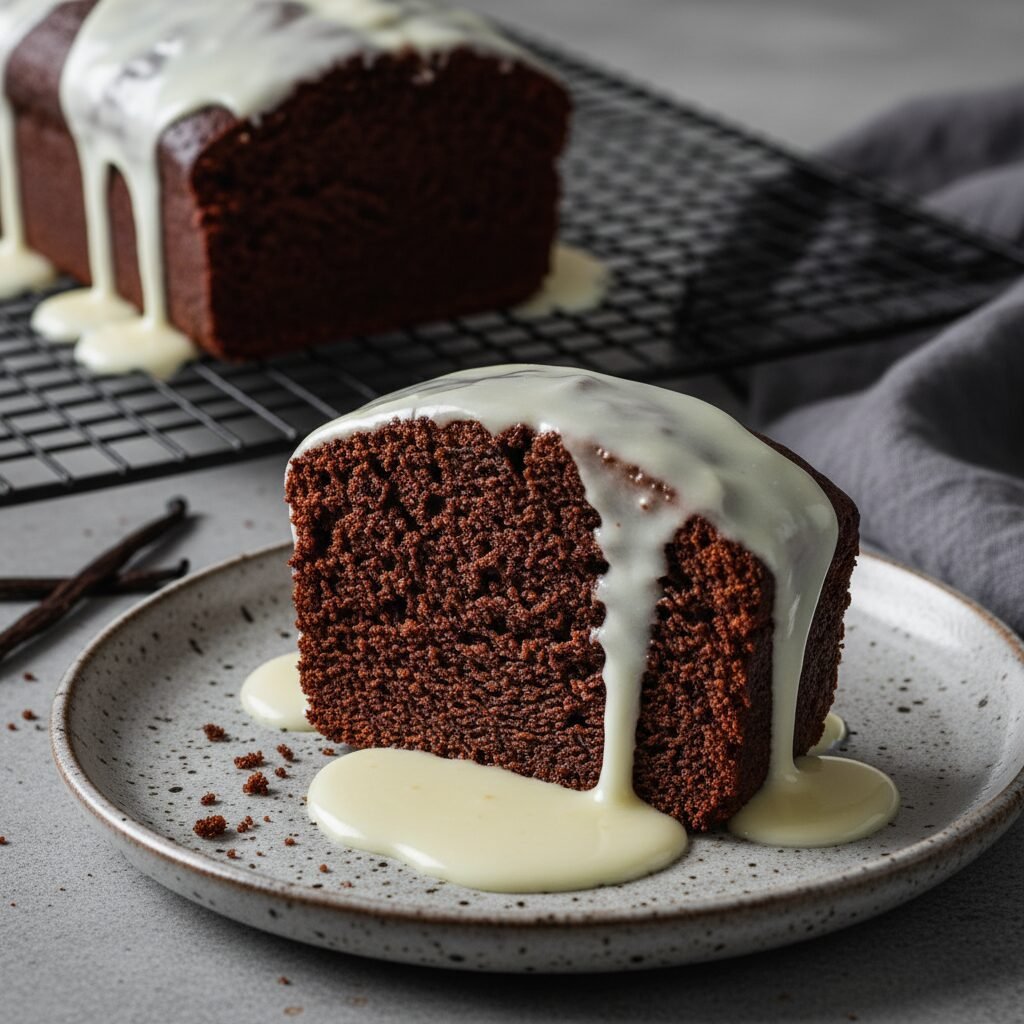
This incredibly moist chocolate loaf cake is the ultimate treat for chocolate lovers, featuring a deep, fudgy crumb and a stark white vanilla bean glaze. It is an easy, one-bowl recipe that delivers bakery-style results without the fuss of layer cakes.
20 minutes
55 minutes
1 hour 15 minutes
1 loaf (10-12 slices)
Dessert
Baking
American
Vegetarian
There is something undeniably comforting about a loaf cake. Unlike its towering layered cousins that require leveling, stacking, and elaborate frosting, a loaf cake is humble, approachable, and deeply satisfying. This Moist Chocolate Loaf Cake with Vanilla Glaze is the answer to every chocolate craving you have ever had. It is not just a cake; it is an experience of textures and flavors that dance perfectly on the palate. The crumb is exceptionally tender—almost akin to a brownie but with the lightness of a sponge—thanks to the inclusion of sour cream and the blooming of the cocoa powder with hot coffee.
The deep, dark chocolate flavor is intense without being bitter, creating a sophisticated profile that appeals to both children and adults. To offset this richness, we pour a thick, stark white vanilla glaze over the top. As it sets, it creates a delicate sugary crust that shatters satisfyingly with every bite, giving way to the soft interior. This recipe is designed for the home baker who wants high-impact flavor with minimal cleanup. Whether you are enjoying a thick slice with your morning coffee, serving it as an elegant afternoon tea treat, or dressing it up with berries for a dinner party dessert, this chocolate loaf cake is versatile and forgiving. It stays moist for days, making it the perfect make-ahead bake for busy weeks or unexpected guests. Prepare to fill your kitchen with the intoxicating aroma of cocoa and vanilla.
History & Origins
The concept of the loaf cake is deeply rooted in the history of the ‘pound cake,’ a recipe that dates back to the early 1700s in Northern Europe. Originally, these cakes were named for their simple ratio: a pound each of flour, butter, eggs, and sugar. This density made them durable and rich, perfect for families who needed substantial sustenance. As baking powder and baking soda were introduced in the 19th century, cakes became lighter and airier, evolving from heavy, dense blocks into the tender crumbs we recognize today.
The chocolate variation of the loaf cake came later, gaining significant popularity in the 20th century as cocoa powder became more accessible and affordable to the average household. The ‘Devil’s Food’ phenomenon of the early 1900s introduced the idea of using hot liquid to bloom cocoa, intensifying the chocolate flavor and darkening the color. This specific recipe borrows from that tradition, marrying the convenience of the quick bread format (baked in a loaf tin) with the decadent, fudgy texture of American chocolate cakes. In recent decades, the ‘loaf’ format has seen a resurgence on social media and artisan bakeries, celebrated for its rustic elegance and the ability to slice perfectly uniform portions. It represents a shift away from overly decorative confectionery towards honest, flavor-first baking that highlights quality ingredients like Dutch-processed cocoa and real vanilla beans.
Why This Recipe Works
This recipe succeeds where many dry chocolate cakes fail because of a few key scientific principles. First and foremost is the ‘blooming’ of the cocoa powder. By mixing the cocoa with hot coffee or boiling water at the very beginning, we dissolve the cocoa butter and release flavor compounds that are otherwise locked away. This process also ensures the cake creates a deep, dark color rather than a pale brown.
Secondly, the fat source is a combination of oil and sour cream rather than just butter. While butter provides flavor, it contains water which evaporates; oil is 100% fat and remains liquid at room temperature, ensuring the cake feels moist on the tongue days after baking. The sour cream adds acidity, which tenderizes the gluten strands in the flour, preventing the cake from becoming tough or rubbery. It also activates the baking soda for a proper rise. Finally, the ratio of sugar to flour is carefully balanced to ensure the crust caramelizes slightly while the interior remains fudgy. The vanilla glaze is not just for aesthetics; its high sugar content seals the top of the cake, locking in moisture as it cools.
Why You’ll Love This Recipe
- ✓Deep, intense chocolate flavor enhanced by blooming cocoa.
- ✓Stays moist for up to 4 days thanks to oil and sour cream.
- ✓Simple one-bowl method means less cleanup.
- ✓Versatile enough for breakfast, snack, or dessert.
- ✓Beautiful contrast between dark cake and white glaze.
- ✓Freezes exceptionally well for future treats.
Equipment You’ll Need
- ✓9×5 inch Loaf Pan
- ✓Large Mixing Bowl
- ✓Whisk
- ✓Rubber Spatula
- ✓Measuring Cups and Spoons
- ✓Wire Cooling Rack
- ✓Parchment Paper
Ingredients
- ✓1 1/2 cups All-Purpose Flour
- ✓1/2 cup Unsweetened Cocoa Powder (Dutch-processed preferred)
- ✓1 1/4 cups Granulated Sugar
- ✓3/4 teaspoon Baking Powder
- ✓1/4 teaspoon Baking Soda
- ✓1/2 teaspoon Sea Salt
- ✓3 Large Eggs, room temperature
- ✓1/2 cup Vegetable Oil or Canola Oil
- ✓1/2 cup Sour Cream, room temperature
- ✓2 teaspoons Pure Vanilla Extract
- ✓1/2 cup Hot Brewed Coffee (or boiling water)
- ✓1 cup Powdered Sugar (for glaze)
- ✓2-3 tablespoons Whole Milk (for glaze)
- ✓1/2 teaspoon Vanilla Bean Paste or Extract (for glaze)
Instructions
- Preheat your oven to 350°F (175°C). Grease a 9×5 inch loaf pan generously with butter or cooking spray and line it with parchment paper, leaving an overhang on the sides for easy removal.
- In a large mixing bowl, sift together the flour, cocoa powder, granulated sugar, baking powder, baking soda, and salt. Whisk well to ensure the dry ingredients are evenly distributed.
- In a separate medium bowl, whisk together the eggs, vegetable oil, sour cream, and vanilla extract until the mixture is smooth and creamy.
- Pour the wet ingredients into the dry ingredients. Use a rubber spatula to gently fold the mixture. Do not overmix at this stage; a few streaks of flour are okay.
- Carefully pour the hot coffee (or boiling water) into the batter. Whisk gently but quickly until the batter is smooth and glossy. The batter will be thin; this is normal and ensures a moist cake.
- Pour the batter into the prepared loaf pan. Tap the pan on the counter a few times to release any large air bubbles.
- Bake in the center of the preheated oven for 50 to 60 minutes. Test for doneness by inserting a toothpick into the center of the cake; it should come out with a few moist crumbs attached, but no wet batter.
- Remove the cake from the oven and let it cool in the pan for about 15 minutes. Then, use the parchment paper handles to lift the cake out and place it on a wire rack to cool completely.
- While the cake is cooling, prepare the glaze. In a small bowl, whisk together the powdered sugar, vanilla bean paste, and 2 tablespoons of milk. Add more milk, a teaspoon at a time, until you reach a thick but pourable consistency.
- Once the cake is entirely cool to the touch, pour the glaze over the top, letting it drip down the sides naturally. Allow the glaze to set for 15 minutes before slicing.
Expert Cooking Tips
- ✓Use room temperature ingredients (eggs and sour cream) to ensure the batter emulsifies properly.
- ✓Do not skip the hot liquid step; it blooms the cocoa powder for a richer chocolate taste.
- ✓Check the cake at the 45-minute mark; if the top is browning too fast, tent it loosely with aluminum foil.
- ✓Measure flour by spooning it into the cup and leveling it off, rather than scooping, to avoid a dense cake.
- ✓Wait until the cake is completely cool before glazing, or the glaze will melt and slide right off.
- ✓Dutch-processed cocoa gives a darker color and mellower flavor, but natural cocoa works too.
Substitutions and Variations
This recipe is quite adaptable to various dietary needs and pantry staples. If you do not have sour cream, full-fat Greek yogurt or buttermilk are excellent substitutes that provide the same tang and tenderness. For the oil, you can use melted coconut oil or melted unsalted butter, though vegetable oil generally yields the moistest crumb. If you are sensitive to caffeine or serving this to children, replace the hot coffee with boiling water or hot decaf coffee; the coffee flavor is not dominant but enhances the chocolate. To make this gluten-free, substitute the all-purpose flour with a high-quality 1:1 gluten-free baking flour blend that contains xanthan gum. For a dairy-free version, use a dairy-free yogurt alternative and swap the milk in the glaze for almond or oat milk.
Common Mistakes to Avoid
The most common mistake with loaf cakes is overmixing the batter once the flour is added. Overmixing develops gluten, which can lead to a tough, rubbery texture and a peaked top that cracks excessively. Mix only until the dry ingredients are just incorporated. Another pitfall is overbaking. Chocolate cakes are tricky because you cannot see them browning. Rely on the toothpick test; if the toothpick comes out clean, the cake might already be dry. You want a few moist crumbs clinging to it. Lastly, using cold ingredients can cause the batter to curdle or bake unevenly. Always take your eggs and dairy out of the fridge 30 minutes before you start baking.
Serving Suggestions
This cake is stunning on its own, but it can be dressed up for any occasion. For a cozy breakfast, serve a slice slightly warmed with a pat of salted butter. For a decadent dessert, top a slice with a dollop of whipped cream and fresh raspberries or strawberries to cut through the richness. It also pairs beautifully with a scoop of vanilla bean ice cream and a drizzle of hot fudge sauce. If you are hosting a brunch, arrange slices on a platter garnished with edible flowers and mint leaves. The vanilla glaze provides enough sweetness, but a dusting of extra cocoa powder on top can add a nice professional finish.
Storage and Reheating Tips
To keep this cake moist, store it in an airtight container at room temperature for up to 4 days. If you live in a very hot or humid climate, you may store it in the refrigerator for up to a week, but be sure to bring it to room temperature before eating for the best texture. This cake freezes beautifully. To freeze, wrap individual slices or the entire unglazed loaf tightly in plastic wrap, followed by a layer of aluminum foil. It will keep in the freezer for up to 3 months. Thaw overnight on the counter. If freezing the whole loaf, it is best to add the glaze after thawing.
Nutrition Facts (Estimated)
| Serving Size | 1 slice |
| Calories | 340 |
| Fat | 16g |
| Saturated Fat | 4g |
| Unsaturated Fat | 11g |
| Trans Fat | 0g |
| Cholesterol | 45mg |
| Sodium | 210mg |
| Carbohydrates | 45g |
| Fiber | 3g |
| Sugar | 28g |
| Protein | 5g |
Frequently Asked Questions
Can I use melted butter instead of oil?
Yes, you can use melted butter for a richer, buttery flavor. However, oil is superior for keeping the cake moist over several days because it remains liquid at room temperature.
Why do I need to use hot coffee?
Hot coffee ‘blooms’ the cocoa powder, dissolving it fully to release more flavor and creating a darker color. You won’t taste the coffee in the final product; it just makes the chocolate taste more like chocolate.
My loaf cake sank in the middle. What happened?
This usually happens if the oven door was opened too early, causing the structure to collapse before it set, or if the batter was overmixed. It can also be a sign of too much leavening (baking powder/soda).
Can I make this recipe into muffins?
Absolutely! This batter works well for muffins. Bake them at 350°F (175°C) for about 18-22 minutes. The yield will be approximately 12-14 standard muffins.
Do I have to use Dutch-processed cocoa?
Dutch-processed cocoa has a lower acidity and a darker color, which works well here. However, natural cocoa powder will also work fine, though the cake may be slightly lighter in color and have a tangier flavor profile.
How do I know when the cake is exactly done?
Insert a wooden skewer or toothpick into the deepest part of the crack on top. It should come out with moist crumbs. If it’s wet, it needs more time. If it’s clean, it might be overbaked.
Can I add chocolate chips to the batter?
Yes! You can fold in about 1/2 cup of semi-sweet or dark chocolate chips before pouring the batter into the pan. Toss them in a teaspoon of flour first to prevent them from sinking.
Why is my glaze too runny?
Glaze consistency depends on humidity and exact measurements. If it’s too runny, add more powdered sugar a tablespoon at a time. If it’s too thick, add a few drops of milk.
Can I double this recipe?
Yes, you can double the ingredients to make two loaves. Bake them side-by-side with a little space between pans for air circulation. You may need to add a few minutes to the baking time.
Is this cake suitable for shipping?
Yes, loaf cakes are dense and sturdy, making them great for shipping. Wrap the unglazed loaf tightly in plastic wrap and foil. Include a small packet of glaze ingredients or a jar of glaze separately.
Conclusion
This Moist Chocolate Loaf Cake with Vanilla Glaze is destined to become a staple in your recipe box. It strikes that elusive balance between everyday ease and special-occasion decadence. Whether you are a novice baker looking for a foolproof win or a seasoned pro wanting a reliable chocolate fix, this recipe delivers every single time. The magic lies in the simplicity of the ingredients coming together to create a texture that is truly memorable. Don’t forget to share your creations on social media and tag us—we love seeing how you make this recipe your own! Happy baking!