The Ultimate Super-Moist Chocolate Cupcakes for Kids’ Birthdays
Moist Chocolate Cupcake For Kids Birthday Recipe
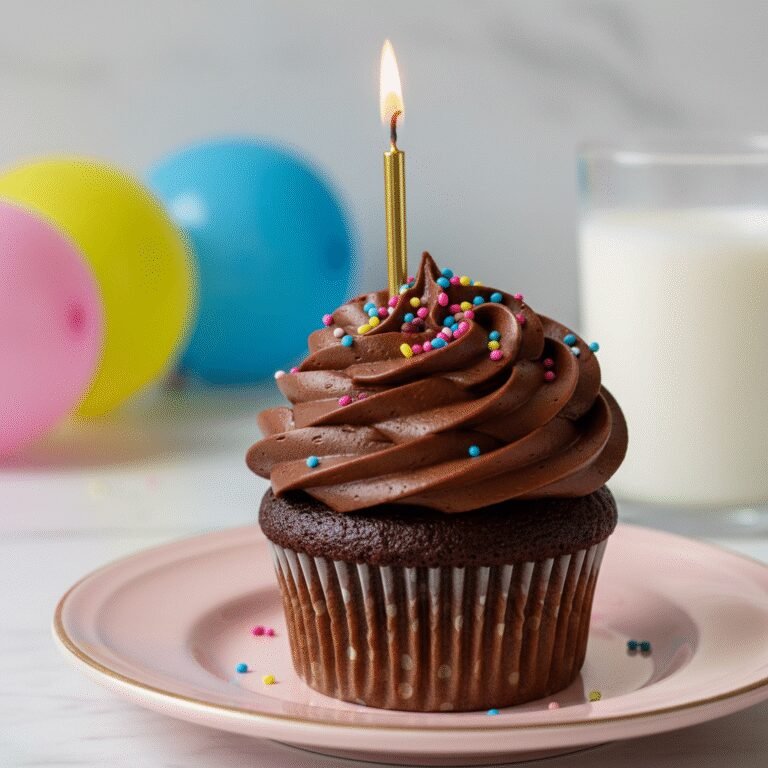
Stop searching for the perfect birthday treat because this is the only chocolate cupcake recipe you will ever need. These cupcakes are impossibly moist, deeply chocolaty, and sturdy enough to hold a mountain of sprinkles, making them the guaranteed hit of any children’s party.
20 minutes
20 minutes
40 minutes
24 Cupcakes
Dessert
Baking
American
Vegetarian
There is a specific kind of panic that sets in when you are responsible for the primary dessert at a child’s birthday party. You want something that looks spectacular on a Pinterest board, yes, but more importantly, you want something that kids will actually eat. We have all been to those parties where the cupcakes look beautiful but taste like dry kitchen sponges, resulting in a room full of half-eaten treats and disappointed faces. This recipe is the antithesis of that experience. These are not your average, dry bakery-style muffins masquerading as dessert. These are the moistest, fudgiest, most reliable chocolate cupcakes you will ever bake. The texture is soft and tender, almost resembling a steamed pudding, yet they possess enough structure to support a generous swirl of buttercream or a heavy fondant topper. The flavor profile strikes a careful balance; it is deeply chocolaty enough to satisfy the adults in the room who might sneak one, but sweet and accessible enough for a toddler’s palate. We achieve this through a specific combination of oil-based fats and the blooming of cocoa powder, techniques we will discuss later. Whether you are a seasoned baker or a parent attempting your first homemade birthday spread, this recipe is designed to be foolproof. It requires just one bowl for the batter, minimizing the cleanup chaos that usually accompanies party prep. By the time these come out of the oven, filling your kitchen with the scent of warm vanilla and cocoa, you will realize that the search for the perfect birthday cupcake is finally over. These are memories in the making, waiting to be frosted and devoured.
History & Origins
The history of the cupcake is a fascinating journey through American culinary evolution, dating back much further than the modern boutique bakery craze. The earliest known reference to what we would recognize as a cupcake appeared in 1796 in Amelia Simmons’ ‘American Cookery,’ the first cookbook authored by an American. She described ‘a cake to be baked in small cups,’ a revolutionary idea at the time when cakes were typically massive, hearth-baked endeavors. This shift to individual portions was not just about aesthetics; it was a matter of practicality and thermodynamics. Small cakes baked significantly faster and more evenly in the wood-fired ovens of the 18th and 19th centuries. The term ‘cupcake’ itself became popularized in the early 19th century, though it originally referred to two different concepts. One was the small cake baked in a tea cup or pottery ramekin. The other referred to the method of measurement, as the ‘1-2-3-4 cake’ (1 cup butter, 2 cups sugar, 3 cups flour, 4 eggs) standardized volume measurements over weighing ingredients. As the industrial revolution brought about metal muffin tins in the 20th century, the paper liner was introduced, and the cupcake cemented its status as the quintessential American party treat. The specific evolution of the chocolate cupcake parallels the availability of cocoa powder. In the early 1900s, as chocolate became more affordable and Devil’s Food Cake gained popularity for its reddish hue and moist texture, bakers began adapting these rich, fudgy batters for the cupcake format. Today, the chocolate cupcake at a child’s birthday is a cultural icon, representing a democratization of celebration where every child gets their own personal, pristine cake.
Why This Recipe Works
The science behind why this specific recipe triumphs over others lies primarily in the choice of fat and the liquid incorporation method. Many cupcake recipes rely on butter as the primary fat. While butter offers great flavor, it contains water and milk solids which can lead to a drier crumb once the cake cools, especially if stored in the fridge. This recipe uses vegetable oil. Oil is 100% fat and remains liquid at room temperature (and stays soft when chilled), which coats the flour proteins more effectively, preventing tough gluten formation and ensuring the cupcake stays sensationally moist for days. Secondly, we utilize the ‘blooming’ technique. By adding boiling hot water or hot coffee to the batter at the very end, we achieve two things. First, the heat blooms the cocoa powder, releasing flavor compounds that are otherwise locked in the dry particles, resulting in a more intense chocolate taste without adding bitterness. Second, the hot liquid helps to dissolve the sugar rapidly and disperses the cocoa butter, creating a silky, fluid batter. We also use both baking powder and baking soda. The baking soda reacts instantly with the acidity of the buttermilk and cocoa, creating an immediate lift and a tender crumb, while the baking powder provides a sustained rise in the oven. The addition of buttermilk breaks down long strands of gluten, further ensuring that ‘melt-in-your-mouth’ texture that is so critical for a kid-friendly cake.
Why You’ll Love This Recipe
- ✓Stays moist for up to 4 days without drying out.
- ✓One-bowl method means minimal cleanup.
- ✓Deep chocolate flavor that isn’t too bitter for kids.
- ✓Sturdy flat tops perfect for decorating.
- ✓Freezer-friendly for advance party prep.
Equipment You’ll Need
- ✓Two 12-cup muffin tins
- ✓Cupcake liners
- ✓Large mixing bowl
- ✓Whisk
- ✓Measuring cups and spoons
- ✓Liquid measuring cup
- ✓Wire cooling rack
Ingredients
- ✓2 cups granulated sugar
- ✓1 3/4 cups all-purpose flour
- ✓3/4 cup unsweetened cocoa powder (not dutch-processed)
- ✓1 1/2 teaspoons baking powder
- ✓1 1/2 teaspoons baking soda
- ✓1 teaspoon salt
- ✓2 large eggs, room temperature
- ✓1 cup whole milk or buttermilk, room temperature
- ✓1/2 cup vegetable oil or canola oil
- ✓2 teaspoons pure vanilla extract
- ✓1 cup boiling water
Instructions
- Preheat your oven to 350°F (175°C) and line two 12-cup muffin tins with paper cupcake liners.
- In a large mixing bowl, whisk together the sugar, flour, cocoa, baking powder, baking soda, and salt. Ensure there are no large lumps of cocoa powder.
- Add the eggs, milk (or buttermilk), vegetable oil, and vanilla extract to the dry ingredients.
- Beat with a whisk or an electric mixer on medium speed for about 2 minutes. The batter should look smooth and creamy.
- Stir in the boiling water by hand. Pour it in slowly so you do not splash hot water on yourself. The batter will become very thin and watery; this is completely normal and essential for the moisture.
- Pour the batter into the prepared cupcake liners. Fill them about 2/3 full. Do not overfill, or they will spill over and sink in the middle.
- Bake for 18 to 22 minutes. Test for doneness by inserting a wooden toothpick into the center of a cupcake; it should come out clean or with just a few moist crumbs attached.
- Remove from the oven and allow the cupcakes to cool in the pans for 10 minutes to set their structure.
- Transfer the cupcakes to a wire rack to cool completely before frosting. Do not attempt to frost warm cupcakes or the icing will melt.
Expert Cooking Tips
- ✓Use room temperature eggs and milk to ensure the batter emulsifies properly.
- ✓Do not substitute butter for the oil; the oil is the key to the moist texture.
- ✓If you want a deeper flavor for adults, substitute the boiling water with boiling hot coffee.
- ✓Fill the liners exactly 2/3 full using a cookie scoop for uniform baking.
- ✓Don’t open the oven door repeatedly during baking, as the temperature drop can cause them to sink.
- ✓Sift the cocoa powder if it looks lumpy before adding to the bowl.
- ✓Wait until the cupcakes are 100% cool before storing or frosting.
Substitutions and Variations
This recipe is quite resilient, but careful substitutions are needed to maintain the texture. For a Gluten-Free version, use a high-quality 1:1 gluten-free baking flour blend that contains xanthan gum; the texture remains surprisingly good. If you do not have buttermilk, you can make a DIY sour milk by adding one tablespoon of white vinegar or lemon juice to a cup of regular milk and letting it sit for 5 minutes. For the oil, melted coconut oil works well, though it imparts a slight coconut flavor; applesauce can be used to reduce fat, but the cupcakes will be denser and less fluffy. You can use Dutch-processed cocoa for a darker color, but because it is less acidic, you should slightly reduce the baking soda and increase the baking powder, though the original recipe works best with natural cocoa. For an egg-free version, commercial egg replacers or flax eggs (1 tbsp flax meal + 3 tbsp water per egg) work adequately, though the rise may be slightly less dramatic.
Common Mistakes to Avoid
The most common mistake with this recipe is panic over the thin batter. When you add the boiling water, the mixture will look like soup. Many bakers instinctively add more flour, thinking they measured wrong. Do not do this; the extra liquid cooks out and creates the steam necessary for a light crumb. Adding flour will result in dry, hard muffins. Another mistake is over-baking. Because the batter is dark, it is hard to see browning. Rely strictly on the toothpick test. If you bake them until they feel firm to the touch like a vanilla cake, they are likely already overdone. Using cold ingredients is another pitfall; cold eggs hitting hot water can cook unevenly or seize the batter, so ensure your dairy is at room temperature. Finally, overfilling the liners is a disaster for this specific recipe because the batter is so liquid; it will run over the edges of the pan rather than puffing up into a dome if filled too high.
Serving Suggestions
These cupcakes are a versatile canvas for any birthday theme. For a classic approach, pair them with a fluffy vanilla buttercream tinted in the birthday child’s favorite color. For a ‘death by chocolate’ experience, use a chocolate ganache or a fudge frosting. If you are serving these at a summer party, they pair wonderfully with a scoop of vanilla bean ice cream. For a lighter option, a simple dusting of powdered sugar and fresh berries works well for older kids or adults. You can also core the centers and fill them with sprinkles for a ‘piñata’ surprise, or fill them with marshmallow fluff for a nod to the classic hostess cupcake. Serve with cold milk to balance the sweetness.
Storage and Reheating Tips
These cupcakes have incredible staying power. Store them in an airtight container at room temperature for up to 3 days; they will actually be moister on day two than day one. If you live in a very hot or humid climate, you can store them in the refrigerator for up to 5 days, but allow them to come to room temperature before serving for the best texture. They freeze beautifully. To freeze, place unfrosted cupcakes on a baking sheet in the freezer until solid, then transfer to a freezer-safe zip-top bag for up to 3 months. Thaw on the counter for an hour before decorating. If they are already frosted, freeze them uncovered until the frosting is hard, then wrap gently.
Nutrition Facts (Estimated)
| Serving Size | 1 cupcake (unfrosted) |
| Calories | 185 |
| Fat | 9g |
| Saturated Fat | 1.5g |
| Unsaturated Fat | 7g |
| Trans Fat | 0g |
| Cholesterol | 25mg |
| Sodium | 140mg |
| Carbohydrates | 24g |
| Fiber | 1g |
| Sugar | 16g |
| Protein | 3g |
Frequently Asked Questions
Can I make these cupcakes ahead of time?
Absolutely. In fact, making them one day in advance allows the flavors to meld and the moisture to distribute evenly. Just keep them in an airtight container.
Why do I need to use boiling water?
Boiling water ‘blooms’ the cocoa powder, releasing its full flavor potential, and helps dissolve the sugar completely for a smooth, non-grainy texture.
Can I use butter instead of oil?
It is not recommended. Butter contains water and solidifies at room temperature, which can make the cupcakes feel dry or dense compared to the silkiness provided by vegetable oil.
Why did my cupcakes sink in the middle?
This usually happens if the oven door was opened too early, the oven temperature was too low, or the liners were overfilled, causing the structure to collapse under its own weight.
Can I make this into a layer cake instead?
Yes, this batter works perfectly for two 8-inch or 9-inch round cake pans. You will need to increase the baking time to approximately 30-35 minutes.
Can I make mini cupcakes with this recipe?
Yes, this recipe yields about 48-50 mini cupcakes. Bake them for 10-12 minutes, keeping a close eye on them as they cook very quickly.
My batter is extremely runny, did I do something wrong?
No, you did it perfectly! This specific recipe relies on a very thin, liquid batter to produce the moistest possible crumb. Trust the process.
What kind of cocoa powder should I use?
Standard unsweetened natural cocoa powder (like Hershey’s or generic store brand) works best here. Dutch-processed can be used but may slightly alter the rise.
Conclusion
In the world of parenting and party planning, having a fail-safe recipe in your arsenal is a true superpower. These moist chocolate cupcakes offer peace of mind; you know they will rise, you know they will be moist, and you know the plate will be licked clean. They capture the essence of what a birthday treat should be: indulgent, joyful, and made with love. So, preheat that oven and boil that water. You are about to become the hero of the birthday party, one delicious, fudgy bite at a time. Don’t forget to snap a photo of your creation before they vanish!