Decadent Easy Red Velvet Mug Cake For Two People: Ready in 5 Minutes
Easy Red Velvet Mug Cake For Two People Recipe
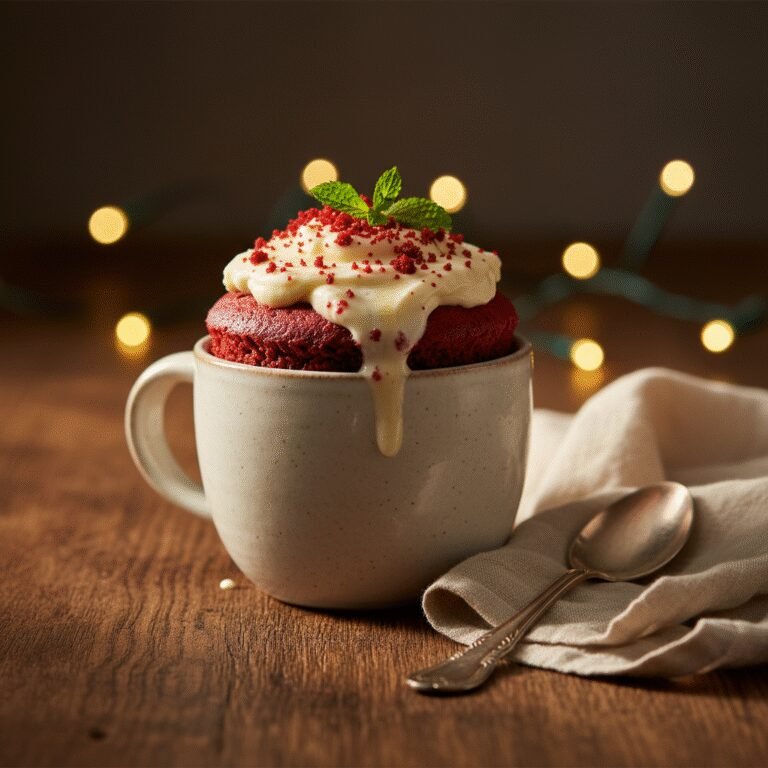
Satisfy your late-night cravings instantly with this incredibly moist and fluffy Red Velvet Mug Cake recipe designed specifically for two. It captures all the classic tangy, cocoa-infused flavors of the traditional layer cake, topped with a luscious cream cheese frosting, but is ready to eat in under 10 minutes.
5 minutes
2 minutes
7 minutes
2 Servings
Dessert
Microwave
American
Vegetarian
There is something undeniably romantic and comforting about Red Velvet cake. It is the quintessential dessert for Valentine’s Day, anniversaries, or simply those Tuesday nights when you need a little something sweet to end the day. However, the prospect of baking a full-sized three-layer cake, waiting for it to cool, and whipping up a massive batch of frosting is often enough to deter even the most enthusiastic home baker. Enter the magic of the Red Velvet Mug Cake for two. This recipe bridges the gap between gourmet indulgence and instant gratification. It is not merely a chocolate cake with red food coloring; it is a carefully balanced formulation that replicates the distinct ‘velvet’ texture and the subtle buttermilk tang that defines the classic dessert.
Many mug cake recipes suffer from a fatal flaw: they turn out rubbery, spongy, or dry. This is often due to the aggressive heat of the microwave scrambling the eggs or drying out the flour. This specific recipe has been tested and re-tested to ensure a tender, moist crumb that rivals any oven-baked cupcake. We utilize a specific ratio of fat to flour and rely on the reaction between vinegar and baking powder to provide lift without the heaviness of an egg. The result is a warm, spoonable dessert that feels like a hug in a mug. Whether you are sharing this with a partner, a roommate, or keeping both mugs for yourself (we won’t judge!), this recipe is the ultimate hack for high-quality dessert in a fraction of the time.
History & Origins
The history of Red Velvet cake is a fascinating journey through chemical reactions, marketing genius, and culinary evolution. While many assume the cake is a modern invention popularized by Southern cuisine, its roots actually trace back to the Victorian era. In the 1800s, ‘velvet’ cakes were a specific category of fancy cakes, named for their smooth, soft texture, which was distinct from the coarser crumb of pound cakes. The reddish hue originally wasn’t from a bottle of dye; it was a result of a chemical reaction. Traditional recipes used unprocessed cocoa powder, which contains anthocyanins. When this cocoa mixed with acidic ingredients like buttermilk and vinegar, it revealed a ruddy, mahogany tint.
During the Great Depression and World War II, when rationing made baking supplies scarce, the recipe evolved. The Adams Extract company in Texas is often credited with popularizing the modern, bright red version we know today. In an effort to sell more food coloring and vanilla extract during the Depression, they distributed tear-off recipe cards for ‘Adams Red Velvet Cake’ at grocery stores. This cemented the cake’s association with red dye No. 40. The cake saw a massive resurgence in pop culture in the late 1980s following the movie ‘Steel Magnolias’ (featuring the famous armadillo groom’s cake) and later in the early 2000s thanks to the cupcake craze sparked by Magnolia Bakery in New York City. The adaptation of this classic into a ‘mug cake’ is a much more recent phenomenon, born out of the internet age’s desire for single-serving, rapid-cooking comfort foods, utilizing the microwave to steam-bake the batter in minutes.
Why This Recipe Works
Microwave baking is fundamentally different from oven baking. An oven cooks from the outside in using convection or conduction, while a microwave excites water molecules to create steam, cooking the food from within. This is why many mug cakes fail—they use traditional cake ratios that don’t account for this steaming process, resulting in a tough, omelet-like texture. This recipe works because it eliminates the egg entirely. In a small volume of batter, even one egg provides too much structure and protein, which tightens up rapidly in the microwave. By removing the egg and relying on a combination of baking powder and a splash of vinegar, we achieve a rise that is soft and fluffy rather than dense.
Furthermore, the inclusion of oil instead of butter is crucial for the texture. While butter adds flavor, it contains water and solids that can make a mug cake dry once it cools slightly. Oil is 100% fat and keeps the cake moist even after the initial heat dissipates. We also use a specific blend of milk and vinegar (a DIY buttermilk) to ensure that tangy flavor profile essential to Red Velvet, while also activating the baking soda for a better rise. Finally, the cooking time is split between two mugs to ensure even heat distribution, preventing the center from being raw while the edges are overcooked.
Why You’ll Love This Recipe
- ✓Ready in under 10 minutes from start to finish.
- ✓Perfectly portioned for two people to avoid leftovers.
- ✓Egg-free batter prevents a rubbery or spongy texture.
- ✓Includes a quick 3-ingredient cream cheese frosting.
- ✓Requires only one bowl for mixing, meaning minimal cleanup.
- ✓Captures the authentic tangy and chocolaty Red Velvet flavor.
Equipment You’ll Need
- ✓Two microwave-safe mugs (10-12 oz capacity)
- ✓Small mixing bowl
- ✓Whisk or fork
- ✓Measuring spoons and cups
- ✓Small bowl for frosting
Ingredients
- ✓6 tablespoons All-Purpose Flour
- ✓4 tablespoons Granulated Sugar
- ✓1 teaspoon Unsweetened Cocoa Powder
- ✓1/4 teaspoon Baking Powder
- ✓1 pinch Salt
- ✓6 tablespoons Milk (dairy or non-dairy)
- ✓1/2 teaspoon White Vinegar or Lemon Juice
- ✓3 tablespoons Vegetable Oil or Melted Butter
- ✓1/2 teaspoon Red Food Coloring (liquid or gel)
- ✓1/2 teaspoon Vanilla Extract
- ✓2 tablespoons Cream Cheese, softened (for frosting)
- ✓1 tablespoon Butter, softened (for frosting)
- ✓3 tablespoons Powdered Sugar (for frosting)
Instructions
- In a small mixing bowl, whisk together the flour, granulated sugar, cocoa powder, baking powder, and salt until well combined and no lumps remain.
- Add the milk, vinegar, vegetable oil, red food coloring, and vanilla extract to the dry ingredients.
- Whisk the batter vigorously until it is smooth and glossy. Ensure the red color is evenly distributed.
- Divide the batter evenly between two microwave-safe mugs. The batter should only fill the mugs about halfway to allow room for rising.
- Microwave the mugs separately. Cook one mug on high power for 60 to 90 seconds. The cake is done when it has risen and the top looks set but slightly shiny. Be careful not to overcook.
- Repeat with the second mug.
- While the cakes cool slightly (about 2 minutes), prepare the frosting. In a small bowl, mix the softened cream cheese, softened butter, and powdered sugar until smooth and creamy.
- Spoon the frosting over the warm cakes and serve immediately.
Expert Cooking Tips
- ✓Do not overcook: Microwaves vary in power. Start with 60 seconds and add 10-second intervals if needed. It’s better to slightly undercook than overcook.
- ✓Use the right mug: Use a standard straight-sided mug rather than a wide shallow bowl for the best rise.
- ✓Don’t skip the vinegar: The acid is necessary to react with the baking powder and mimic the buttermilk flavor.
- ✓Cocoa quality matters: Use a good quality unsweetened cocoa powder for the best depth of flavor.
- ✓Room temperature frosting ingredients: Ensure your cream cheese and butter are soft so they mix easily without lumps.
- ✓Mix thoroughly: Make sure there are no pockets of dry flour at the bottom of the mixing bowl before pouring into mugs.
Substitutions and Variations
This recipe is quite versatile and can be adapted to various dietary needs. For a **Vegan** version, substitute the dairy milk with almond, soy, or oat milk, and use a vegan cream cheese and vegan butter for the frosting. The vinegar in the recipe will curdle the plant-based milk just like dairy milk to create a buttermilk substitute. For a **Gluten-Free** version, swap the all-purpose flour for a high-quality 1-to-1 Gluten-Free Baking Flour blend; ensure the blend contains xanthan gum for structure. If you prefer **Natural Coloring**, you can use beet powder or a natural liquid red dye, though the color may be more muted or brownish compared to artificial dye. If you don’t have **Vegetable Oil**, you can use melted coconut oil (which adds a slight coconut flavor) or melted butter. However, oil generally produces a moister mug cake.
Common Mistakes to Avoid
The most common mistake with mug cakes is **overcooking**. Because microwaves cook unevenly and quickly, leaving the cake in for even 15 seconds too long can turn it into a hard, rubbery puck. Always check it at the 60-second mark. Another mistake is **using the wrong size mug**. If the mug is too small, the batter will overflow and make a mess; if it’s too wide, the cake will be flat and dry. A standard 10-12 ounce coffee mug is ideal. **Forgetting the sugar** is another issue; cocoa powder is very bitter, and without the sugar, the cake will be inedible. Lastly, **eating it too hot** can burn your mouth, but waiting too long makes it stale. Let it sit for exactly 2 minutes for the perfect texture and temperature.
Serving Suggestions
These mug cakes are best served warm, directly in the mug. The residual heat helps slightly melt the cream cheese frosting, creating a decadent sauce-like consistency. For an extra touch of elegance, sprinkle the top with mini chocolate chips, red sanding sugar, or a few chocolate shavings. If you want to make it a plated dessert, you can run a knife around the edge and invert the cake onto a plate, though mug cakes are notoriously fragile and are safer eaten with a spoon from the mug. Pair this with a glass of cold milk or a hot espresso to balance the sweetness.
Storage and Reheating Tips
Mug cakes are designed for immediate consumption and do not store well. The texture degrades rapidly, becoming chewy or dry within hours. However, if you absolutely must save one, let it cool completely, wrap the top of the mug tightly with plastic wrap to prevent air exposure, and store it in the refrigerator for up to 24 hours. To reheat, remove the plastic and microwave on 50% power for 15-20 seconds. Note that the frosting will melt significantly upon reheating. It is highly recommended to mix the batter fresh when you want to eat it.
Nutrition Facts (Estimated)
| Serving Size | 1 mug cake with frosting |
| Calories | 420 |
| Fat | 22g |
| Saturated Fat | 8g |
| Unsaturated Fat | 12g |
| Trans Fat | 0g |
| Cholesterol | 25mg |
| Sodium | 210mg |
| Carbohydrates | 52g |
| Fiber | 2g |
| Sugar | 32g |
| Protein | 4g |
Frequently Asked Questions
Can I make this in the oven instead of the microwave?
Yes, but the texture will be different. You can bake the batter in oven-safe ramekins at 350°F (175°C) for about 15-20 minutes. Keep in mind this defeats the ‘quick’ purpose of the recipe.
Why is my mug cake rubbery?
A rubbery texture is almost always caused by overcooking or over-mixing the batter. Gluten develops when flour is mixed, and too much heat tightens the proteins. Mix just until combined and watch the cooking time closely.
Do I have to use red food coloring?
No, the food coloring is purely for aesthetics. You can leave it out, and the cake will taste exactly the same but will be a light brown color.
Can I double this recipe for four people?
Yes, you can double the ingredients in a larger mixing bowl, but you must still cook the mugs individually or two at a time (adjusting time slightly) to ensure they cook evenly.
Can I use self-rising flour?
If you use self-rising flour, omit the baking powder and the salt from the recipe. The texture might be slightly different, but it will work.
Can I use water instead of milk?
Technically yes, but the cake will be less rich and flavorful. Milk adds fat and sugar which helps with browning and tenderness.
Is it safe to eat the batter raw?
Since this recipe is egg-free, the main risk usually associated with raw batter is gone. However, raw flour can carry bacteria, so it is generally recommended to cook flour products before eating, though the risk is low.
What if I don’t have cream cheese?
You can top the cake with whipped cream, vanilla ice cream, or a simple buttercream made from butter, powdered sugar, and a splash of milk.
Conclusion
This Easy Red Velvet Mug Cake for Two is the ultimate solution for those moments when you crave something special but don’t have the time or energy for a full baking project. It perfectly captures the essence of the beloved classic—the vibrant color, the hint of cocoa, and the tangy sweetness—in a convenient, single-serving package. Whether you are treating your significant other to a surprise dessert or enjoying a cozy night in with a friend, this recipe delivers gourmet results with microwave ease. Gather your ingredients, grab your favorite mugs, and enjoy a spoonful of warm, velvety bliss in just minutes.