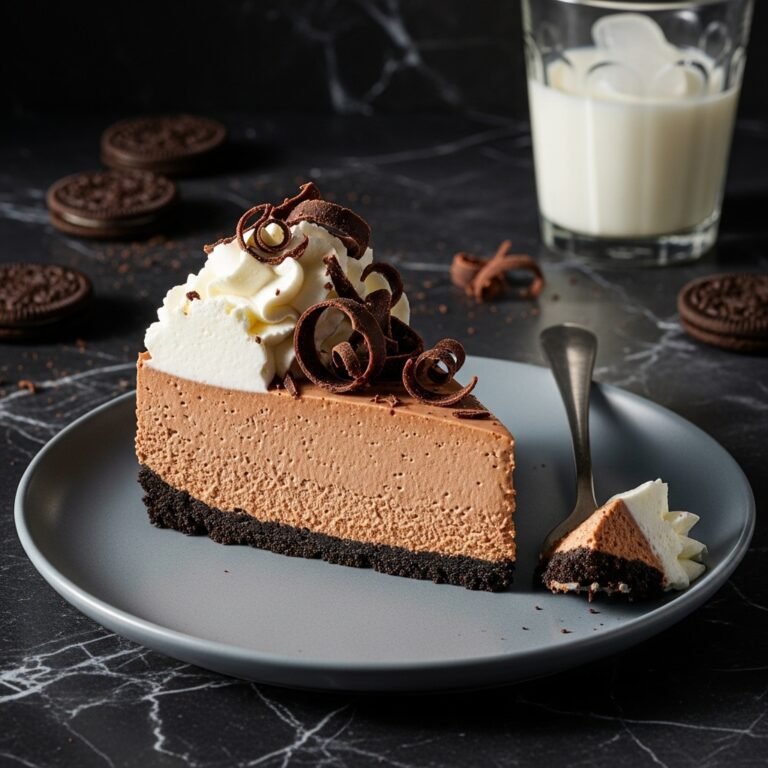
Easy No Bake Oreo Cheesecake In Loaf Pan Recipe
Easy No Bake Oreo Cheesecake In Loaf Pan Recipe
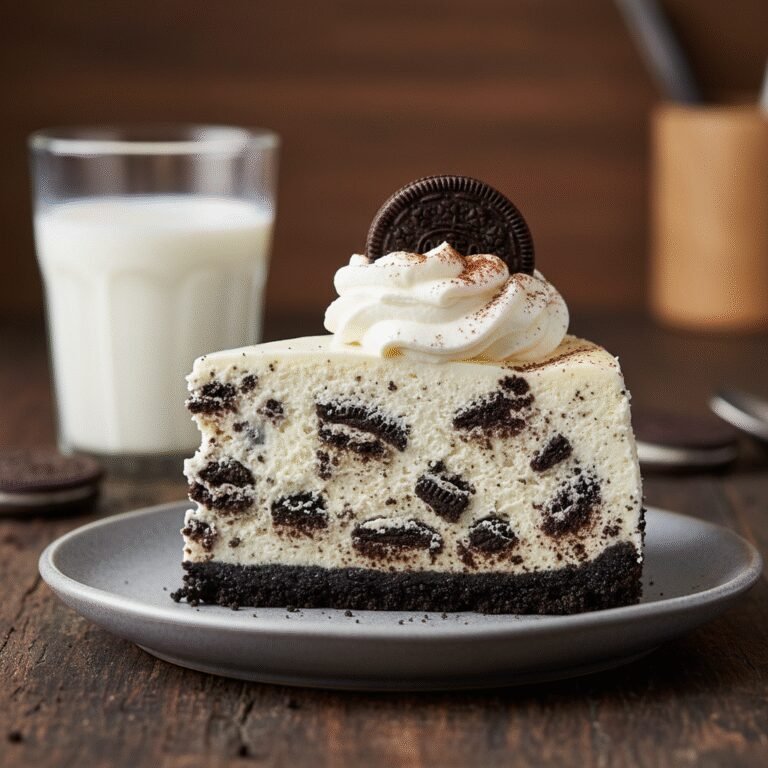
This decadent No Bake Oreo Cheesecake Loaf is the ultimate cookies and cream dream, featuring a buttery Oreo crust and a velvety, cookie-loaded cheesecake filling. Made easily in a loaf pan for perfect slicing, this dessert requires zero oven time and delivers maximum indulgence with minimal effort.
20 minutes
0 minutes
4 hours 20 minutes (includes chilling)
8-10 slices
Dessert
No-Bake / Chilling
American
Vegetarian
There is something undeniably magical about the combination of tangy cheesecake and the nostalgic, cocoa-rich crunch of Oreo cookies. While traditional cheesecakes often require water baths, springform pans, and the constant worry of surface cracks, this Easy No Bake Oreo Cheesecake In Loaf Pan Recipe strips away all the stress while amplifying the flavor. By utilizing a loaf pan, we transform the classic round cake into a sleek, sliceable dessert that looks as professional as it tastes. This format is not only aesthetically pleasing—creating distinct, beautiful strata of black crust and speckled white filling—but it is also incredibly practical for storage and serving.
Perfect for summer days when turning on the oven feels like a chore, or for busy holidays when your baking racks are already full, this recipe relies on the power of chilling rather than baking. The filling is a luscious mousse-like hybrid, stabilized by whipped heavy cream and rich cream cheese, studded generously with chopped cookies. Every bite offers a contrast of textures: the sandy, buttery base, the smooth, airy filling, and the sudden crunch of a cookie chunk. Whether you are a seasoned baker looking for a quick fix or a complete novice in the kitchen, this recipe is virtually fool-proof. It captures the essence of a high-end bakery treat but is humble enough to be whipped up on a Tuesday night. Get ready to impress your friends and family with a dessert that looks like it took hours to make but actually comes together in minutes.
History & Origins
The history of cheesecake is a journey that spans millennia, originating in ancient Greece where it was served to athletes during the first Olympic Games in 776 BC. These early versions were simple mixtures of cheese, honey, and wheat. However, the modern cheesecake we know and love—dense, creamy, and smooth—is largely an American innovation. The invention of cream cheese in 1872 by a New York dairyman named William Lawrence revolutionized the dessert, paving the way for the iconic New York Style Cheesecake. But as culinary techniques evolved, so did the desire for convenience, leading to the rise of ‘icebox cakes’ and gelatin-free no-bake desserts in the mid-20th century, coinciding with the widespread adoption of home refrigerators.
Parallel to this is the story of the Oreo. Introduced by the National Biscuit Company (Nabisco) in 1912 at its Chelsea factory in New York City, the Oreo was an instant hit. Originally sold as the ‘Oreo Biscuit’, it has since become the world’s best-selling cookie. The marriage of these two icons—the Oreo and the Cheesecake—was inevitable. The ‘Cookies and Cream’ flavor profile exploded in popularity during the late 1970s and early 1980s, initially popularized by ice cream flavors before making its way into baked goods. This specific iteration, the No Bake Oreo Cheesecake Loaf, represents a modern, minimalist evolution of that history. It takes the grandeur of the classic dessert and adapts it for the modern home cook who values time, aesthetics, and the timeless appeal of dipping a chocolate cookie into a glass of milk.
Why This Recipe Works
This recipe succeeds because it carefully balances fat, sugar, and air to create a stable structure without the need for eggs, flour, or heat. Traditional baked cheesecakes rely on the coagulation of egg proteins to set the filling. In this no-bake version, we rely on mechanical aeration and temperature. By whipping heavy cream to stiff peaks, we introduce microscopic air bubbles that lighten the dense cream cheese. When these two components are folded together, the fat globules from the cream and cheese solidify as they chill, creating a firm sliceable texture that melts in your mouth.
Furthermore, the choice of a loaf pan is not merely aesthetic; it is functional. A standard 9×5 loaf pan has a smaller surface area relative to its depth compared to a 9-inch round pan. This allows for a thicker, taller layer of cheesecake filling, which feels more luxurious and substantial. The loaf shape also makes lining the pan with parchment paper incredibly easy, allowing you to lift the entire dessert out in one go for clean, sharp cuts. Finally, the Oreo crust acts as a moisture barrier and a textural anchor. The butter binds the crumbs into a solid base that doesn’t get soggy, providing the necessary crunch to offset the richness of the filling. It is a chemistry of cold and fat that results in a perfectly set dessert every time.
Why You’ll Love This Recipe
- ✓Requires absolutely no oven time, keeping your kitchen cool.
- ✓Uses a standard loaf pan, so no specialty springform pan is needed.
- ✓Only 6 simple ingredients found in any grocery store.
- ✓Produces clean, bakery-style slices that are perfect for photography.
- ✓Can be made ahead of time and frozen for longer storage.
- ✓The ultimate crowd-pleaser with the classic cookies and cream flavor.
Equipment You’ll Need
- ✓9×5 inch Loaf Pan
- ✓Parchment Paper
- ✓Food Processor or Ziploc bag and rolling pin
- ✓Electric Hand Mixer or Stand Mixer
- ✓Large Mixing Bowl
- ✓Medium Mixing Bowl
- ✓Rubber Spatula
- ✓Measuring Cups and Spoons
Ingredients
- ✓24 Oreo cookies (whole, with filling), divided
- ✓4 tablespoons unsalted butter, melted
- ✓16 oz (2 blocks) full-fat cream cheese, softened to room temperature
- ✓1/2 cup powdered sugar (confectioners’ sugar)
- ✓1 teaspoon pure vanilla extract
- ✓1 1/4 cups heavy whipping cream, cold
- ✓Optional: Whipped cream and extra crushed Oreos for garnish
Instructions
- Prepare the Pan: Line a 9×5 inch loaf pan with parchment paper. Ensure there is enough paper hanging over the long sides to create ‘handles’ for easy removal later. Lightly grease the pan before adding paper to help it stick.
- Make the Crust: Place 14 of the Oreo cookies into a food processor and pulse until they are fine crumbs. Alternatively, place them in a Ziploc bag and crush with a rolling pin. Pour the melted butter over the crumbs and mix until it resembles wet sand.
- Press the Crust: Dump the buttery crumb mixture into the prepared loaf pan. Using the bottom of a measuring cup or a glass, press the crumbs firmly and evenly into the bottom of the pan. Place the pan in the freezer to set while you make the filling.
- Whip the Cream: In a medium bowl, using an electric mixer, whip the cold heavy cream until stiff peaks form. Be careful not to over-beat it into butter. Set this aside.
- Beat Cream Cheese: In a large mixing bowl, beat the softened cream cheese, powdered sugar, and vanilla extract until completely smooth and creamy. Scrape down the sides of the bowl to ensure no lumps remain. This usually takes about 2-3 minutes.
- Combine: Gently fold the whipped cream into the cream cheese mixture using a rubber spatula. Do this in two batches to preserve the airiness. Fold until just combined and no streaks of white cream remain.
- Add Mix-ins: Chop the remaining 10 Oreo cookies into coarse chunks. Gently fold these chunks into the cheesecake batter.
- Assemble: Remove the crust from the freezer. Pour the cheesecake filling over the crust and smooth the top with an offset spatula or the back of a spoon.
- Chill: Cover the pan loosely with plastic wrap and refrigerate for at least 4 hours, preferably overnight. The filling needs this time to firm up.
- Serve: Once set, use the parchment paper handles to lift the cheesecake out of the loaf pan. Place on a cutting board, slice with a warm knife, and serve immediately.
Expert Cooking Tips
- ✓Room Temperature Cream Cheese: This is non-negotiable. If your cream cheese is cold, it will not blend properly with the sugar and will result in a lumpy texture.
- ✓Cold Heavy Cream: Conversely, your heavy cream must be very cold to whip up to maximum volume.
- ✓Don’t Over-mix: When folding the whipped cream into the cheese, go slowly. If you deflate the air bubbles, the cheesecake will be dense rather than fluffy.
- ✓Clean Slices: To get those perfect bakery-style cuts, run your knife under hot water and wipe it dry between every single slice.
- ✓Parchment Overhang: Don’t skimp on the parchment paper length. The overhang is the only way to safely get the cheesecake out of the pan without ruining the crust.
- ✓Full Fat is Best: Do not use ‘spreadable’ cream cheese from a tub or low-fat versions; they contain too much water and will not set firmly.
Substitutions and Variations
While the classic recipe is designed for optimal texture and flavor, there are several substitutions you can make. For the **Oreos**, you can use any sandwich cookie, including Golden Oreos, mint Oreos, or even gluten-free Oreos to make the dessert gluten-friendly (provided you check the other ingredients). If you prefer a different crust, graham cracker crumbs or digestive biscuits mixed with cocoa powder work beautifully. regarding the **butter**, salted butter can be used to add a slight savory contrast to the sweet filling. For the **sweetener**, granulated sugar can be used, but it takes longer to dissolve; powdered sugar is preferred for the smoothest texture. If you don’t have **heavy whipping cream**, you can use a thawed tub of Cool Whip (approx 3 cups), but omit the step of whipping the cream and reduce the sugar in the cream cheese mixture slightly as the topping is already sweetened. Unfortunately, there is no good direct substitute for full-fat block cream cheese in this specific no-bake application without altering the stability.
Common Mistakes to Avoid
The most common mistake is **rushing the chilling process**. Because there is no gelatin or eggs, the cold temperature is the only thing holding the structure together. Cutting it too early will result in a sloppy mess. Another frequent error is **using tub cream cheese**; these products are aerated and have higher water content, leading to a soupy filling that never sets. **Over-beating the heavy cream** can also be disastrous; if you take it too far, it turns into butter and separates, ruining the smooth texture of the mousse. Finally, **not pressing the crust firmly enough** leads to a crumbly base that falls apart when you try to plate it. Take the extra minute to really pack that crust down.
Serving Suggestions
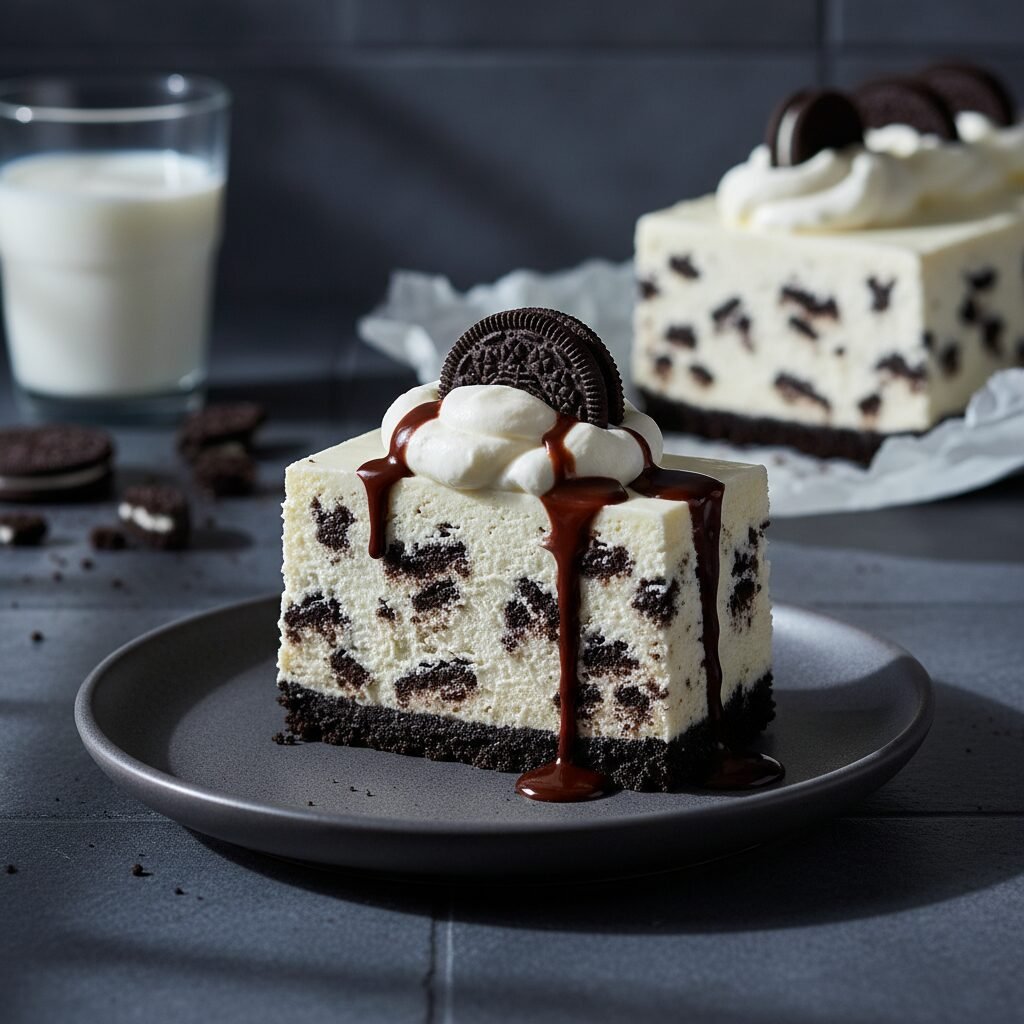
This cheesecake is rich, so it pairs well with elements that cut through the creaminess. Serve each slice with a dollop of freshly whipped cream and a drizzle of dark chocolate ganache or chocolate syrup. Fresh berries, such as raspberries or strawberries, add a tart brightness that balances the heavy sweetness of the Oreos. For a coffee-shop vibe, serve alongside a hot espresso or a cold brew coffee. If you are feeling festive, you can sprinkle crushed peppermint candy on top for a winter holiday variation.
Storage and Reheating Tips
This cheesecake must be kept cold. Store leftovers in an airtight container in the refrigerator for up to 5 days. Because it is a loaf, you can easily slide it back into the pan and cover it with plastic wrap. For longer storage, this cheesecake freezes exceptionally well. Wrap individual slices or the whole loaf tightly in plastic wrap, then in aluminum foil. It can be frozen for up to 2 months. Thaw overnight in the refrigerator before serving. Do not attempt to microwave it to thaw, as it will melt the filling.
Nutrition Facts (Estimated)
| Serving Size | 1 Slice |
| Calories | 450 |
| Fat | 34g |
| Saturated Fat | 18g |
| Unsaturated Fat | 14g |
| Trans Fat | 0g |
| Cholesterol | 95mg |
| Sodium | 320mg |
| Carbohydrates | 38g |
| Fiber | 1g |
| Sugar | 28g |
| Protein | 5g |
Frequently Asked Questions
Can I use gelatin to make it firmer?
Yes, if you want a very stiff slice that can withstand warmer room temperatures, you can dissolve 1 teaspoon of unflavored gelatin in 1 tablespoon of water and beat it into the cream cheese mixture.
Why is my cheesecake filling runny?
This usually happens if the heavy cream wasn’t whipped to stiff peaks, or if ‘spreadable’ tub cream cheese was used instead of brick style. It also happens if the cake hasn’t chilled long enough.
Can I make this in a round pan?
Absolutely. This recipe fits perfectly in an 8-inch or 9-inch round springform pan or pie dish. The chilling time remains the same.
Do I remove the cream filling from the Oreos for the crust?
No! Leave the cream filling in. It acts as a binder along with the butter to hold the crust together.
How long does it take to set?
4 hours is the minimum, but overnight (8-12 hours) is ideal for the best texture and cleanest slices.
Can I use Double Stuf Oreos?
Yes, you can. However, since they have more filling, you might want to reduce the melted butter in the crust slightly (by about 1/2 tablespoon) so it isn’t too greasy.
Is this recipe gluten-free?
It is not gluten-free if using standard Oreos. However, if you use Gluten-Free Oreos (which are widely available now), the rest of the ingredients are naturally gluten-free.
Can I add other mix-ins?
Yes! Chopped peanut butter cups, chocolate chips, or swirls of caramel sauce are great additions. Just be careful not to overload the batter or it may not set.
Conclusion
The Easy No Bake Oreo Cheesecake In Loaf Pan is a testament to the fact that incredible desserts don’t need to be complicated. It brings together the beloved crunch of America’s favorite cookie with the sophisticated creaminess of a cheesecake, all in a convenient, easy-to-serve package. Whether you are making this for a summer barbecue, a birthday treat, or just a weekend indulgence, it promises to deliver satisfaction in every forkful. The hardest part of this entire recipe is simply waiting for it to chill in the fridge. So grab your loaf pan, a package of Oreos, and get ready to make your new favorite no-bake dessert!