Velvety Easy No-Bake Mixed Berry Cheesecake With Graham Cracker Crust
Easy No Bake Mixed Berry Cheesecake With Graham Cracker Crust Recipe
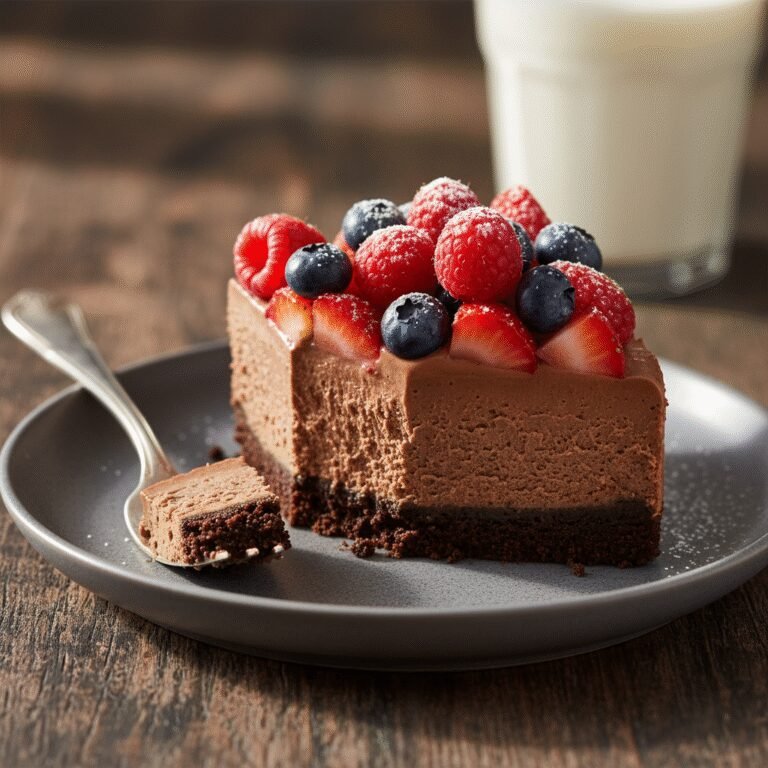
This foolproof No-Bake Mixed Berry Cheesecake features a buttery, crunchy graham cracker crust filled with a silky, mousse-like cream cheese filling. Topped with a vibrant crown of fresh strawberries, blueberries, and raspberries, it is the ultimate refreshing dessert for warm weather entertaining.
20 minutes
0 minutes
6 hours 20 minutes (includes chilling)
10 servings
Dessert
Chill / No-Bake
American
Vegetarian
There is something undeniably magical about a dessert that delivers five-star elegance with zero time spent near a hot oven. This Easy No-Bake Mixed Berry Cheesecake is the epitome of summer indulgence, perfectly balancing the rich, tangy creaminess of a classic cheesecake with the bright, bursting acidity of fresh seasonal berries. Unlike its baked counterpart, which requires water baths, precise temperature control, and the constant fear of surface cracks, this no-bake version relies on the mechanical aeration of heavy cream and the stabilizing power of cool temperatures to achieve its lofty, cloud-like texture. The foundation is a classic graham cracker crust—thick, buttery, and slightly salty—which provides the necessary textural contrast to the smooth filling. As you slice into it, the knife glides effortlessly through the layers, revealing a stark white center vividly contrasted by the jewel-toned berry topping. It is a recipe born out of the desire for luxury without labor, offering a sophisticated flavor profile that appeals to both children and adults alike. Whether you are hosting a backyard barbecue, a bridal shower, or simply craving a sweet treat on a Tuesday night, this cheesecake promises to be the showstopper on your table. The luscious vanilla bean notes in the filling marry beautifully with the tartness of the fruit, ensuring that every bite is rich but never heavy.
History & Origins
While the concept of cheesecake dates back to ancient Greece, specifically on the island of Samos where it was served to athletes during the first Olympic Games in 776 B.C., the modern no-bake iteration is a distinct evolution of the classic dish. Ancient versions were essentially cakes made of cheese, wheat, and honey, pounded together and baked on earthenware griddles. The Romans later adopted the recipe, spreading it across Europe. However, the cheesecake we know today changed forever with the accidental invention of cream cheese by American dairyman William Lawrence in 1872. Trying to replicate French Neufchâtel, he created a richer, unripened cheese that became the basis for the iconic New York Style cheesecake. The ‘no-bake’ phenomenon gained traction in the mid-20th century with the rise of convenience cooking and modern refrigeration. Home cooks sought ways to replicate the beloved flavor of cheesecake without the fuss of baking custard. Early versions often relied heavily on gelatin or store-bought whipped toppings for structure. Over time, culinary enthusiasts refined the method, discovering that high-quality heavy cream whipped to stiff peaks could provide enough structure to hold the cream cheese without the rubbery texture sometimes imparted by gelatin. This specific mixed berry variation pays homage to the classic pairing of cheese and fruit, a tradition seen in European cuisines for centuries, but adapted for the modern American palate that craves fresh, vibrant produce atop rich dairy.
Why This Recipe Works
This recipe succeeds where many other no-bake cheesecakes fail because of the precise ratio of fat to acid and the method of aeration. Many no-bake recipes result in a filling that is either too soupy to slice or too stiff and waxy. Here, we use full-fat block cream cheese at room temperature, which ensures a lump-free base. We fold in heavy whipping cream that has been beaten to stiff peaks; this incorporates microscopic air bubbles into the batter, giving it a mousse-like lightness that mimics the lift of a baked soufflé without heat. Furthermore, the addition of a small amount of lemon juice does more than just add flavor; the acid reacts with the proteins in the dairy, helping to ‘set’ the mixture slightly as it chills. The crust recipe uses a higher ratio of butter to crumbs than standard baked crusts, ensuring it solidifies firmly in the fridge and doesn’t crumble when sliced. Finally, the berry topping is kept fresh rather than cooked down into a compote. This prevents the juices from bleeding into the white filling and keeping the aesthetic crisp and clean while providing a textural pop of fresh fruit skin against the smooth cheese.
Why You’ll Love This Recipe
- ✓Requires absolutely no oven time, keeping your kitchen cool.
- ✓Achieves a professional, clean slice with a sturdy graham cracker crust.
- ✓The filling is light and airy, not dense or heavy like baked versions.
- ✓Versatile topping options allow you to use whatever berries are in season.
- ✓Can be made up to two days in advance, perfect for stress-free hosting.
Equipment You’ll Need
- ✓9-inch Springform Pan
- ✓Electric Hand Mixer or Stand Mixer
- ✓Large Mixing Bowls
- ✓Rubber Spatula
- ✓Measuring Cups and Spoons
- ✓Food Processor (optional, for crumbs)
- ✓Offset Spatula
Ingredients
- ✓2 cups graham cracker crumbs (about 14-16 full sheets)
- ✓1/2 cup unsalted butter, melted
- ✓1/3 cup granulated sugar (for crust)
- ✓24 oz (3 blocks) full-fat cream cheese, softened to room temperature
- ✓1 1/2 cups heavy whipping cream, cold
- ✓1 cup powdered sugar, sifted
- ✓1 tablespoon fresh lemon juice
- ✓2 teaspoons pure vanilla extract
- ✓1 teaspoon lemon zest
- ✓2 cups mixed fresh berries (strawberries, blueberries, raspberries)
- ✓Optional: Fresh mint leaves for garnish
Instructions
- 1. Prepare the Crust: In a medium bowl, combine the graham cracker crumbs and 1/3 cup granulated sugar. Pour in the melted butter and mix with a fork until the texture resembles wet sand.
- 2. Form the Base: Pour the crumb mixture into a 9-inch springform pan. Use the bottom of a measuring cup or glass to press the crumbs firmly and evenly into the bottom and slightly up the sides of the pan. Place the pan in the freezer for 15-20 minutes to set while you make the filling.
- 3. Whip the Cream: In a large bowl using a hand mixer (or stand mixer with whisk attachment), whip the cold heavy cream until stiff peaks form. Be careful not to over-beat into butter. Set this bowl aside.
- 4. Beat the Cream Cheese: In a separate large bowl, beat the softened cream cheese until completely smooth and creamy, about 2-3 minutes. There should be no lumps.
- 5. Combine Filling Ingredients: Add the sifted powdered sugar, vanilla extract, lemon juice, and lemon zest to the cream cheese. Beat again until fully combined and smooth.
- 6. Fold in Cream: Gently fold the whipped cream into the cream cheese mixture using a rubber spatula. Use a slow, sweeping motion to maintain the air bubbles. Fold until just combined and no streaks of white cream remain.
- 7. Assemble: Remove the crust from the freezer. Pour the filling over the crust and smooth the top with an offset spatula.
- 8. Chill: Cover the pan loosely with plastic wrap and refrigerate for at least 6 hours, preferably overnight. This step is crucial for the cheesecake to set properly.
- 9. Garnish and Serve: Before serving, run a thin knife around the edge of the pan to loosen the cheesecake, then release the springform ring. Top generously with fresh mixed berries and mint leaves. Slice and enjoy cold.
Expert Cooking Tips
- ✓Ensure your cream cheese is truly at room temperature before mixing to avoid a lumpy texture.
- ✓Do not use ‘whipped’ cream cheese from a tub; use the brick style for proper stability.
- ✓Sift your powdered sugar to prevent grainy pockets in the smooth filling.
- ✓Chill the bowl and beaters before whipping the heavy cream to get volume faster.
- ✓Press the crust very firmly; if it’s too loose, it will crumble when you cut the first slice.
- ✓For clean slices, wipe your knife with a warm, damp cloth between each cut.
Substitutions and Variations
This recipe is quite flexible regarding dietary needs and pantry staples. For the crust, if you don’t have graham crackers, you can use digestive biscuits, vanilla wafers, or even Oreos (remove the cream filling first) for a chocolate twist. For a Gluten-Free version, simply swap the graham crackers for a certified gluten-free brand; the filling is naturally gluten-free. If you want to lower the sugar content, you can use a powdered erythritol sweetener in the filling, though it may have a slight cooling effect. While full-fat dairy is highly recommended for stability, you can use Neufchâtel cheese for a slightly lighter version, though the cake will be softer. Do not substitute the heavy whipping cream for half-and-half or milk, as the fat content is required for the whip that holds the cake together. For the topping, feel free to use cherry pie filling, lemon curd, or chocolate ganache instead of fresh berries.
Common Mistakes to Avoid
The most common mistake with no-bake cheesecake is not chilling it long enough. Impatience often leads to a dessert that collapses on the plate; give it the full 6 hours, or better yet, overnight. Another error is using cold cream cheese. If the cheese is cold, it won’t blend with the sugar properly, leaving tiny white lumps that ruin the mouthfeel. Over-whipping the heavy cream can turn it into butter, which will make the filling greasy rather than fluffy. Conversely, under-whipping it will result in a runny filling. Finally, be careful not to fold the mixtures too aggressively. You want to keep the air in the whipped cream; stirring wildly effectively deflates the batter, resulting in a dense, heavy cake.
Serving Suggestions
Serve this cheesecake chilled, straight from the refrigerator. It pairs beautifully with a glass of sparkling Moscato or a hot cup of dark roast coffee to cut through the richness. For an extra elegant presentation, dust the berries with a little powdered sugar right before serving, or melt some apricot jelly and brush it over the fruit for a bakery-style shine. If you are serving this for a 4th of July party, arrange strawberries and blueberries in a pattern to mimic the flag. A dollop of extra whipped cream on the side never hurts, and a drizzle of raspberry coulis can add a professional plating touch.
Storage and Reheating Tips
Store any leftover cheesecake in the refrigerator, covered loosely with plastic wrap or in an airtight cake carrier, for up to 5 days. The crust may soften slightly over time as it absorbs moisture from the filling. This cheesecake also freezes exceptionally well. To freeze, chill the cake completely without the fruit topping. Wrap the whole cake (or individual slices) tightly in plastic wrap, then in aluminum foil. It can be frozen for up to 3 months. Thaw in the refrigerator overnight before serving. Add the fresh fruit topping only after the cake has thawed to prevent the berries from becoming mushy.
Nutrition Facts (Estimated)
| Serving Size | 1 slice |
| Calories | 480 |
| Fat | 36g |
| Saturated Fat | 22g |
| Unsaturated Fat | 12g |
| Trans Fat | 0g |
| Cholesterol | 110mg |
| Sodium | 320mg |
| Carbohydrates | 38g |
| Fiber | 2g |
| Sugar | 28g |
| Protein | 6g |
Frequently Asked Questions
Can I use frozen berries for the topping?
Yes, but you should thaw and drain them first. Frozen berries tend to release a lot of water as they thaw, which can make the top of your cheesecake soggy and bleed color into the white filling. Fresh berries are preferred for texture.
Why didn’t my cheesecake set?
This usually happens if the heavy cream wasn’t whipped to stiff peaks before folding, or if the cake wasn’t chilled long enough. Using low-fat cream cheese or cream can also prevent setting.
Can I use granulated sugar in the filling?
It is not recommended. Granulated sugar takes longer to dissolve and can leave the cheesecake with a gritty texture. Powdered sugar dissolves instantly and contains a small amount of cornstarch which helps stabilize the filling.
Do I need to use gelatin?
No, this recipe relies on the fat structure of the cream cheese and whipped cream. However, if you live in a very hot climate or need the cake to sit out for a long time, you can dissolve 1 teaspoon of unflavored gelatin in water and add it for extra insurance.
Can I make this in a regular pie dish?
Absolutely. If you don’t have a springform pan, a deep-dish pie plate works well. The slices might be a bit harder to remove cleanly, but it will taste just as good.
How do I get the cream cheese to room temperature quickly?
Cut the cream cheese blocks into small cubes and spread them out on a plate. They should soften in about 15-20 minutes. Do not microwave them, as this can melt the fat unevenly.
Is this recipe safe for pregnant women?
Yes, since there are no raw eggs in this recipe (unlike some traditional baked cheesecakes or mousses), it is generally safe, provided the dairy is pasteurized.
Can I add flavors to the filling?
Yes! You can swirl in melted chocolate, fruit puree, or caramel sauce. Just be mindful not to add too much liquid, or the cake may not set properly.
Conclusion
This Easy No-Bake Mixed Berry Cheesecake is more than just a recipe; it is a reliable companion for your summer hosting needs. It proves that you do not need complex techniques or hours of baking to create a dessert that looks stunning and tastes divine. The combination of the crunchy, buttery crust with the cloud-like filling and the burst of fresh berries creates a harmony of textures and flavors that is hard to beat. We hope this becomes a staple in your recipe box, bringing joy and sweetness to your table with minimal effort. Give it a try for your next gathering, and prepare for the compliments to roll in!