Ultimate Moist Chocolate Cupcakes with Creamy Peanut Butter Frosting
Moist Chocolate Cupcake With Peanut Butter Frosting Recipe
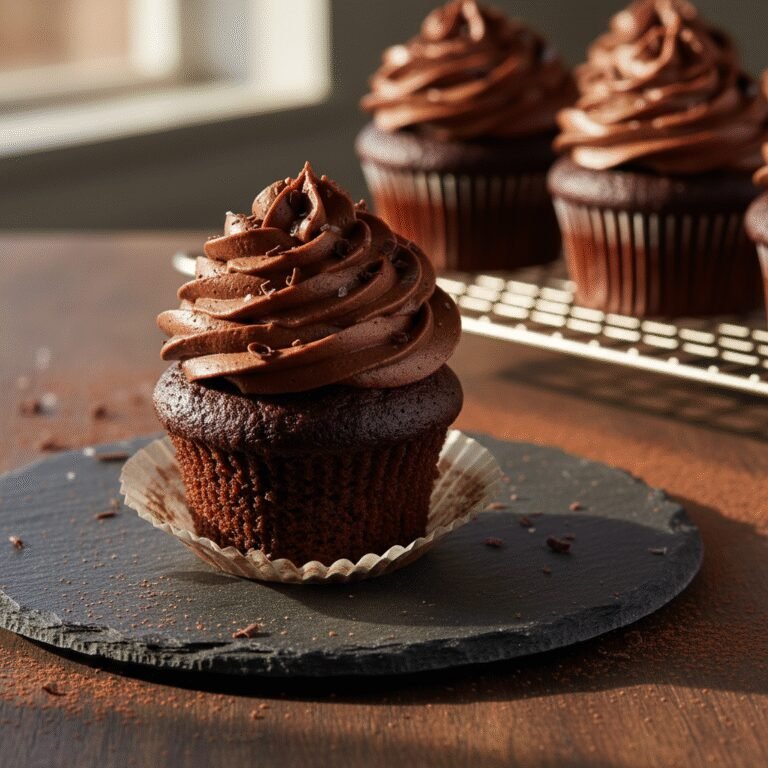
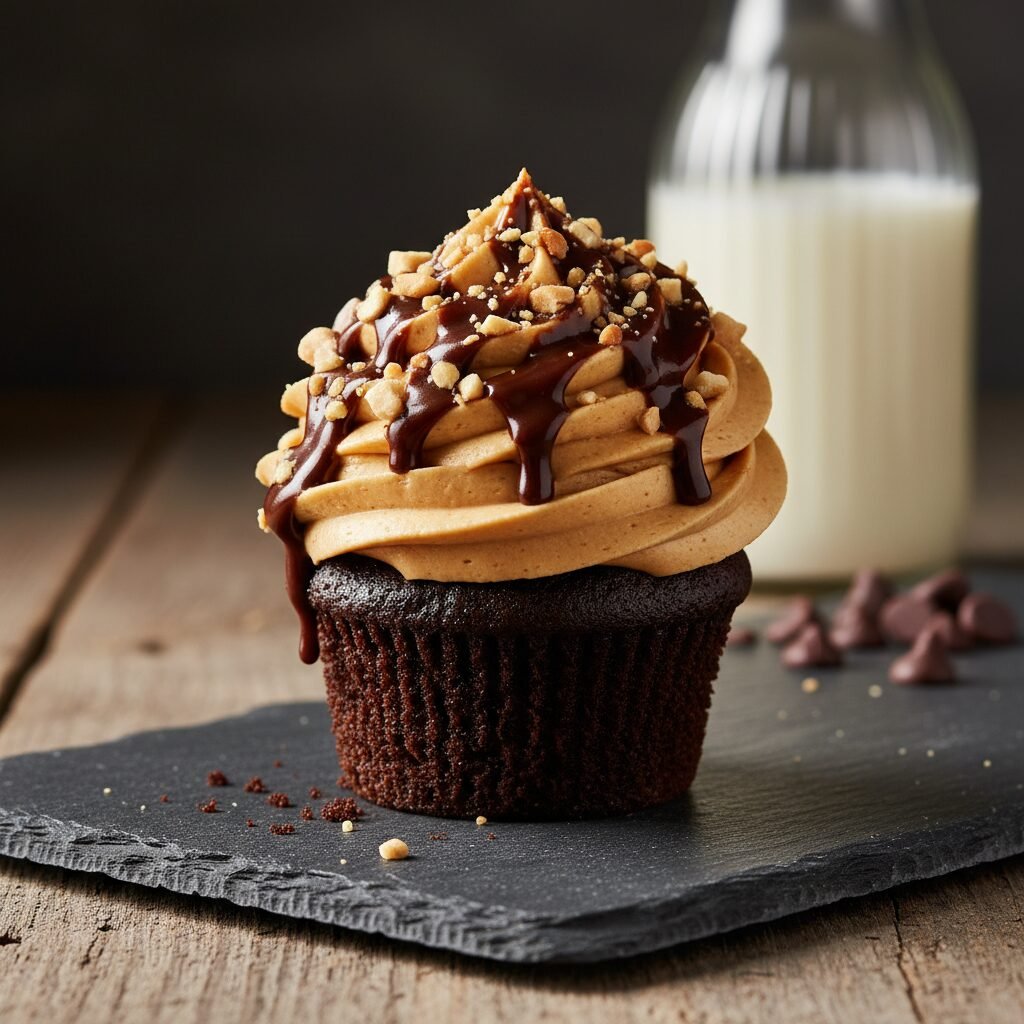
Experience the perfect marriage of rich, dark chocolate and salty-sweet peanut butter in these incredibly moist cupcakes. Topped with a velvety, cloud-like frosting, they are the ultimate indulgence for any dessert lover and are surprisingly easy to bake at home.
20 minutes
22 minutes
45 minutes
12-14 cupcakes
Dessert
Baking
American
Vegetarian
There are few culinary duos as iconic and universally adored as chocolate and peanut butter. It is a pairing that transcends trends, rooting itself deeply in the comfort food hall of fame. This recipe for Moist Chocolate Cupcakes with Peanut Butter Frosting is not just another dessert; it is a love letter to that timeless combination. Imagine sinking your teeth into a cake crumb that is impossibly dark, tender, and moist—so moist that it stays fresh for days—balanced perfectly by a frosting that is light, fluffy, and packed with robust roasted peanut flavor. The magic of this recipe lies in the texture. Unlike many chocolate cupcakes that can turn dry or crumbly, these rely on a specific blend of oil and buttermilk to ensure a melt-in-your-mouth experience. The chocolate base is not overly sweet, allowing the deep cocoa notes to shine through, which provides the necessary counterpoint to the sweet and salty richness of the peanut butter buttercream. Whether you are baking for a birthday party, a bake sale, or simply a Tuesday night craving, these cupcakes promise to deliver satisfaction. The frosting is whipped to perfection, avoiding the heavy, greasy texture that plagues lesser recipes, resulting in a topping that tastes like the inside of a gourmet peanut butter cup. As you prepare to bake, get ready for your kitchen to be filled with the intoxicating aroma of blooming cocoa and roasted nuts. This guide will walk you through every step to ensure bakery-quality results right from your own oven.
History & Origins
The history of the cupcake is a fascinating journey through American culinary evolution. The concept dates back to 1796, when a recipe for ‘a cake to be baked in small cups’ was written in ‘American Cookery’ by Amelia Simmons. This was a revolutionary idea at the time, significantly reducing baking times and allowing for more consistent heat distribution compared to large hearth cakes. However, the term ‘cupcake’ itself didn’t truly surface until the early 19th century. Fast forward to the 20th century, and the cupcake became a staple of American home baking, largely due to the invention of the muffin tin. The specific marriage of chocolate and peanut butter, however, has a distinct history tied to the rise of processed peanut butter in the early 1900s. The pivotal moment for this flavor profile was arguably the creation of the peanut butter cup by H.B. Reese in 1928. Reese, a former dairy farmer and shipping foreman for Milton S. Hershey, created a confection that cemented the chocolate and peanut butter pairing in the American palate. Over the decades, this combination migrated from candy bars to baked goods, becoming a favorite for cakes, brownies, and eventually, the modern gourmet cupcake boom of the early 2000s. Today, the chocolate peanut butter cupcake is a standard by which many bakeries are judged, representing a perfect blend of historic baking techniques and modern flavor obsessions.
Why This Recipe Works
This recipe succeeds where others fail due to a few key chemical interactions and ingredient choices. First and foremost is the decision to use oil instead of butter in the cupcake batter. While butter provides flavor, it contains water and milk solids that can lead to a drier texture once the cake cools. Oil, being 100% fat, remains liquid at room temperature, coating the flour proteins and inhibiting gluten formation, which guarantees a tender, moist crumb that lasts. Secondly, we utilize the ‘blooming’ technique with the cocoa powder. By mixing the cocoa with hot coffee or boiling water, we dissolve the cocoa butter and release the full potential of the chocolate flavor, eliminating any chalkiness. The coffee enhances the chocolate’s depth without making the cake taste like java. Third, the inclusion of buttermilk is crucial. Its acidity reacts with the baking soda to create carbon dioxide, giving the cupcakes a superior lift and a soft, airy structure, while also tenderizing the gluten. For the frosting, the ratio of butter to peanut butter is meticulously balanced. Too much peanut butter can make the frosting heavy and sticky; too little and the flavor is lost. We whip the butter first to aerate it before adding the peanut butter, ensuring a frosting that is pipeable, stable, and silky smooth.
Why You’ll Love This Recipe
- ✓Stays incredibly moist for up to 4 days
- ✓Deep, intense chocolate flavor enhanced by hot coffee
- ✓Perfect salty-sweet balance in the frosting
- ✓Simple one-bowl method for the batter
- ✓Freezer-friendly for make-ahead prep
- ✓Bakery-style domed tops every time
Equipment You’ll Need
- ✓Muffin tin
- ✓Cupcake liners
- ✓Large mixing bowl
- ✓Whisk
- ✓Electric hand mixer or stand mixer
- ✓Measuring cups and spoons
- ✓Wire cooling rack
- ✓Piping bag and star tip
Ingredients
- ✓1 1/2 cups all-purpose flour
- ✓1 1/2 cups granulated sugar
- ✓3/4 cup unsweetened cocoa powder
- ✓1 1/2 teaspoons baking soda
- ✓3/4 teaspoon baking powder
- ✓3/4 teaspoon salt
- ✓2 large eggs, room temperature
- ✓3/4 cup buttermilk, room temperature
- ✓3/4 cup warm water or hot coffee
- ✓1/4 cup vegetable oil
- ✓1 teaspoon vanilla extract
- ✓1/2 cup unsalted butter, softened (for frosting)
- ✓1 cup creamy peanut butter (for frosting)
- ✓2-3 cups powdered sugar (for frosting)
- ✓1/4 cup heavy cream (for frosting)
- ✓1 teaspoon vanilla extract (for frosting)
- ✓Pinch of salt (for frosting)
Instructions
- Preheat your oven to 350°F (175°C) and line a standard muffin tin with paper liners.
- In a large bowl, sift together the flour, sugar, cocoa powder, baking soda, baking powder, and salt. Whisk well to ensure everything is evenly distributed.
- Add the eggs, buttermilk, warm water (or coffee), oil, and vanilla extract to the dry ingredients.
- Mix on medium speed with an electric mixer or whisk vigorously by hand for about 2 minutes. The batter will be very thin; this is normal and essential for moisture.
- Pour the batter into the prepared cupcake liners, filling them about 2/3 full. Do not overfill, or they will spill over while baking.
- Bake in the preheated oven for 20-22 minutes, or until a toothpick inserted into the center comes out clean or with just a few moist crumbs.
- Remove the cupcakes from the oven and let them cool in the pan for 5 minutes, then transfer them to a wire rack to cool completely before frosting.
- While the cupcakes cool, prepare the frosting. In a large bowl, beat the softened butter and peanut butter together until smooth and creamy.
- Gradually add the powdered sugar, one cup at a time, mixing on low speed until incorporated.
- Add the vanilla extract, a pinch of salt, and the heavy cream. Beat on high speed for 3 minutes until the frosting is light, fluffy, and pale in color.
- Once the cupcakes are completely cool, pipe the peanut butter frosting onto each cupcake using a piping bag and your preferred tip.
- Garnish with chocolate shavings, chopped peanuts, or a mini peanut butter cup if desired.
Expert Cooking Tips
- ✓Do not overmix the batter once the flour is added, although this recipe is forgiving, overmixing can lead to tunneling.
- ✓Use room temperature ingredients (eggs, buttermilk) to ensure the batter emulsifies properly.
- ✓If you don’t have buttermilk, make a substitute by adding 1 tablespoon of vinegar or lemon juice to a cup of milk and letting it sit for 5 minutes.
- ✓Use high-quality cocoa powder; Dutch-processed will give a darker color and fudgier taste, while natural cocoa gives a lighter, reddish hue.
- ✓For the frosting, use standard creamy peanut butter (like Jif or Skippy) rather than natural peanut butter, which can separate and cause the frosting to be oily.
- ✓Check for doneness at the 18-minute mark to avoid overbaking; dry cupcakes are often just overbaked cupcakes.
Substitutions and Variations
This recipe is quite versatile when it comes to substitutions. If you need to make these gluten-free, a high-quality 1:1 gluten-free baking flour blend works exceptionally well; just look for one that contains xanthan gum. For a dairy-free version, you can substitute the buttermilk with a mixture of almond milk and vinegar, and use a plant-based oil substitute for the butter in the frosting, though the texture may vary slightly. The vegetable oil in the batter can be swapped for melted coconut oil or canola oil without impacting the flavor. If you want to avoid caffeine, use hot water or decaf coffee instead of regular coffee; the coffee flavor is subtle but enhances the chocolate. For the frosting, if you have a peanut allergy, almond butter or sunflower seed butter can be used as a direct replacement, though the flavor profile will obviously shift. You can also adjust the sweetness of the frosting by varying the amount of powdered sugar or adding a pinch more salt to cut the sweetness.
Common Mistakes to Avoid
The most common mistake with this recipe is overfilling the cupcake liners. Because the batter is thin and has a good amount of leavening, it rises significantly. Filling past the 2/3 mark will cause the batter to spill over and create flat, messy tops rather than nice domes. Another frequent error is frosting the cupcakes before they are completely cool. Even a slightly warm cupcake will melt the butter in the frosting, causing it to slide off or become greasy. In terms of the frosting, under-whipping is a common issue. You really need to beat the butter and peanut butter mixture for several minutes to incorporate enough air to make it fluffy; otherwise, it will be dense and heavy like fudge. Finally, measuring flour incorrectly by scooping the cup into the bag packs the flour down, leading to dry cupcakes. Always spoon the flour into the measuring cup and level it off, or use a kitchen scale for precision.
Serving Suggestions
These cupcakes are rich and decadent, so they pair beautifully with a glass of cold milk to cut through the sweetness. For a more sophisticated serving option, pair them with a hot cup of espresso or a dark roast coffee, which complements the chocolate notes in the cake. If serving at a party, consider garnishing them with a drizzle of melted chocolate ganache or a mini peanut butter cup on top to signal the flavor profile to your guests. They look stunning arranged on a tiered cake stand. For a dessert platter, you can serve them alongside fresh strawberries or raspberries; the tart fruit provides a nice contrast to the heavy peanut butter and chocolate flavors.
Storage and Reheating Tips
These cupcakes store remarkably well due to the oil-based batter. They can be kept in an airtight container at room temperature for up to 3 days without drying out. If you live in a particularly hot or humid climate, it is safer to store them in the refrigerator to prevent the frosting from melting, but be sure to bring them to room temperature before eating for the best texture and flavor. Cold buttercream can be waxy and hard. For longer storage, you can freeze the unfrosted cupcakes for up to 3 months. Wrap them individually in plastic wrap and place them in a freezer bag. The frosted cupcakes can also be frozen; freeze them on a baking sheet first until the frosting is hard, then wrap them carefully. Thaw overnight in the refrigerator and let come to room temperature before serving.
Nutrition Facts (Estimated)
| Serving Size | 1 cupcake |
| Calories | 450 |
| Fat | 26g |
| Saturated Fat | 9g |
| Unsaturated Fat | 15g |
| Trans Fat | 0g |
| Cholesterol | 45mg |
| Sodium | 280mg |
| Carbohydrates | 52g |
| Fiber | 3g |
| Sugar | 32g |
| Protein | 7g |
Frequently Asked Questions
Can I use natural peanut butter for the frosting?
It is not recommended. Natural peanut butter tends to separate and can make the buttercream oily or gritty. Standard commercial creamy peanut butter provides the best stability and texture.
Why is the batter so thin?
The batter is intentionally thin because of the high liquid content (buttermilk, oil, coffee). This ensures the cocoa hydrates fully and results in a very moist, tender crumb.
Can I make these into a layer cake instead?
Yes, this recipe doubles well and can be baked in two 8-inch or 9-inch round cake pans. You will need to increase the baking time to approximately 30-35 minutes.
My cupcakes sank in the middle, what happened?
This usually happens if the oven door was opened too early during baking, causing a temperature drop, or if the cupcakes were underbaked. It can also be caused by expired baking soda or powder.
Can I use melted butter instead of oil in the cake?
You can, but the texture will change. Butter makes a denser, slightly drier cake once cooled. Oil is superior for keeping chocolate cakes moist for longer periods.
Do I have to use coffee?
No, you can use hot water. However, coffee enhances the chocolate flavor significantly without making the cake taste like coffee. It acts as a flavor booster.
How do I get the frosting to be fluffy?
The key is whipping. Beat the butter and peanut butter together for at least 2-3 minutes before adding sugar, and then beat again on high speed after adding the cream.
Can I reduce the sugar in the recipe?
Reducing sugar in baking can affect the texture and moisture retention. It is best to stick to the recipe for the cake, but you can reduce the sugar in the frosting to taste.
Conclusion
In the world of desserts, the Moist Chocolate Cupcake with Peanut Butter Frosting stands as a titan of flavor and comfort. It is a recipe that delivers on every promise: texture, taste, and visual appeal. By following the steps outlined above, you are not just mixing ingredients; you are crafting a memory, a moment of pure indulgence that you can share with friends and family. Whether you are a novice baker or a seasoned pro, the simplicity of this method and the complexity of the results will make this a permanent addition to your recipe box. So, grab your whisk, preheat your oven, and prepare to enjoy the best cupcakes you have ever made.