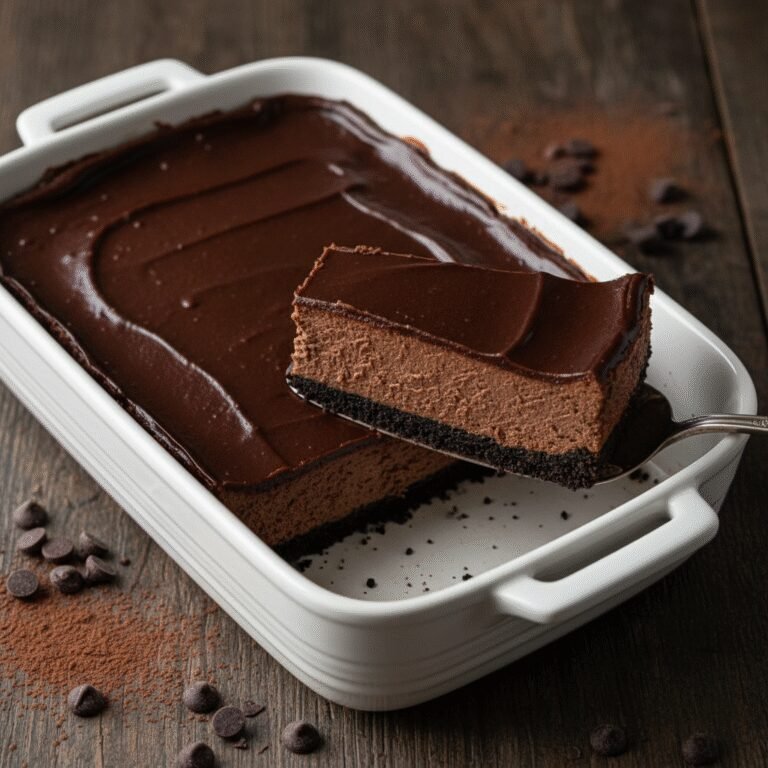
The Ultimate Creamy Chocolate Cheesecake with Digestive Biscuit Crust
Creamy Chocolate Cheesecake With Digestive Biscuit Crust Recipe
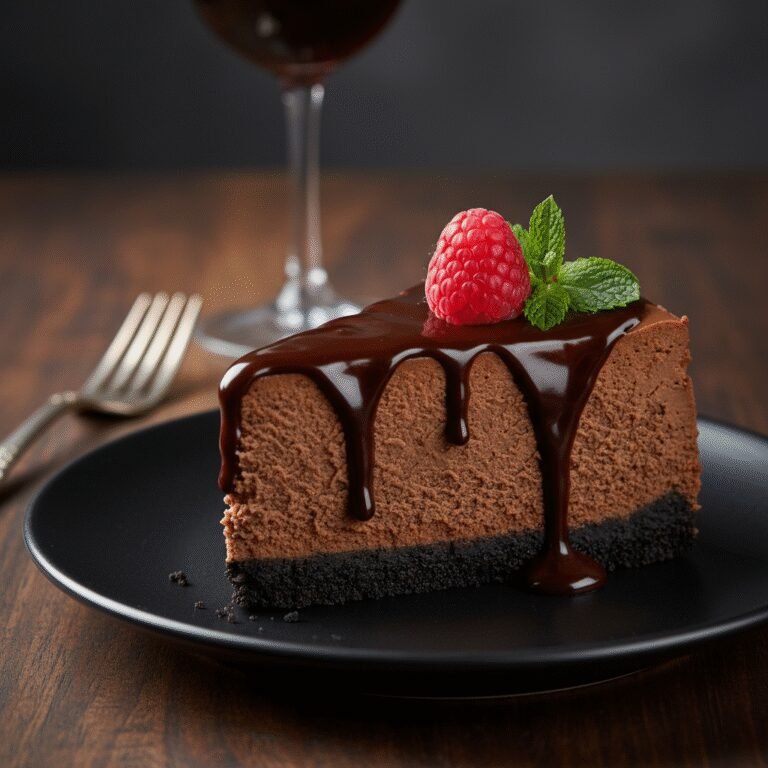
Indulge in the ultimate dessert experience with this velvety, rich chocolate cheesecake sitting atop a buttery, crumbly Digestive biscuit base. Perfectly balanced between sweet and savory, this recipe guarantees a crack-free, restaurant-quality slice every time.
30 minutes
1 hour 10 minutes
8 hours (includes cooling time)
12 servings
Dessert
Baking
American / British Fusion
Vegetarian
There are few desserts as universally adored and instantly comforting as a perfectly executed chocolate cheesecake. But we aren’t just talking about any cheesecake here; we are diving deep into the world of ultra-creamy, dense, yet melt-in-your-mouth chocolate cheesecake that rivals the finest patisseries in New York or Paris. The secret weapon in this specific recipe is the crust. While the standard American graham cracker crust is a classic, swapping it for British-style Digestive biscuits elevates the flavor profile entirely. The slightly coarser texture and wheaty, semi-sweet flavor of Digestives provide a robust foundation that stands up magnificently to the intense richness of the chocolate filling.
This recipe is a labor of love, designed for the home baker who wants to impress. We focus heavily on texture—achieving that elusive silkiness that coats the palate without being heavy or cloying. By using high-quality semi-sweet chocolate and a precise baking method involving a water bath, we eliminate the dryness often associated with baked chocolate desserts. The result is a dessert that feels sophisticated yet accessible. Whether you are hosting a dinner party, celebrating a milestone, or simply satisfying a midnight chocolate craving, this cheesecake is the answer. It is a showstopper that demands to be photographed before being devoured. Prepare your kitchen for the aroma of melting chocolate and baking butter—it is time to create a masterpiece.
History & Origins
The history of cheesecake is a journey that spans millennia, originating long before the cream cheese blocks we know today lined supermarket shelves. The earliest known cheesecake recipes date back to ancient Greece, where they were served to athletes during the first Olympic Games in 776 BC for energy. These early iterations, known as ‘plakous’, were simple mixtures of flour, wheat, honey, and cheese. The Romans later adopted the recipe, adding eggs and baking it under hot bricks, calling it ‘libum’.
However, the modern cheesecake we recognize today owes its existence to an accidental discovery in New York in 1872. William Lawrence, a dairyman from Chester, New York, was attempting to replicate the French cheese Neufchâtel. Instead, he created a richer, creamier ‘unripened cheese’ that eventually became the Philadelphia Cream Cheese brand. This paved the way for the dense, rich New York-style cheesecake.
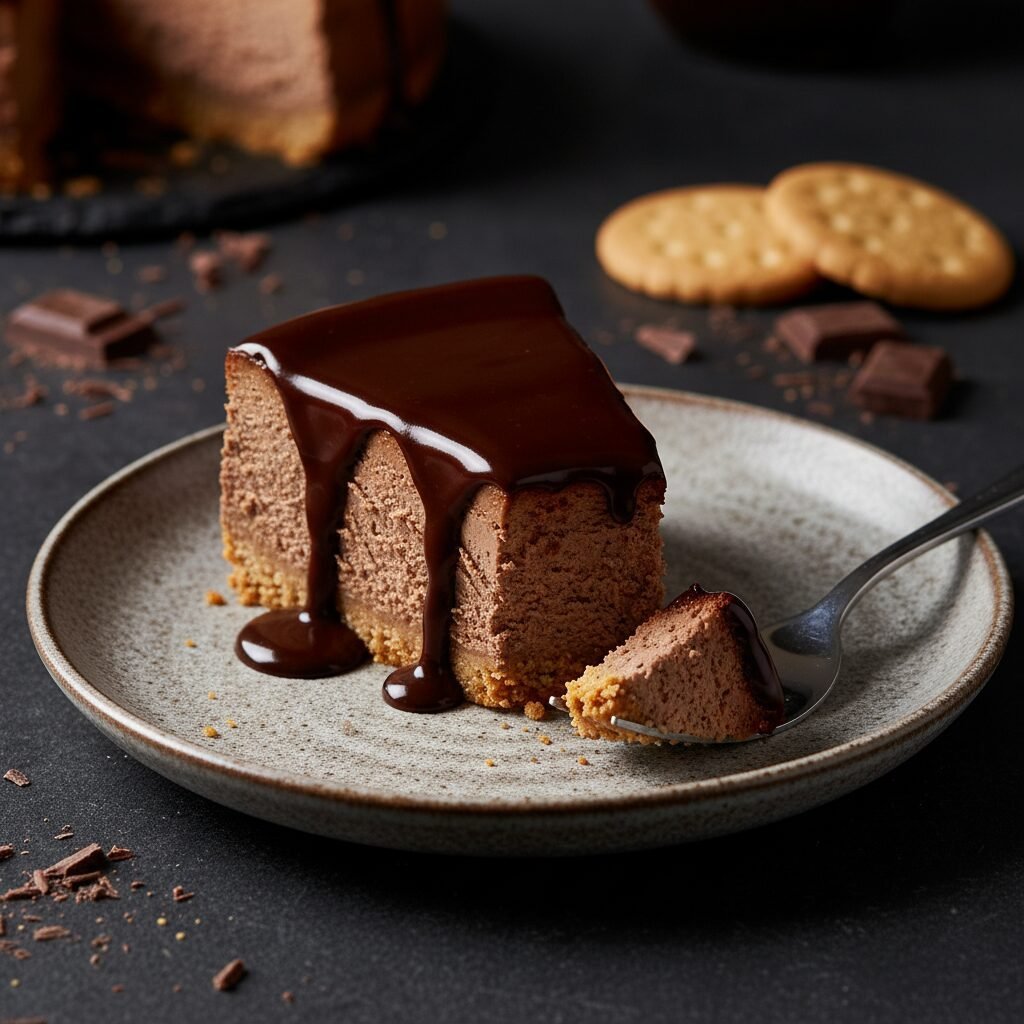
The crust component of this recipe also has a storied past. The Digestive biscuit was developed in 1839 by two Scottish doctors to aid digestion. However, it was Alexander Grant, working for McVitie’s in 1892, who perfected the recipe. Originally considered a health food due to the use of coarse brown wheat flour and baking soda, it became a staple in British tea culture. The marriage of the American cream cheese filling and the British Digestive biscuit crust represents a transatlantic culinary evolution, combining the best of New York richness with the rustic, savory crunch of Scottish baking tradition.
Why This Recipe Works
This recipe succeeds where many others fail due to three critical factors: temperature control, ingredient ratios, and the choice of crust. First, chocolate is a temperamental ingredient in cheesecakes; it acts as a solidifier. Many recipes result in a grainy or overly stiff texture because the chocolate seizes or the eggs overcook. By incorporating a warm water bath (bain-marie) during the baking process, we ensure gentle, even heat distribution. This prevents the edges from cooking faster than the center, which is the primary cause of surface cracks and rubbery textures.
Secondly, the ratio of cream cheese to heavy cream and sour cream is scientifically balanced. The sour cream adds a necessary tang that cuts through the density of the chocolate and fat, while the heavy cream lightens the batter just enough to prevent it from becoming a brick. We use melted chocolate mixed into the batter rather than just cocoa powder; cocoa powder can dry out the mixture, whereas melted chocolate contributes cocoa butter, adding to the luscious mouthfeel.
Finally, the Digestive biscuit crust works better here than graham crackers because Digestives are less sweet and have a higher fiber content. This slight savoriness provides a necessary counterpoint to the sweet, rich filling, preventing flavor fatigue. The coarser crumb absorbs the butter beautifully, creating a base that stays crunchy rather than turning soggy under the weight of the batter.
Why You’ll Love This Recipe
- ✓Uses Digestive biscuits for a superior, nutty, and crunchy base compared to graham crackers.
- ✓Incorporates a water bath method to guarantee a silky, crack-free surface.
- ✓Features a dual-chocolate approach with melted chocolate in the batter and a ganache topping.
- ✓Balanced sweetness with a hint of tang from sour cream.
- ✓Can be made ahead of time, as the flavor improves after 24 hours of chilling.
- ✓Includes detailed instructions for a professional-grade presentation.
Equipment You’ll Need
- ✓9-inch Springform Pan
- ✓Large Roasting Pan (for water bath)
- ✓Electric Stand Mixer or Hand Mixer
- ✓Food Processor (for biscuits)
- ✓Rubber Spatula
- ✓Heavy-bottomed Saucepan
- ✓Aluminum Foil (heavy duty)
- ✓Parchment Paper
Ingredients
- ✓250g Digestive biscuits (about 15-17 biscuits)
- ✓100g unsalted butter, melted
- ✓900g (4 blocks) full-fat cream cheese, room temperature
- ✓200g granulated sugar
- ✓30g cocoa powder, sifted
- ✓4 large eggs, room temperature
- ✓250g semi-sweet chocolate (60-70% cocoa), melted and slightly cooled
- ✓180ml sour cream, room temperature
- ✓1 tsp vanilla extract
- ✓1/4 tsp salt
- ✓150ml heavy cream (for ganache)
- ✓150g dark chocolate chips (for ganache)
Instructions
- 1. Preheat your oven to 325°F (163°C). Line the bottom of a 9-inch springform pan with parchment paper and grease the sides lightly with butter.
- 2. Prepare the crust: Place the Digestive biscuits in a food processor and pulse until they form fine crumbs. Pour in the melted butter and pulse again until the mixture resembles wet sand. Press this mixture firmly and evenly into the bottom of the prepared pan. Bake for 10 minutes, then remove and let cool completely.
- 3. Melt the chocolate: Chop the semi-sweet chocolate and melt it in a microwave-safe bowl in 30-second intervals, stirring in between, until smooth. Set aside to cool until it is lukewarm but still liquid.
- 4. Make the filling: In a large mixing bowl or stand mixer fitted with the paddle attachment, beat the room temperature cream cheese and sugar on medium-low speed until smooth and creamy (about 2-3 minutes). Do not overbeat to avoid incorporating too much air.
- 5. Add the sifted cocoa powder, sour cream, vanilla extract, and salt. Mix until combined, scraping down the sides of the bowl with a rubber spatula.
- 6. Add the eggs one at a time, mixing on low speed just until incorporated after each addition. Gently fold in the lukewarm melted chocolate until the batter is uniform in color.
- 7. Prepare the water bath: Wrap the outside of the springform pan securely with 2-3 layers of heavy-duty aluminum foil to prevent water from seeping in. Place the springform pan inside a large roasting pan.
- 8. Pour the batter over the cooled crust and smooth the top with a spatula. Pour boiling water into the roasting pan until it reaches halfway up the sides of the springform pan.
- 9. Bake for 60-70 minutes. The edges should be set, but the center should still have a slight wobble (like Jell-O) when the pan is gently shaken. Turn off the oven and crack the door open slightly. Let the cheesecake cool inside the oven for 1 hour.
- 10. Remove from the water bath and run a thin knife around the edge to loosen it from the pan. Let it cool completely on a wire rack, then refrigerate for at least 6 hours, preferably overnight.
- 11. Make the ganache: Heat the heavy cream in a small saucepan until it just begins to simmer. Pour it over the dark chocolate chips in a bowl. Let sit for 5 minutes, then whisk until smooth and glossy. Pour over the chilled cheesecake before serving.
Expert Cooking Tips
- ✓Room temperature ingredients are non-negotiable; cold cream cheese causes lumps.
- ✓Do not overmix the batter once the eggs are added; too much air leads to cracks.
- ✓Use heavy-duty foil or a silicone slow cooker liner around the pan to ensure no water leaks into the crust.
- ✓The ‘wobble’ test is key; if the center looks firm in the oven, it is already overbaked.
- ✓Cooling gradually in the turned-off oven helps the structure settle without thermal shock.
- ✓Use a hot knife (dipped in hot water and wiped dry) for clean slices.
- ✓High-quality chocolate makes a huge difference; avoid generic baking chips for the melting step.
Substitutions and Variations
If you cannot find Digestive biscuits, you can substitute them with an equal weight of graham crackers, though the flavor will be sweeter and the texture less crumbly. For a gluten-free version, use gluten-free digestive biscuits or gluten-free graham style crackers. You can replace the sour cream with full-fat Greek yogurt if necessary, though sour cream offers a richer texture. If you prefer a sweeter cheesecake, use milk chocolate instead of semi-sweet, but reduce the added sugar by 30g to maintain balance. For the eggs, there is no direct substitute that maintains the exact texture of a baked cheesecake, so this recipe is not suitable for egg-free diets without significant alteration to the chemistry.
Common Mistakes to Avoid
The most common mistake is overbeating the batter. Whipping too much air into the eggs causes the cheesecake to rise like a soufflé in the oven and then collapse, leading to unsightly surface cracks. Another frequent error is rushing the cooling process. Placing a hot cheesecake directly into the fridge will cause condensation to form on the surface, making it soggy, and the rapid temperature change will almost certainly cause cracking. Finally, failing to wrap the springform pan tightly enough for the water bath results in a soggy, unappetizing crust. Always use multiple layers of foil or a dedicated silicone pan protector.
Serving Suggestions
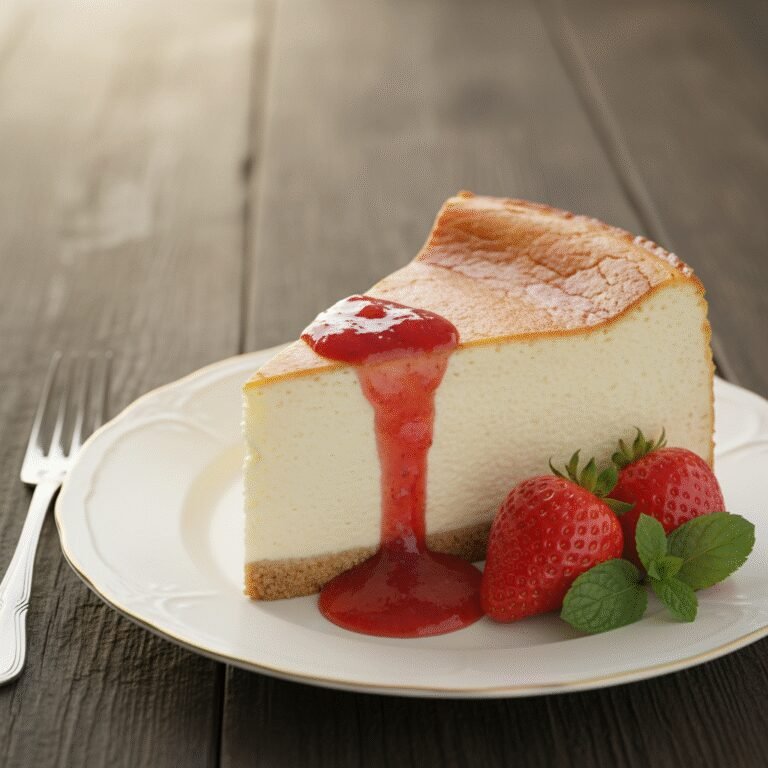
Serve this cheesecake chilled. A slice is rich enough to stand on its own, but it pairs beautifully with tart elements to cut through the chocolate. Fresh raspberries or strawberries are classic accompaniments. A dollop of unsweetened whipped cream or crème fraîche also works wonders. For a beverage pairing, serve with a strong espresso, a dark roast coffee, or a glass of ruby port wine. If you want to be extra decadent, drizzle salted caramel sauce over the ganache just before serving.
Storage and Reheating Tips
Store the cheesecake in the refrigerator, loosely covered with plastic wrap or in a cake carrier, for up to 5 days. The crust will soften slightly over time. For long-term storage, this cheesecake freezes exceptionally well. Slice the cake, wrap individual slices tightly in plastic wrap, and then a layer of aluminum foil. Place the wrapped slices in a freezer-safe bag. They can be frozen for up to 2 months. To eat, thaw a slice in the refrigerator overnight. Do not freeze with fresh fruit garnishes.
Nutrition Facts (Estimated)
| Serving Size | 1 slice |
| Calories | 580 |
| Fat | 42g |
| Saturated Fat | 24g |
| Unsaturated Fat | 16g |
| Trans Fat | 0.5g |
| Cholesterol | 145mg |
| Sodium | 320mg |
| Carbohydrates | 48g |
| Fiber | 3g |
| Sugar | 38g |
| Protein | 8g |
Frequently Asked Questions
Can I make this without a water bath?
Technically yes, but it is highly risky. Without the water bath, the texture will be denser, closer to a brownie, and the top will likely crack and sink. The water bath ensures the creamy, custard-like consistency.
Why did my cheesecake crack?
Cracks are usually caused by overmixing the batter (too much air), overbaking (drying it out), or cooling it too quickly (thermal shock). Follow the cooling instructions in the oven carefully.
What are Digestive biscuits?
Digestive biscuits are semi-sweet, whole-wheat biscuits popular in the UK. They have a crumbly texture and a malty flavor that pairs perfectly with chocolate.
Can I use low-fat cream cheese?
It is not recommended. Low-fat cream cheese has a higher water content and stabilizers that can prevent the cheesecake from setting properly, leading to a runny or rubbery texture.
How do I know when it is done?
Gently shake the pan. The outer 2 inches should look set and matte, while the center should jiggle slightly like gelatin. It will firm up as it cools.
Can I use a different size pan?
Yes, but baking times will vary. A 10-inch pan will yield a thinner cake and bake faster; an 8-inch pan will be thicker and take longer. Stick to 9-inch for best results with these measurements.
My ganache is too runny, what do I do?
If the ganache is too thin, let it sit at room temperature for 10-15 minutes to thicken up before pouring. If you overheated the cream, the chocolate might have separated; try whisking in a teaspoon of warm milk.
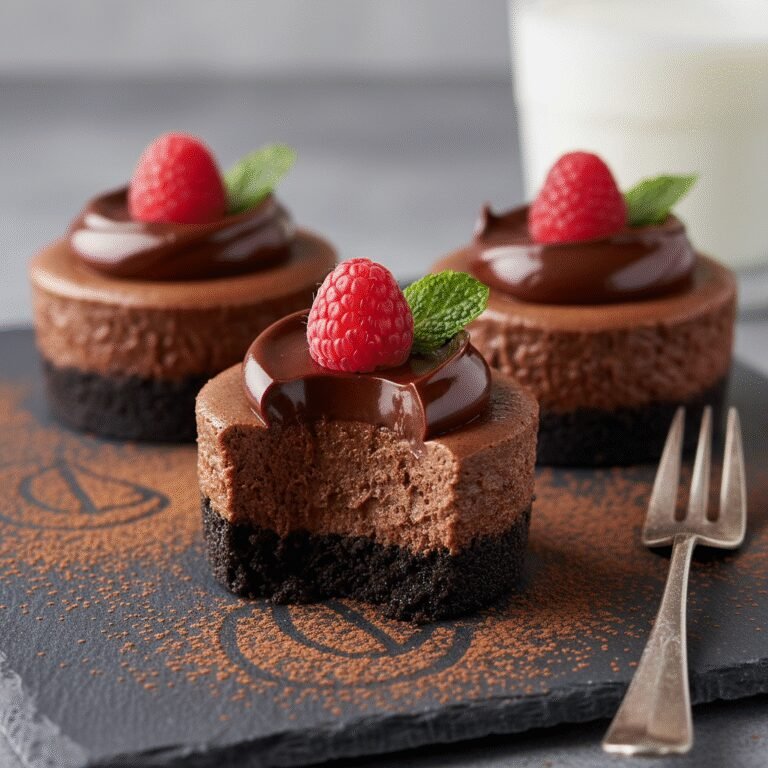
Can I make this recipe into mini cheesecakes?
Yes! You can bake these in a muffin tin with liners. Press crust into each liner, fill, and bake for significantly less time—usually 15-20 minutes.
Conclusion
Mastering this Creamy Chocolate Cheesecake with Digestive Biscuit Crust is a culinary achievement that pays off with every bite. The contrast between the nutty, wholesome crust and the luxurious, deep chocolate filling creates a dessert that is sophisticated yet universally comforting. While the process requires patience—particularly the cooling time—the result is a flawless, crack-free cheesecake that looks and tastes like it came from a high-end bakery. We hope this recipe becomes a staple in your home for celebrations, holidays, or those moments when only the best chocolate dessert will do. Happy baking!