The Ultimate Creamy Vanilla Cheesecake with Buttery Graham Cracker Crust
Creamy Vanilla Cheesecake With Graham Cracker Crust Recipe
Discover the secret to a flawlessly smooth, crack-free New York-style cheesecake right in your own kitchen. This recipe features a dense, velvety vanilla bean filling atop a thick, buttery graham cracker crust that is guaranteed to impress any crowd.
30 minutes
1 hour 15 minutes
8 hours 45 minutes (includes cooling and chilling)
12 servings
Dessert
Baking (Water Bath)
American
Vegetarian
There are few desserts in the culinary world that command as much respect and adoration as a perfectly executed vanilla cheesecake. It is the quintessential crowd-pleaser, a dessert that manages to be both sophisticated and deeply comforting all at once. For many home bakers, however, the cheesecake is a source of intimidation. Tales of cracked tops, sunken centers, and grainy textures often deter people from attempting this classic dish at home. But I am here to tell you that with the right technique and a bit of patience, you can produce a cheesecake that rivals—nay, exceeds—the quality of any high-end bakery or famous cheesecake chain.
This specific recipe is the culmination of years of testing. We aren’t looking for ‘good enough’ here; we are aiming for perfection. We want a texture that is dense yet creamy, rich but not cloying, and smooth as silk on the tongue. The flavor profile relies heavily on high-quality vanilla—preferably vanilla bean paste—to cut through the tang of the cream cheese and sour cream. The foundation of this masterpiece is, of course, the graham cracker crust. It needs to be substantial enough to support the heavy filling, buttery enough to hold together, and baked just right to provide that essential textural contrast to the soft cheese. Whether you are making this for a holiday dinner, a birthday celebration, or simply because you deserve a slice of heaven on a Tuesday, this guide will walk you through every single step to ensure your success. Get ready to master the water bath, conquer the cooling process, and serve the best dessert of your life.
History & Origins
The history of cheesecake is a fascinating journey that spans thousands of years, long before the cream cheese blocks we know today lined supermarket shelves. Believe it or not, the earliest iterations of cheesecake can be traced back to ancient Greece. Anthropologists have found cheese molds dating back to 2,000 B.C., and it is believed that a form of cheesecake was served to athletes during the first Olympic Games in 776 B.C. to provide them with energy. These early versions were simple mixtures of flour, wheat, honey, and soft cheese, baked into a cake.
When the Romans conquered Greece, they adopted the recipe, modifying it into a dish called ‘Libum,’ which was often used as an offering at temples. As the Roman Empire expanded, so did the concept of the cheesecake, spreading across Europe where each region began to put its own spin on the dish using local ingredients. However, the modern American cheesecake—specifically the New York style—has a much more recent origin story tied to the accidental invention of cream cheese. In 1872, a dairyman named William Lawrence from Chester, New York, was attempting to replicate the French cheese Neufchâtel. He accidentally added too much cream, resulting in a richer, spreadable cheese that eventually became the brand Philadelphia Cream Cheese.
The classic pairing with graham crackers also has American roots. The graham cracker was developed in the early 19th century by Sylvester Graham, a Presbyterian minister who advocated for a bland diet to suppress ‘carnal urges.’ Ironically, his health food creation was eventually crushed, mixed with butter and sugar, and used to form the base of one of the most indulgent desserts in history. By the 1900s, the New York-style cheesecake, dense and rich with cream cheese and eggs, had cemented its place as an iconic American dessert.
Why This Recipe Works
This recipe succeeds where others fail because it strictly adheres to the scientific principles of custard baking. Cheesecake is, at its core, a baked cheese custard. The primary structural components are the proteins found in the eggs and the cheese. When these proteins are heated, they coagulate and set the structure. If they are heated too quickly or too aggressively, the proteins tighten up rapidly, squeezing out moisture and causing the texture to become grainy or rubbery, and the surface to crack.
To prevent this, this recipe utilizes a water bath (bain-marie). The water acts as an insulator, ensuring that the temperature around the cake pan never exceeds 212°F (100°C), regardless of the oven temperature. This gentle, moist heat allows the eggs to cook slowly and evenly, resulting in that ultra-creamy, smooth texture. Furthermore, the ratio of ingredients is meticulously balanced. We use full-fat cream cheese and sour cream. The sour cream adds a crucial tang that breaks up the heaviness of the cheese, while also introducing extra fat and acidity which tenderizes the protein network. Finally, the ‘cool down’ method—leaving the cake in the turned-off oven—is vital. A sudden drop in temperature causes the cheesecake to contract rapidly, leading to cracks. By letting it cool gradually, the structure settles perfectly flat and smooth.
Why You’ll Love This Recipe
- ✓Velvety smooth, crack-free texture guaranteed by the water bath method.
- ✓Rich vanilla flavor enhanced by sour cream for a classic tang.
- ✓Thick, buttery graham cracker crust that stays crisp.
- ✓Can be made 1-2 days in advance for stress-free entertaining.
- ✓Freezes beautifully for long-term storage.
Equipment You’ll Need
- ✓9-inch Springform Pan
- ✓Large Roasting Pan (for water bath)
- ✓Electric Stand Mixer or Hand Mixer
- ✓Rubber Spatula
- ✓Parchment Paper
- ✓Aluminum Foil (heavy duty)
- ✓Measuring Cups and Spoons
Ingredients
- ✓2 cups graham cracker crumbs (about 14 full sheets)
- ✓1/2 cup unsalted butter, melted
- ✓1/4 cup granulated sugar (for crust)
- ✓1 pinch salt
- ✓32 oz (4 blocks) full-fat cream cheese, softened to room temperature
- ✓1 1/4 cups granulated sugar (for filling)
- ✓1 cup full-fat sour cream, room temperature
- ✓2 tsp vanilla bean paste or high-quality vanilla extract
- ✓4 large eggs, room temperature
- ✓2 tbsp all-purpose flour or cornstarch
Instructions
- Preheat your oven to 350°F (175°C). Line the bottom of a 9-inch springform pan with parchment paper and grease the sides lightly with butter.
- In a medium bowl, combine the graham cracker crumbs, melted butter, 1/4 cup sugar, and a pinch of salt. Mix until the texture resembles wet sand.
- Press the crumb mixture firmly into the bottom and slightly up the sides of the prepared springform pan. You can use the bottom of a measuring cup to pack it down tightly. Bake for 10 minutes, then set aside to cool. Reduce oven temperature to 325°F (163°C).
- In the bowl of a stand mixer fitted with the paddle attachment, beat the softened cream cheese and 1 1/4 cups sugar on medium-low speed until completely smooth and creamy (about 2-3 minutes). Scrape down the sides and bottom of the bowl to ensure no lumps remain.
- Add the sour cream, vanilla bean paste, and flour. Mix on low speed until combined. Do not overmix.
- Add the eggs one at a time, mixing on low speed just until the yellow disappears after each addition. It is crucial not to overbeat the eggs, as incorporating too much air will cause the cheesecake to puff up and then crack.
- Prepare the pan for the water bath. Wrap the outside of the springform pan in 2-3 layers of heavy-duty aluminum foil to ensure no water seeps in. Alternatively, place the springform pan inside a slightly larger cake pan, and then place that setup into the roasting pan.
- Pour the cheesecake batter over the cooled crust. Tap the pan gently on the counter a few times to release any trapped air bubbles.
- Place the foil-wrapped pan into a large roasting pan. Pour boiling water into the roasting pan until it reaches halfway up the sides of the springform pan.
- Bake at 325°F (163°C) for 60-75 minutes. The cheesecake is done when the edges are set but the center still jiggles slightly like Jell-O.
- Turn off the oven and crack the oven door open about an inch (use a wooden spoon to hold it if necessary). Let the cheesecake cool in the oven for 1 hour. This slow cooling prevents cracks.
- Remove the cheesecake from the water bath and run a thin knife around the edge to loosen it from the pan. Let it cool completely to room temperature on a wire rack.
- Cover loosely with plastic wrap and refrigerate for at least 6 hours, preferably overnight, to set completely before slicing.
Expert Cooking Tips
- ✓Room temperature ingredients are non-negotiable. Cold cream cheese causes lumps, and cold eggs don’t emulsify properly.
- ✓Do not skip the water bath. It regulates the heat and keeps the air moist, which is essential for that creamy texture.
- ✓Avoid overmixing the batter once the eggs are added. Too much air leads to rising and falling, which causes cracks.
- ✓Use a flat-bottomed glass or measuring cup to press the crust down evenly and firmly.
- ✓Scrape the bowl constantly during mixing to ensure all cream cheese is incorporated and smooth.
Substitutions and Variations
If you are gluten-free, simply swap the graham crackers for gluten-free graham style crackers or gluten-free vanilla sandwich cookies, and swap the flour in the filling for cornstarch (which is naturally gluten-free). If you cannot find sour cream, full-fat Greek yogurt is a decent substitute, though it will add a slightly tangier flavor. Heavy cream can also be used for a milder flavor, but the texture may be slightly less dense. For the crust, you can use digestive biscuits (common in the UK) or vanilla wafers instead of graham crackers. While vanilla bean paste provides the best visual appeal and flavor, a high-quality pure vanilla extract is a perfectly acceptable substitute.
Common Mistakes to Avoid
The most common mistake is using cold ingredients, which results in a lumpy batter. Another major error is opening the oven door during baking; the draft can cause the cheesecake to sink or crack. Overbaking is also a frequent issue; remember that the center should still be wobbly when you turn the oven off—it will firm up as it cools. Lastly, rushing the cooling process by putting a warm cheesecake directly into the fridge will almost certainly cause condensation to form on top and the surface to crack due to thermal shock.
Serving Suggestions
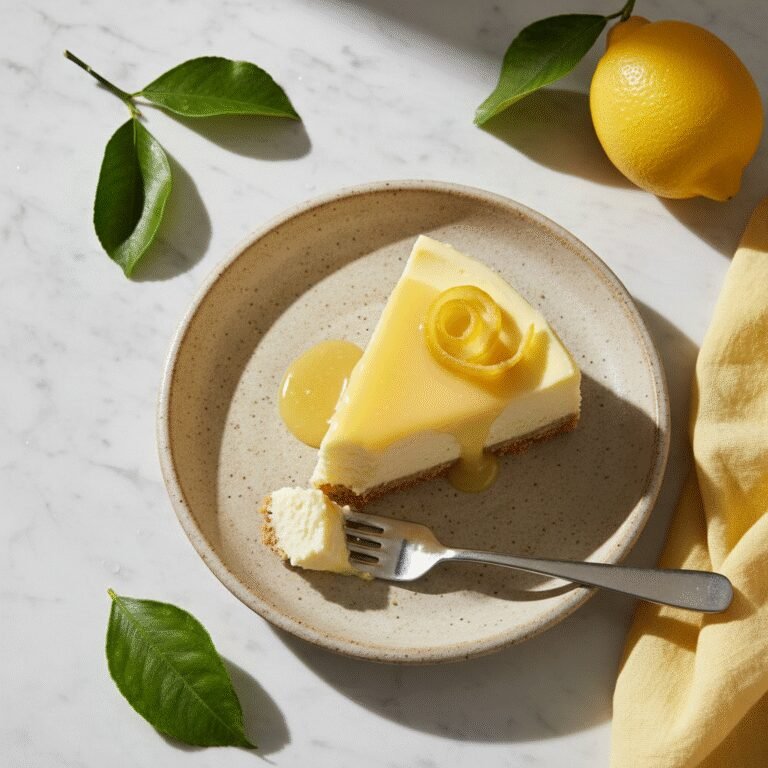
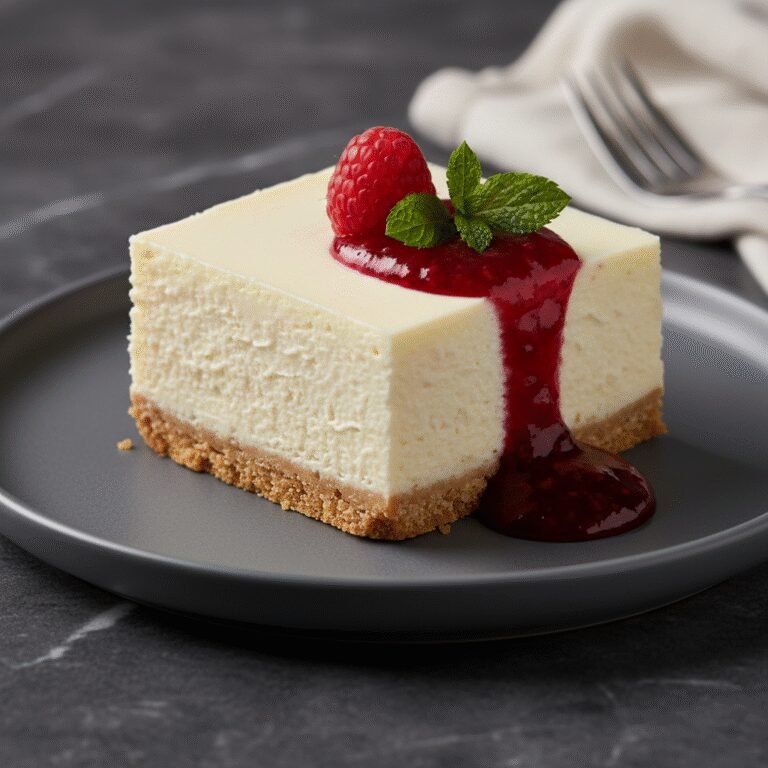
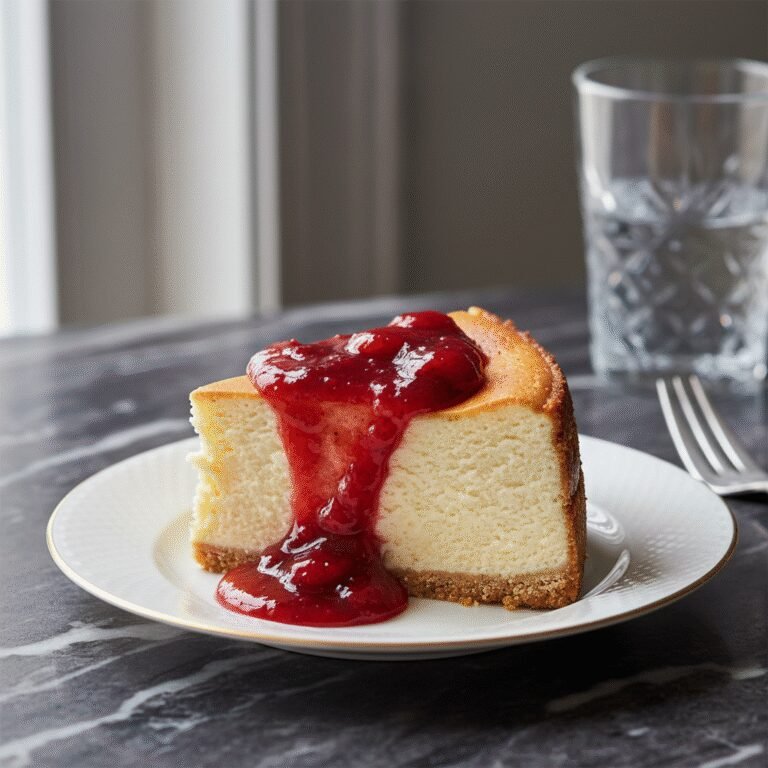
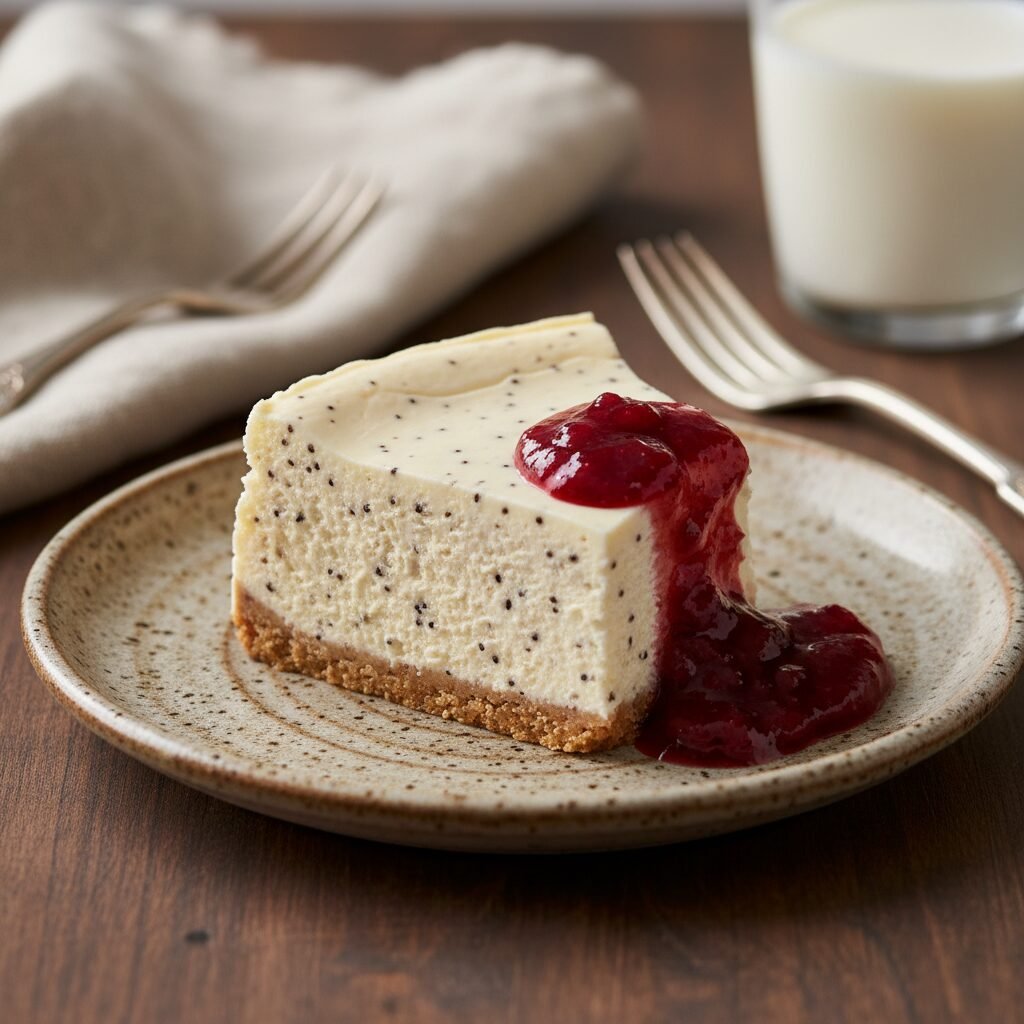
This cheesecake is a blank canvas. Serve it with a fresh berry compote (simmer strawberries or raspberries with a little sugar and lemon juice), a drizzle of salted caramel sauce, or a dollop of freshly whipped cream. For a sophisticated touch, garnish with lemon zest and mint leaves. To get clean slices, dip a sharp knife in hot water and wipe it dry between each cut.
Storage and Reheating Tips
Store the cheesecake in the refrigerator, loosely covered with plastic wrap or in an airtight cake carrier, for up to 5 days. For longer storage, this cheesecake freezes exceptionally well. Wrap individual slices or the whole cooled cake in plastic wrap, followed by a layer of aluminum foil. Freeze for up to 2 months. Thaw in the refrigerator overnight before serving.
Nutrition Facts (Estimated)
| Serving Size | 1 slice |
| Calories | 560 |
| Fat | 42g |
| Saturated Fat | 24g |
| Unsaturated Fat | 14g |
| Trans Fat | 1g |
| Cholesterol | 165mg |
| Sodium | 340mg |
| Carbohydrates | 40g |
| Fiber | 1g |
| Sugar | 32g |
| Protein | 9g |
Frequently Asked Questions
Do I really need to use a water bath?
Yes, absolutely. While it is possible to bake without one, the water bath ensures gentle, even heat which prevents the edges from overcooking before the center is done, and significantly reduces the risk of cracks.
Why did my cheesecake crack?
Cracks are usually caused by overmixing the batter (incorporating too much air), overbaking (drying it out), or cooling it too quickly (thermal shock).
How do I know when it is done?
The ‘jiggle test’ is best. Gently shake the pan. The outer 2-3 inches should look set and firm, but the center should still wobble slightly, similar to set gelatin.
Can I use low-fat cream cheese?
It is not recommended. Low-fat cream cheese has more water and stabilizers, which can negatively affect the texture and setting ability of the cheesecake. Go for full-fat for the best results.
How do I prevent water from leaking into the springform pan?
Use extra-wide heavy-duty foil and wrap the pan in multiple directions. Alternatively, place the springform pan inside a slightly larger solid cake pan, and place that in the water bath.
Can I make this recipe ahead of time?
Yes, cheesecake actually tastes better the next day after the flavors have melded. It is the perfect make-ahead dessert.
Why do ingredients need to be room temperature?
Room temperature cream cheese blends smoothly without lumps. Room temperature eggs emulsify easier, meaning you don’t have to mix as much, preventing air bubbles.
Can I freeze the cheesecake?
Yes! Wrap it tightly in plastic wrap and foil. It freezes well for up to 2 months. Thaw in the fridge overnight.
Why do I need flour or cornstarch in the batter?
A small amount of starch helps to bind the custard and prevent the eggs from curdling (scrambling) if the heat gets a little too high. It adds insurance for a smooth texture.
How do I get clean slices?
Run a sharp chef’s knife under hot water, wipe it dry, make a cut, and repeat the process for every single slice.
Conclusion
Mastering the art of the perfect vanilla cheesecake is a milestone for any home baker. While the process requires time and attention to detail, the result is a dessert that is truly spectacular. The contrast between the crisp, buttery graham cracker crust and the rich, creamy filling is a timeless combination that never goes out of style. Whether you top it with fruit, chocolate, or enjoy it plain, this cheesecake is sure to become a requested favorite in your household. Don’t rush the process, trust the water bath, and enjoy every decadent bite.