The Ultimate Tall Unicorn Birthday Cake: A Magical 4-Layer Recipe
Tall Unicorn Birthday Cake Four Layer Cake Recipe
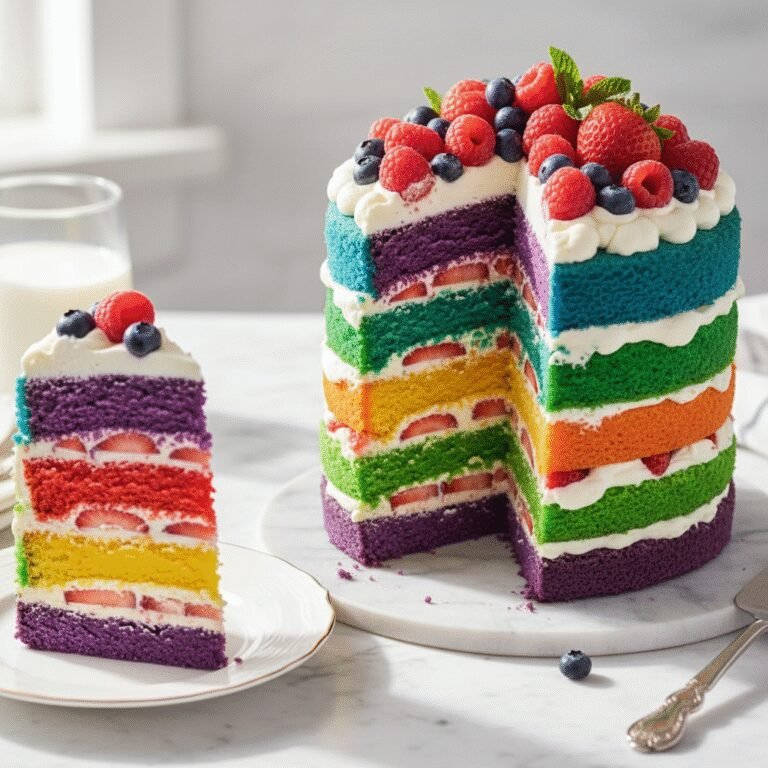
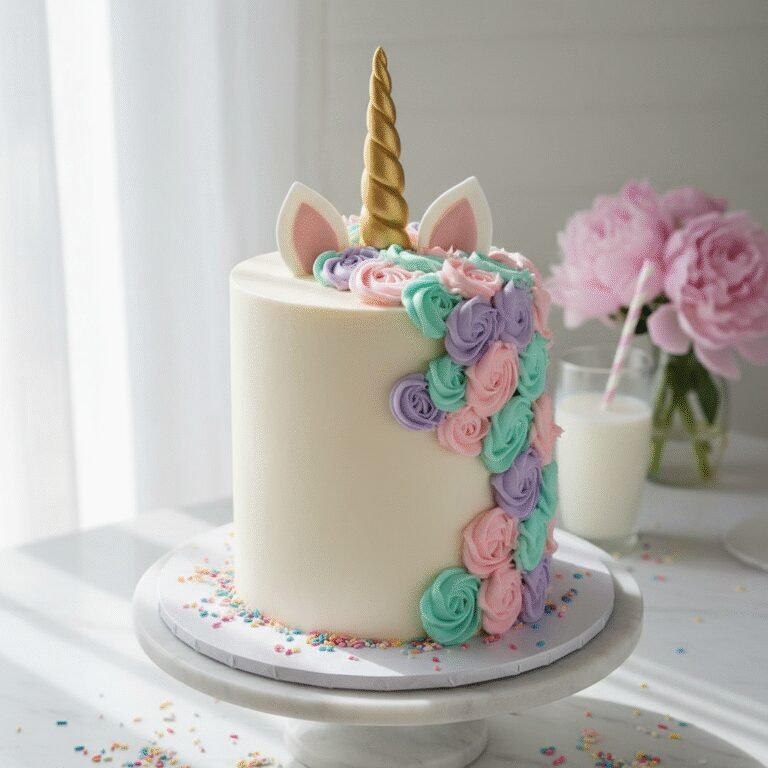
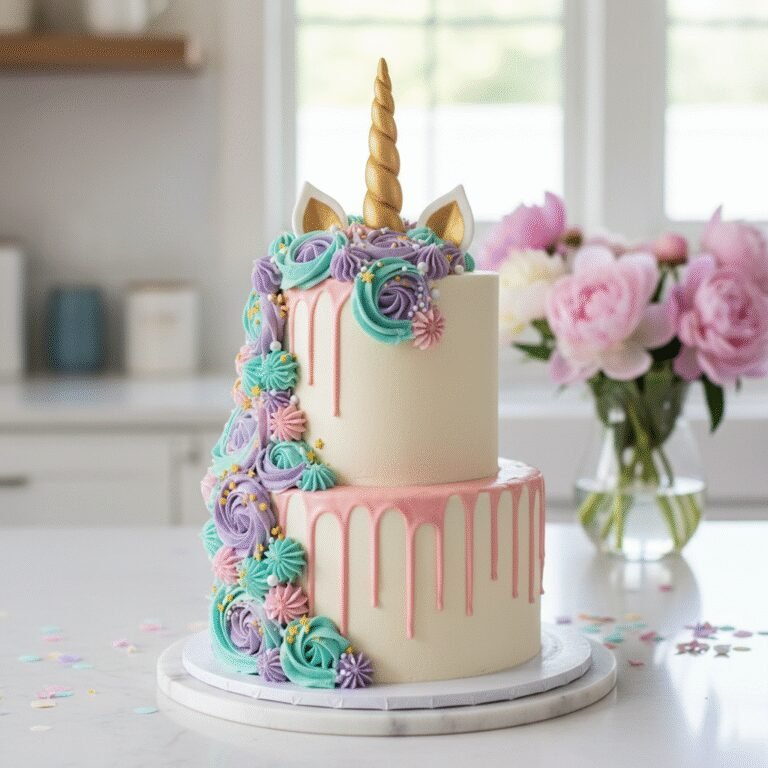
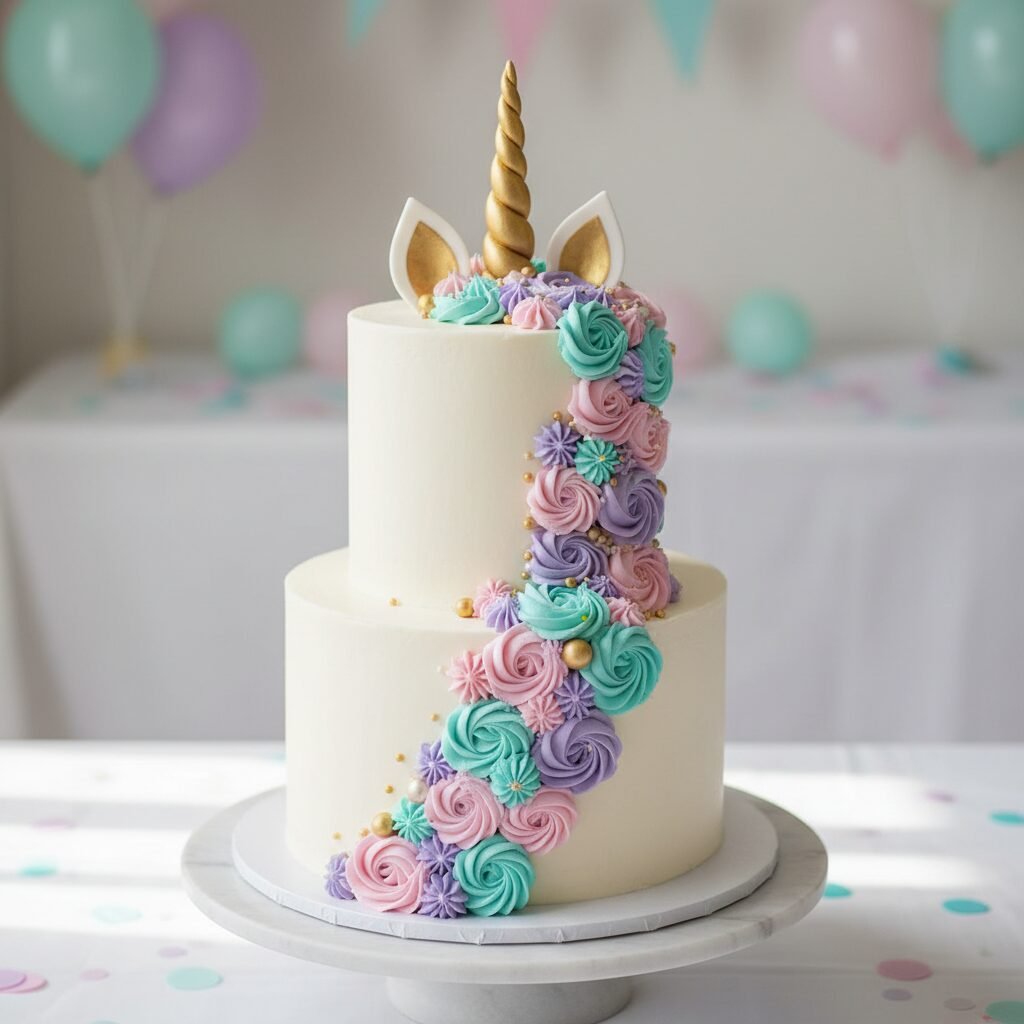
Make dreams come true with this stunning Tall Unicorn Birthday Cake! Featuring four fluffy layers of vanilla bean cake, a silky pastel buttercream mane, and a shimmering gold horn, this showstopper is the perfect centerpiece for any magical celebration. It is surprisingly easy to assemble and guaranteed to wow your guests.
1 hour 30 minutes
35 minutes
4 hours (includes cooling and decorating)
16-20 servings
Dessert
Baking
American
Vegetarian
There is something undeniably enchanting about a unicorn cake. It is not just a dessert; it is a statement piece, a work of edible art that instantly transforms a standard birthday party into a magical event. This Tall Unicorn Birthday Cake is designed to be the ultimate showstopper. We are talking about four towering layers of tender, melt-in-your-mouth white velvet cake, stacked high and wrapped in a smooth coat of vanilla buttercream. But the real magic happens with the decoration: a cascading mane of pastel swirls in pinks, purples, and teals, topped with a hand-painted gold fondant horn and ears.
While it looks professionally made, this recipe is crafted specifically for the home baker. The cake base uses a reverse-creaming method variation to ensure a sturdy yet plush crumb that can support the weight of four layers and ample frosting without becoming dense. We use clear vanilla extract and egg whites to keep the cake interior brilliantly white, allowing you to tint the batter with funfetti or rainbow swirls if you desire. The buttercream is a crusting American buttercream, which is essential for piping the intricate rosettes and stars that make up the unicorn’s mane. It holds its shape perfectly at room temperature, ensuring your unicorn doesn’t melt before the candles are blown out. Whether you are baking for a child’s birthday, a whimsical baby shower, or just because you need a little more magic in your life, this comprehensive guide will walk you through every step of the process, from baking flat layers to mastering the piping bag.
History & Origins
The concept of the birthday cake dates back centuries, with roots in the German ‘Kinderfest’ of the 15th century, but the modern iteration of the ‘Unicorn Cake’ is a strictly 21st-century phenomenon. The trend exploded onto the culinary scene around 2016, coinciding with a massive cultural shift toward ‘millennial pink,’ pastel aesthetics, and nostalgic, whimsical imagery on social media platforms like Pinterest and Instagram. The specific design featuring ‘sleepy eyes’ (usually drawn with black fondant or edible marker), a central gold horn, and a piped buttercream mane is largely attributed to cake designers like Jenna Rae Cakes and various independent bakery innovators who began sharing their creations online. This design solved a complex problem: how to make a character cake that looks elegant rather than cartoonish.
Before this trend, unicorn cakes were often literal interpretations of the animal’s body, which could be difficult to execute without professional sculpting skills. The ‘head-only’ cylinder design revolutionized home baking because it utilized standard round cake pans and basic piping techniques to create something recognizable and iconic. It represents a shift in food culture where visual impact and ‘shareability’ became just as important as flavor. The ‘Unicorn Food’ craze of 2017, fueled by viral beverages and rainbow bagels, cemented this cake style as a modern classic. Today, it remains one of the most requested birthday themes, symbolizing joy, creativity, and a touch of fantasy in the modern kitchen.
Why This Recipe Works
This recipe succeeds where others fail because it prioritizes structural integrity without sacrificing texture. Tall cakes, specifically those with four layers, face the challenge of stability; a cake that is too soft will collapse under its own weight, while a cake that is too dense feels like eating bread. We solve this by using a high-ratio cake recipe where the sugar equals or exceeds the flour weight, and the liquid weight equals or exceeds the sugar. This creates a tight, fine crumb that is moist but sturdy.
Furthermore, we utilize egg whites instead of whole eggs. This does two things: it keeps the cake distinctively white (a perfect canvas for the unicorn theme) and it strengthens the protein structure without the added fat from yolks, which can sometimes make tall stacks slippery. For the frosting, we opt for a high-fat American Buttercream with a touch of heavy cream. Unlike Swiss or Italian meringues, which can be temperature sensitive and slippery, American buttercream forms a slight crust. This is crucial for the ‘mane’ decoration, as it ensures the piped rosettes hold their sharp edges and do not droop over time. The inclusion of a ‘crumb coat’ step in the instructions is non-negotiable here; it locks in loose crumbs and provides a cement-like foundation for the final decorations, ensuring a flawless, professional finish.
Why You’ll Love This Recipe
- ✓Four impressive layers create a dramatic height.
- ✓Sturdy ‘white velvet’ crumb perfect for stacking.
- ✓Detailed piping guide for the iconic unicorn mane.
- ✓Uses common ingredients found in standard grocery stores.
- ✓Customizable color palette to match any party theme.
- ✓Includes tips for making a food-safe gold horn.
Equipment You’ll Need
- ✓Four 6-inch round cake pans
- ✓Stand mixer with paddle attachment
- ✓Turntable (lazy Susan)
- ✓Offset spatula
- ✓Bench scraper
- ✓Piping bags
- ✓Piping tips (1M, 2D, 4B)
- ✓Gel food coloring (Pink, Purple, Teal)
- ✓Cardboard cake rounds
- ✓Kitchen scale
Ingredients
- ✓3 cups (345g) cake flour, sifted
- ✓1 tbsp baking powder
- ✓1/2 tsp salt
- ✓1 cup (226g) unsalted butter, room temperature
- ✓2 cups (400g) granulated sugar
- ✓5 large egg whites, room temperature
- ✓1 tbsp clear vanilla extract
- ✓1 cup (240ml) whole milk, room temperature
- ✓For the Buttercream: 2 cups (452g) unsalted butter
- ✓7-8 cups (900g) powdered sugar
- ✓1/4 cup heavy cream
- ✓1 tbsp vanilla extract
- ✓Pinch of salt
- ✓For Decor: White fondant, Gold luster dust, Vodka or lemon extract (for painting), Black fondant (for eyes), Sprinkles
Instructions
- Preheat oven to 350°F (175°C). Grease four 6-inch cake pans, line bottoms with parchment paper, and grease the paper.
- In a medium bowl, whisk together cake flour, baking powder, and salt. Set aside.
- In the bowl of a stand mixer fitted with the paddle attachment, beat the butter and sugar on medium-high speed until pale and fluffy (about 3-4 minutes).
- Add egg whites one at a time, mixing well after each addition. Scrape down the sides of the bowl. Stir in the clear vanilla extract.
- Reduce mixer speed to low. Add the flour mixture in three parts, alternating with the milk, starting and ending with flour. Mix only until just combined to avoid a dense cake.
- Divide the batter evenly among the four prepared pans. Bake for 30-35 minutes, or until a toothpick inserted into the center comes out clean.
- Allow cakes to cool in pans for 10 minutes, then turn out onto a wire rack to cool completely. Once cool, level the tops with a serrated knife.
- While cakes cool, prepare the horn. Roll a snake of fondant, taper the ends, and twist it around a skewer. Let it dry hard. Mix gold luster dust with a drop of vodka and paint the horn and two fondant ears. Let dry.
- Make the buttercream: Beat butter until creamy. Gradually add powdered sugar, cream, vanilla, and salt. Whip on high for 5 minutes until white and fluffy.
- Assembly: Place a dab of frosting on a cake board. Place the first cake layer down. Top with 1/2 cup frosting and smooth. Repeat with remaining layers.
- Apply a thin crumb coat of frosting over the entire cake. Chill for 20 minutes.
- Apply a thick final coat of white frosting and smooth with a bench scraper. Chill again.
- Divide remaining frosting into 3 bowls. Tint pink, purple, and teal. Fill piping bags fitted with various star tips (1M, 2D, etc.).
- Insert the horn and ears into the top of the cake. Pipe rosettes and swirls starting from the top and cascading down one side to create the mane. Add sprinkles for texture.
- Roll thin ropes of black fondant to create the sleepy eyes and gently press them onto the front of the cake.
Expert Cooking Tips
- ✓Use ‘clear’ vanilla extract in the cake batter if you want the layers to be stark white rather than off-white.
- ✓Chill your cake layers in the freezer for 20 minutes before stacking; this makes them firmer and easier to handle.
- ✓Weigh your batter when dividing into pans to ensure perfectly even layers.
- ✓If your buttercream gets too soft while piping, pop the piping bag in the fridge for 5-10 minutes.
- ✓Insert a bubble tea straw or wooden dowel down the center of the cake if you plan to transport it, to prevent sliding.
Substitutions and Variations
If you cannot find cake flour, you can make a substitute by removing 2 tablespoons of all-purpose flour from every cup and replacing it with cornstarch, sifting several times. For a dairy-free version, substitute the butter with high-quality vegetable shortening or vegan butter sticks (ensure they are firm at room temperature) and use almond or soy milk in the batter. If you do not have fondant for the horn, you can use a sugar cone turned upside down and covered in buttercream or gold spray. For the egg whites, you can use pasteurized carton egg whites (approx. 3/4 cup). The vanilla extract can be swapped for almond extract or coconut extract for a different flavor profile suitable for tropical themes.
Common Mistakes to Avoid
The most common mistake is not leveling the cakes properly. If the layers are domed, the cake will be unstable and likely to lean or topple (the ‘Leaning Tower of Pisa’ effect). Always use a serrated knife to cut the tops completely flat. Another mistake is rushing the cooling process. If you frost a warm cake, the butter in the frosting will melt, causing the layers to slide and the decoration to droop. Ensure the cake is cool to the touch. Finally, over-mixing the batter after adding the flour will develop gluten and result in a tough, chewy cake instead of a tender one; mix on low speed and stop as soon as the flour streaks disappear.
Serving Suggestions
This tall cake is best served by cutting it into a grid pattern rather than traditional wedges, which allows for more manageable portions and maximizes the yield. Serve each slice with a scoop of rainbow sherbet or vanilla bean ice cream to complement the buttery cake. A side of fresh berries can cut through the sweetness of the buttercream. For a party setting, pair it with ‘unicorn water’ (sparkling water with a drop of blue food coloring and cotton candy garnish).
Storage and Reheating Tips
Store the fully decorated cake in a cake box in the refrigerator for up to 3 days. The buttercream acts as a seal, keeping the inside moist. Bring the cake to room temperature for at least 2-3 hours before serving, as cold butter cake can taste dry and hard. Leftover slices can be wrapped tightly in plastic wrap and then foil, and frozen for up to 2 months. To thaw, place the wrapped slices in the fridge overnight.
Nutrition Facts (Estimated)
| Serving Size | 1 slice |
| Calories | 650 |
| Fat | 30g |
| Saturated Fat | 18g |
| Unsaturated Fat | 10g |
| Trans Fat | 0g |
| Cholesterol | 85mg |
| Sodium | 320mg |
| Carbohydrates | 88g |
| Fiber | 1g |
| Sugar | 55g |
| Protein | 6g |
Frequently Asked Questions
Can I make the cake layers ahead of time?
Yes! You can bake the layers up to 3 days in advance. Wrap them tightly in plastic wrap and store them in the fridge. Alternatively, freeze them for up to a month.
How do I get the frosting so smooth?
The secret is a hot metal bench scraper. Run your metal scraper under hot water, dry it off, and then smooth the cake. The heat slightly melts the outer layer of butter, creating a glass-like finish.
Do I need dowels for this cake?
For a 4-layer 6-inch cake, dowels are recommended but not strictly necessary if you are not traveling far. However, a central dowel adds peace of mind.
My buttercream is full of air bubbles, how do I fix it?
Use a paddle attachment instead of a whisk for the final few minutes of mixing, and run the mixer on the lowest speed to push air out.
Can I use a different size pan?
Yes, this recipe makes enough batter for three 8-inch pans or two 9-inch pans, though the baking time will need to be adjusted slightly (usually increased by 5-10 minutes).
How do I make the gold paint?
Mix edible gold luster dust (found in craft stores) with a few drops of high-proof alcohol like vodka or lemon extract. The alcohol evaporates, leaving just the gold sheen.
Why did my cake sink in the middle?
This usually happens if the oven door was opened too early during baking or if the baking powder was expired. Check your leavening agents before starting.
Can I use liquid food coloring?
It is better to use gel food coloring. Liquid coloring adds too much moisture to the batter and frosting, which can affect stability and consistency.
How do I transport this tall cake?
Use a tall cake box. Place the cake box on the floor of the car (the flattest surface), not on a seat. Ensure the car is cool with AC running.
Is the fondant horn edible?
Yes, fondant is edible, but it dries very hard. Most people choose to remove the horn and ears before slicing and serving the cake.
Conclusion
Creating this Tall Unicorn Birthday Cake is a labor of love that pays off tenfold when you see the delight on everyone’s faces. It combines the nostalgia of a classic vanilla birthday cake with the artistic flair of modern baking trends. Don’t be intimidated by the height or the decorations; take it one step at a time, and remember that even imperfect swirls taste delicious. Whether you are a seasoned baker or trying your first tiered cake, this recipe guides you to a magical result. So grab your sprinkles, whip up that buttercream, and get ready to bake a little bit of magic!