Sky-High Rainbow Layer Cake With Fresh Berries And Cloud Cream
Tall Rainbow Layer Cake With Fresh Berries And Cream Recipe
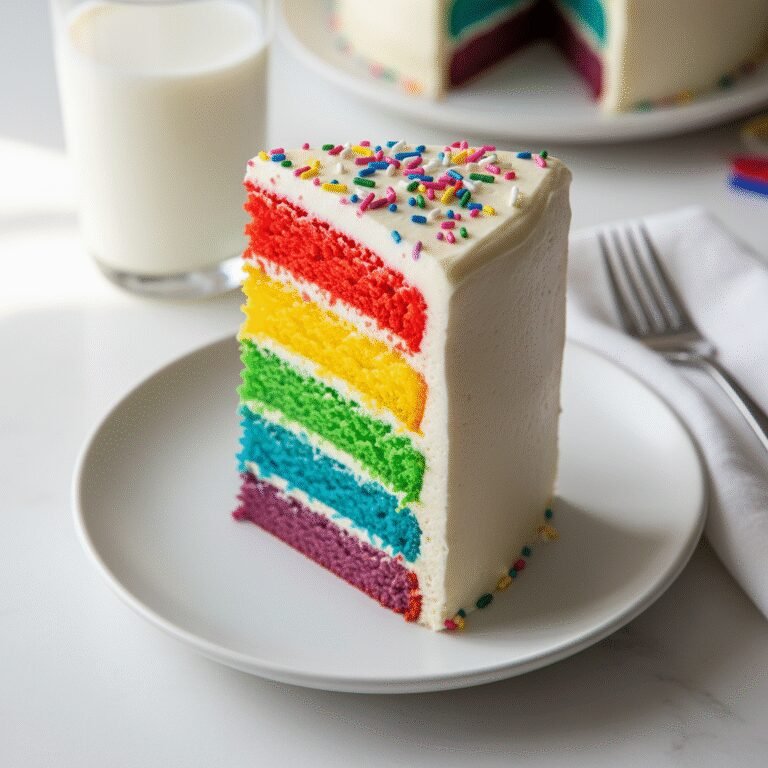
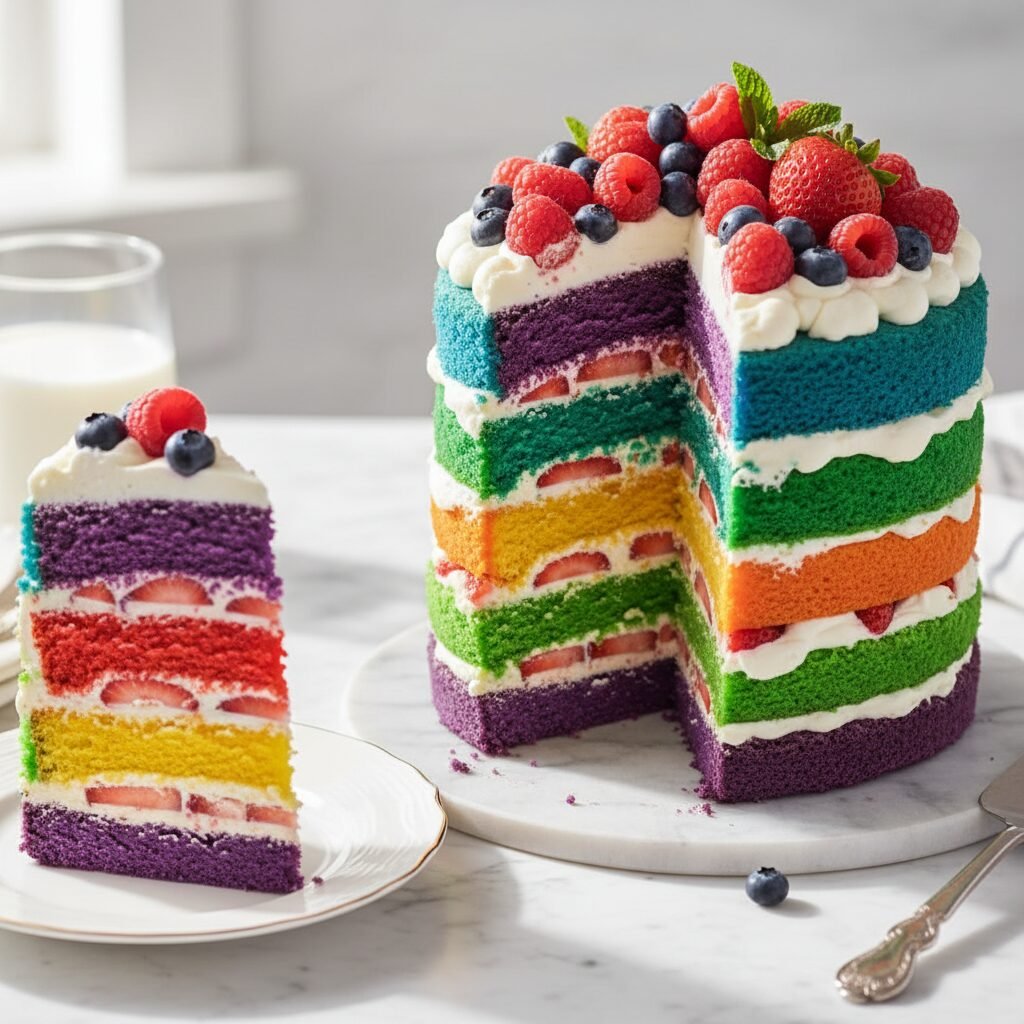
Get ready to slice into pure joy with this show-stopping Tall Rainbow Layer Cake! Featuring six vibrant, tender layers of vanilla bean sponge sandwiched between fluffy stabilized whipped cream and juicy fresh berries, this dessert is the ultimate celebration centerpiece that tastes as magical as it looks.
1 hour 30 minutes
45 minutes
3 hours (includes cooling)
12-16 servings
Dessert
Baking
American
Vegetarian
There is something undeniably magical about cutting into a cake and revealing a hidden spectrum of colors. This Tall Rainbow Layer Cake with Fresh Berries and Cream is more than just a dessert; it is an experience, a conversation starter, and a slice of edible happiness. While many rainbow cakes rely on heavy, sugary American buttercream that can often overpower the delicate crumb of the sponge, this recipe takes a lighter, more sophisticated approach. We use a cloud-like, stabilized Chantilly cream (whipped cream) and layers of tart, fresh berries—strawberries, blueberries, raspberries, and blackberries—to cut through the sweetness of the cake layers.
The result is a dessert that feels surprisingly light on the palate despite its impressive stature. The cake base itself is a modified white velvet cake, utilizing egg whites and sour cream to ensure a pale, neutral canvas that allows the gel food coloring to pop with neon vibrancy while maintaining a moist, tender crumb. This recipe is designed for the home baker who wants to achieve bakery-level aesthetics without needing a degree in pastry arts. Whether you are celebrating a birthday, Pride month, or simply the joy of a Tuesday afternoon, this cake promises to deliver smiles. We will walk you through the architecture of building a tall cake, the secrets to keeping your whipped cream firm for days, and how to achieve those perfectly even, vivid layers that look like they were painted by an artist. Prepare your stand mixer and your camera, because this cake is ready for its close-up.
History & Origins
The concept of the multi-layered cake has roots stretching back to the mid-19th century in Europe, where advancements in milling and leavening agents allowed for lighter sponges that could be stacked. However, the specific phenomenon of the ‘Rainbow Cake’ is a relatively modern culinary trend that intertwines with the history of food coloring and internet virality.
While colored cakes existed in the psychedelic era of the 1960s and 70s, often using natural dyes or early artificial colorings to create marble effects, the distinct, horizontal six-layer rainbow cake we know today exploded in popularity around 2009-2010. It is widely attributed to the food blogging community, specifically a viral post by a blogger named Kaitlin Flannery (Whisk Kid), which was later featured on the Martha Stewart Show. This moment marked a shift in home baking, moving from traditional flavor-focused profiles to high-visual-impact baking designed for the digital age and social media sharing.
Culturally, the rainbow cake has also been embraced as a symbol of diversity and inclusion, particularly within the LGBTQ+ community, often served during Pride celebrations to mirror the Pride flag. Beyond its symbolism, the evolution of this cake represents the democratization of professional baking techniques; what was once the domain of high-end patisseries—creating six uniform, level, and distinctly colored layers—became a fun, achievable challenge for home cooks. This recipe honors that modern tradition while harkening back to the classic Victorian pairing of sponge, cream, and fruit, bridging the gap between viral aesthetics and timeless flavor.
Why This Recipe Works
This recipe succeeds where many other rainbow cakes fail due to three critical technical components: the batter formulation, the coloring agent, and the frosting stability. First, the batter is a ‘reverse creaming’ or ‘high-ratio’ style white cake. By coating the flour particles with fat (butter) before adding the liquids, we inhibit gluten formation. This results in a plush, velvety crumb that stays flat while baking, minimizing the need for leveling and reducing waste. We use egg whites instead of whole eggs to avoid the yellow yolk tint, ensuring the colors remain true and vibrant rather than muddy.
Secondly, we strictly use concentrated gel food coloring rather than liquid drops. Liquid food coloring adds excess water to the batter, which can alter the chemistry, leading to a dense or rubbery texture. Gel paste provides intense saturation without changing the liquid ratio.
Finally, the structural integrity of a tall cake usually demands a stiff buttercream, but we want the lightness of whipped cream. This recipe uses a ‘stabilized’ whipped cream fortified with mascarpone cheese and a touch of powdered sugar. The mascarpone adds fat and structure, allowing the cream to hold the weight of six cake layers and heavy fruit without collapsing or weeping, keeping the cake fresh and upright for days.
Why You’ll Love This Recipe
- ✓Visually stunning six-layer gradient perfect for parties.
- ✓Stabilized mascarpone whipped cream is light yet sturdy.
- ✓Fresh berries provide a tart contrast to the sweet sponge.
- ✓White velvet cake base ensures true, vibrant colors.
- ✓Moist texture that stays fresh for up to 3 days.
- ✓Detailed stacking instructions to prevent leaning.
Equipment You’ll Need
- ✓3 or 4 8-inch round cake pans
- ✓Stand mixer with paddle and whisk attachments
- ✓Kitchen scale
- ✓6 small mixing bowls (for colors)
- ✓Gel food coloring (Red, Orange, Yellow, Green, Blue, Purple)
- ✓Offset spatula
- ✓Rotating cake turntable
- ✓Large serrated knife
- ✓Piping bag with large round tip
Ingredients
- ✓3 cups (375g) cake flour, sifted
- ✓2 1/2 cups (500g) granulated sugar
- ✓1 tablespoon baking powder
- ✓1/2 teaspoon salt
- ✓1 cup (226g) unsalted butter, room temperature, cut into cubes
- ✓1 cup (240ml) whole milk, room temperature
- ✓1/2 cup (120ml) sour cream, room temperature
- ✓5 large egg whites, room temperature
- ✓2 teaspoons pure vanilla extract
- ✓Gel food coloring: Red, Orange, Yellow, Green, Blue, Violet
- ✓3 cups (720ml) heavy whipping cream, cold
- ✓8 oz (225g) mascarpone cheese, cold
- ✓1 cup (120g) powdered sugar
- ✓1 teaspoon vanilla bean paste
- ✓2 cups mixed fresh berries (strawberries, blueberries, raspberries)
- ✓Edible gold leaf (optional, for garnish)
Instructions
- 1. Preheat and Prep: Preheat your oven to 350°F (175°C). Grease three 8-inch round cake pans, line the bottoms with parchment paper, and grease the parchment. (You will bake in two batches if you don’t have 6 pans).
- 2. Mix Dry Ingredients: In the bowl of a stand mixer fitted with the paddle attachment, combine the sifted cake flour, granulated sugar, baking powder, and salt. Mix on low speed for 30 seconds to blend.
- 3. Reverse Creaming: Add the cubed room-temperature butter to the dry ingredients. Mix on low speed until the mixture resembles coarse sand and no large chunks of butter remain. This coats the flour in fat.
- 4. Add Liquids: In a separate jug, whisk together the milk, sour cream, egg whites, and vanilla extract. With the mixer on low, slowly pour in half of the liquid mixture. Increase speed to medium-high and beat for 2 minutes to build structure. Scrape down the bowl. Add the remaining liquid and beat for another 30 seconds just until combined.
- 5. Color the Batter: Weigh your total batter and divide it evenly into 6 small bowls (approx. 1 cup per bowl). Add a few drops of gel food coloring to each bowl to create red, orange, yellow, green, blue, and violet batters. Fold gently until color is uniform.
- 6. Bake: Pour the batters into the prepared pans. If you only have 3 pans, bake Red, Orange, and Yellow first. Bake for 18-22 minutes, or until a toothpick inserted comes out clean. Do not overbake or the colors will brown.
- 7. Cool: Let cakes cool in pans for 10 minutes, then turn out onto wire racks to cool completely. Wash pans and repeat with Green, Blue, and Violet layers.
- 8. Make Stabilized Cream: Chill your mixer bowl and whisk attachment. Combine cold heavy cream, cold mascarpone, powdered sugar, and vanilla bean paste. Whisk on low to combine, then increase to high speed until stiff peaks form. Watch closely to avoid making butter.
- 9. Assembly: Place a dab of cream on your cake board. Place the Violet layer down first. Spread a layer of cream and scatter a few sliced berries. Top with Blue layer. Repeat the process (Green, Yellow, Orange) ending with Red on top.
- 10. Crumb Coat and Chill: Apply a thin layer of cream over the entire cake to lock in crumbs. Chill for 20 minutes. Apply the final thick layer of cream, smoothing with an offset spatula.
- 11. Decorate: Top generously with the remaining fresh berries in a crescent or pile formation. Chill for at least 1 hour before slicing to allow layers to set.
Expert Cooking Tips
- ✓Weigh Your Batter: For perfectly even layers, use a digital kitchen scale to divide the batter exactly by weight into the six bowls.
- ✓Room Temperature Ingredients: Ensure butter, milk, and egg whites are truly at room temperature. This ensures an emulsion forms, creating a tender cake.
- ✓Don’t Overmix: Once the flour and liquid are combined, mix only as directed. Overmixing develops gluten, making the cake tough.
- ✓Gel Colors Only: Do not use liquid food coloring from the grocery store aisle. It is too weak and watery. Use professional gel paste (like Americolor or Wilton) for vibrant hues.
- ✓Chill Before Cutting: This cake is tall! Chilling it for at least an hour after assembly firms up the fat in the cream and butter, allowing for clean, sharp slices.
- ✓Leveling: If your cakes dome slightly, use a serrated knife to level them flat before stacking. Flat layers are crucial for stability.
- ✓Mascarpone is Key: Do not skip the mascarpone in the frosting; it provides the necessary fat content to keep the whipped cream stable for days.
Substitutions and Variations
If you need to make this recipe **Gluten-Free**, substitute the cake flour with a high-quality 1:1 gluten-free baking flour blend that contains xanthan gum. The texture may be slightly denser. For a **Dairy-Free** version, use a plant-based butter block and full-fat canned coconut milk for the cake. For the frosting, a coconut cream whip or a vegan buttercream would be necessary, as dairy-free whipped cream substitutes often lack the stability for a 6-layer cake. If you cannot find **Mascarpone**, you can substitute it with full-fat cream cheese, though the flavor will be slightly tangier, more like a cheesecake frosting. If you prefer **Buttercream** over whipped cream, a Swiss Meringue Buttercream is an excellent, stable alternative that is not as sweet as American buttercream. You can vary the **Fruit** based on the season; sliced peaches, kiwi, or mango also work beautifully inside the layers.
Common Mistakes to Avoid
The most common mistake is **overbaking the layers**, which causes the edges to brown and ruins the vibrant rainbow effect. Check the cakes early; they should look matte on top but not golden. Another issue is **slipping layers**. If your kitchen is warm, the whipped cream may soften. If the cake starts to lean during assembly, insert a long wooden skewer down the center and refrigerate immediately for 30 minutes to firm it up. **Under-whipping the cream** will lead to a runny filling that squishes out when you stack the layers; ensure you hit stiff peaks, but stop before it turns curdled. Finally, **cutting the cake while warm** will result in a structural collapse; patience with cooling and chilling is mandatory.
Serving Suggestions
This cake is a showstopper and deserves to be the center of attention. Serve it on a simple white ceramic pedestal stand to let the colors pop. Because the cake is tall, slices should be cut thin. Use a sharp chef’s knife dipped in hot water and wiped dry between cuts for the cleanest cross-section. Serve with a side of extra berry coulis or a scoop of vanilla bean ice cream if you want to be indulgent. For beverages, a glass of cold milk, a flute of champagne, or a floral Earl Grey tea pairs perfectly with the berries and cream profile.
Storage and Reheating Tips
Because of the fresh whipped cream and berries, this cake must be stored in the refrigerator. It is best eaten within 1-2 days while the fruit is fresh. Store the cake in a dedicated cake keeper or loosely cover the cut section with plastic wrap to prevent it from drying out. Do not freeze the assembled cake, as the fresh berries will release water and turn mushy upon thawing, ruining the cream. However, you can bake the cake layers in advance, wrap them tightly in plastic, and freeze them for up to a month. Thaw the layers completely before assembling with fresh cream.
Nutrition Facts (Estimated)
| Serving Size | 1 slice |
| Calories | 650 |
| Fat | 35g |
| Saturated Fat | 20g |
| Unsaturated Fat | 12g |
| Trans Fat | 0.5g |
| Cholesterol | 95mg |
| Sodium | 320mg |
| Carbohydrates | 78g |
| Fiber | 3g |
| Sugar | 45g |
| Protein | 8g |
Frequently Asked Questions
Can I make the cake layers ahead of time?
Yes! You can bake the layers up to 2 days in advance. Wrap each cooled layer tightly in plastic wrap and store at room temperature. You can also freeze the layers for up to a month.
Why did my colors turn out dull?
You likely used liquid food coloring or didn’t use enough gel. You also might have used yellow egg yolks which muddies the blue and violet layers. Stick to egg whites and high-quality gel paste.
Can I use all-purpose flour instead of cake flour?
In a pinch, yes, but the cake will be heavier and less tender. You can make a DIY cake flour by removing 2 tablespoons of AP flour per cup and replacing it with cornstarch, sifting heavily.
How do I stop the cake from leaning?
Ensure your layers are perfectly level before stacking. Use a chilled, stabilized cream (with mascarpone). If it leans, insert a dowel through the center and chill immediately.
Can I make this a 3-layer cake instead?
Absolutely. You can either halve the batter recipe or just make two layers of each color (swirl red/orange, yellow/green, blue/purple) for a tie-dye effect.
Is the mascarpone necessary?
It is highly recommended for stability. Standard whipped cream will deflate under the weight of 6 layers. If you omit it, you must use a gelatin stabilizer or switch to buttercream.
How do I get the frosting so smooth?
Apply a ‘crumb coat’ first and chill it. Then apply the final coat. Use a metal bench scraper or offset spatula run under hot water and dried to smooth the final layer.
What size eggs should I use?
Use large eggs (approx 50g without shell). This recipe relies on the protein structure of the whites, so size matters.
Conclusion
Creating this Tall Rainbow Layer Cake is a labor of love, but the reaction you will get when you slice into it is worth every minute of preparation. It captures the essence of celebration—colorful, sweet, and shared with people you love. By combining the nostalgia of a rainbow cake with the refined flavors of fresh fruit and Italian-style cream, you elevate a childhood favorite into a gourmet dessert. So, gather your mixing bowls, embrace the mess of the baking process, and get ready to serve a slice of pure happiness. Happy baking!