Ultimate Tall Rainbow Layer Cake With Buttercream Flowers
Tall Rainbow Layer Cake With Buttercream Flowers Recipe
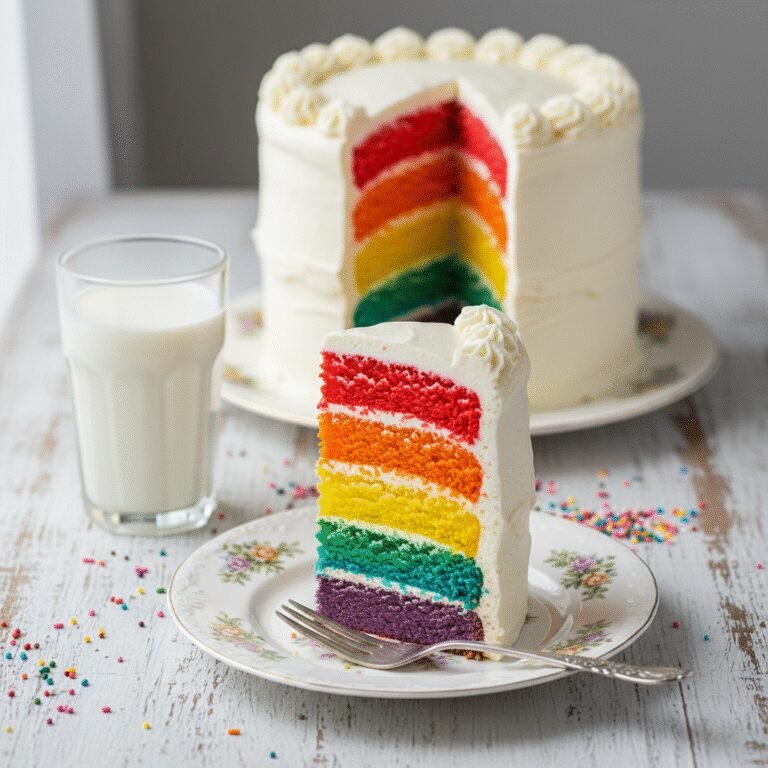
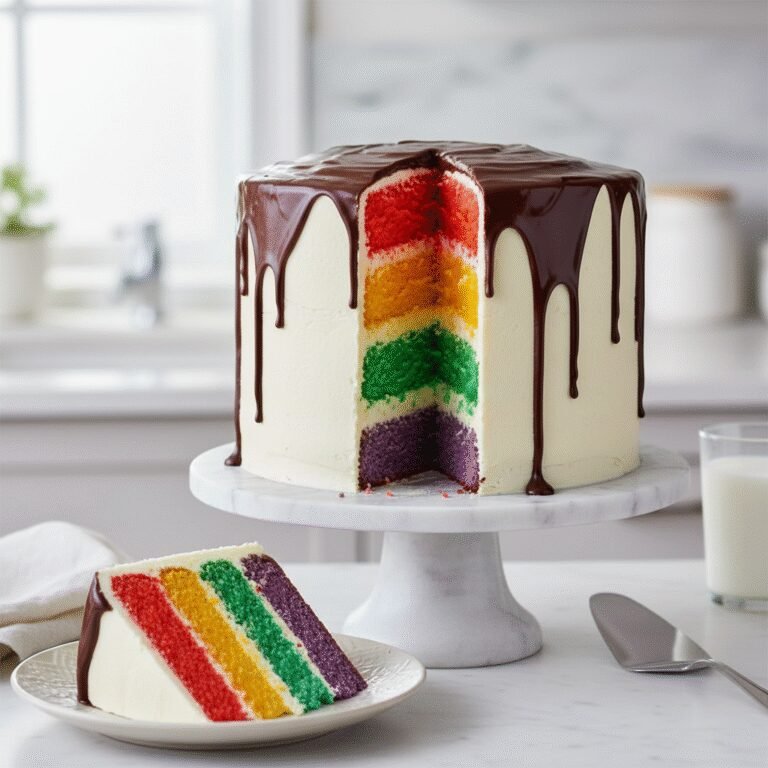
This show-stopping six-layer rainbow cake is the definition of edible joy, featuring vibrant, tender vanilla bean sponge layers stacked high and adorned with a garden of hand-piped buttercream flowers. It is the perfect centerpiece for birthdays, pride celebrations, or any occasion that calls for a spectacular burst of color and flavor.
2 hours
45 minutes
4 hours
16 servings
Dessert
Baking
American
Vegetarian
There are few desserts as universally delightful and visually arresting as a tall, perfectly executed rainbow layer cake. Cutting into a pristine white buttercream exterior to reveal a hidden spectrum of vibrant red, orange, yellow, green, blue, and purple layers is a moment of pure magic that never gets old. This recipe is not just about looks, however; it is designed to taste as incredible as it looks. We use a ‘White Velvet’ cake base, which utilizes egg whites and buttermilk to create a crumb that is exceptionally tender, moist, and pale enough to let the gel food colors shine with neon intensity without the yellow tint of egg yolks interfering.
The exterior is finished with a silky Swiss Meringue Buttercream, which is far superior to standard American buttercream for this application. Its smooth, buttery texture makes it the perfect medium for piping intricate, realistic flowers, and its balanced sweetness ensures that the massive amount of frosting required for a six-layer cake doesn’t become cloying. Whether you are an experienced baker looking for your next masterpiece or an ambitious beginner ready to tackle a project, this guide covers every detail—from achieving flat layers to mastering the art of floral piping—to ensure your creation is a towering success.
History & Origins
The concept of the layer cake dates back to the mid-19th century when chemical leaveners like baking powder were introduced, allowing for lighter, stackable cakes. However, the specific phenomenon of the rainbow layer cake is a decidedly modern trend that exploded in the early 21st century. While multi-colored cakes like the ‘checkerboard cake’ existed in vintage cookbooks, the vibrant, six-layer rainbow stack became a viral sensation around 2010. It is largely credited to a blogger known as ‘Whisk Kid’ (Kaitlin Flannery), whose recipe was featured on the Martha Stewart Show, catapulting the design into the mainstream baking consciousness.
Culturally, the rainbow cake has transcended its role as a mere birthday treat. It has become a powerful symbol of joy, inclusivity, and celebration, particularly associated with Pride Month. The evolution of food coloring technology has also played a massive role in the history of this dessert. The shift from watery liquid dyes to concentrated gel pastes allowed bakers to achieve deep, saturated hues without altering the liquid ratios of the batter, making structurally sound, towering cakes possible. Today, the rainbow cake stands as a testament to the intersection of visual art and culinary science, representing the modern baker’s desire to create food that is ‘Instagrammable’ while remaining delicious.
Why This Recipe Works
This recipe succeeds where many others fail because it prioritizes structural integrity and flavor balance alongside aesthetics. Many rainbow cakes suffer from being dry because the batter is over-mixed during the coloring process. To combat this, we use the ‘reverse creaming’ method (mixing butter into dry ingredients first), which coats the flour proteins in fat, inhibiting gluten development. This allows you to stir in the food coloring thoroughly without worrying about creating a tough, rubbery cake. The result is a plush, velvety crumb every time.
Furthermore, stability is crucial for a cake this tall. We utilize a high-ratio shortening and butter blend in the batter to ensure the layers bake up flat, reducing the need for leveling and waste. For the frosting, Swiss Meringue Buttercream is essential. Unlike American buttercream, which can crust over and crack, Swiss Meringue remains silky and stable at room temperature, acting as a sturdy cement for the heavy layers. The lower sugar content of this buttercream also perfectly offsets the sweet vanilla cake, ensuring that a slice of this giant dessert is enjoyable rather than overwhelmingly sugary.
Why You’ll Love This Recipe
- ✓Produces six distinct, vibrant layers without drying out the crumb.
- ✓Uses Swiss Meringue Buttercream for a silky, non-gritty finish.
- ✓Reverse creaming method ensures a tender, melt-in-your-mouth texture.
- ✓Includes detailed instructions for piping realistic buttercream hydrangeas and roses.
- ✓Sturdy structure suitable for transport and display.
- ✓Perfect balance of sweetness and vanilla flavor.
Equipment You’ll Need
- ✓6 x 8-inch round cake pans
- ✓Stand mixer with paddle and whisk attachments
- ✓Kitchen scale
- ✓Gel food coloring (Red, Orange, Yellow, Green, Blue, Purple)
- ✓Piping bags and couplers
- ✓Piping tips (1M, 104, 352, Russian tips)
- ✓Cake turntable
- ✓Offset spatula
- ✓Bench scraper
- ✓6-inch cardboard cake rounds
Ingredients
- ✓4 1/2 cups cake flour, sifted
- ✓3 cups granulated sugar
- ✓2 1/2 tsp baking powder
- ✓1/2 tsp baking soda
- ✓1 tsp salt
- ✓1 1/2 cups unsalted butter, room temperature, cubed
- ✓1/2 cup vegetable oil
- ✓1 cup egg whites (approx 7-8 large eggs), room temperature
- ✓1 1/2 cups buttermilk, room temperature
- ✓2 tbsp clear vanilla extract
- ✓High-quality gel food coloring set
- ✓FOR THE BUTTERCREAM:
- ✓10 large egg whites
- ✓3 cups granulated sugar
- ✓3 cups unsalted butter, room temperature, cubed
- ✓1 tbsp pure vanilla extract
- ✓Pinch of salt
Instructions
- Preheat your oven to 335°F (170°C). Grease six 8-inch cake pans and line the bottoms with parchment paper.
- In the bowl of a stand mixer fitted with the paddle attachment, combine the sifted cake flour, sugar, baking powder, baking soda, and salt. Mix on low speed for 30 seconds to combine.
- Add the cubed butter and vegetable oil to the dry ingredients. Mix on low speed until the mixture resembles coarse sand and no large chunks of butter remain.
- In a separate jug, whisk together the egg whites, buttermilk, and clear vanilla extract. With the mixer on low, slowly pour in half of the liquid mixture. Increase speed to medium-high and beat for 2 minutes to develop structure.
- Scrape down the sides of the bowl. Add the remaining liquid in two batches, mixing on low speed just until incorporated. Do not overmix.
- Weigh the total amount of batter and divide it evenly into six medium bowls. Use a kitchen scale for precision.
- Add a different gel food color to each bowl (Red, Orange, Yellow, Green, Blue, Purple) and fold gently until the color is uniform and vibrant.
- Pour the colored batters into the prepared pans. Bake for 20-25 minutes, or until a toothpick inserted into the center comes out clean. The cakes should spring back when lightly touched.
- Allow cakes to cool in pans for 10 minutes, then turn out onto a wire rack to cool completely.
- To make the buttercream: Combine egg whites and sugar in a heatproof bowl over a pot of simmering water (double boiler). Whisk constantly until the mixture reaches 160°F (71°C) and sugar is fully dissolved.
- Transfer the mixture to a stand mixer fitted with the whisk attachment. Whip on high speed until stiff glossy peaks form and the bowl feels cool to the touch (about 10-15 minutes).
- Switch to the paddle attachment. Add the butter one cube at a time, mixing on low speed. Once all butter is added, increase speed and whip until smooth and creamy. Add vanilla and salt.
- To assemble: Place the purple layer on a cake board. Spread a layer of buttercream on top. Repeat with blue, green, yellow, orange, and finally red on top.
- Apply a thin crumb coat of buttercream over the entire cake and refrigerate for 20 minutes.
- Apply a thick final coat of white buttercream and smooth with a bench scraper.
- Divide remaining buttercream and tint with desired flower colors. Use piping tips to create a cascade of flowers down the side or on top of the cake.
Expert Cooking Tips
- ✓Use a kitchen scale to divide the batter. Even layers are critical for the visual effect when sliced.
- ✓Do not use liquid food coloring. It will alter the consistency of the batter and won’t provide vibrant colors. Gel paste is mandatory.
- ✓If you don’t have 6 pans, bake in batches. Keep the remaining batter covered at room temperature; do not refrigerate the batter.
- ✓Wipe your knife clean between every single cut when serving to keep the colorful layers distinct and smear-free.
- ✓Ensure your butter for the frosting is truly room temperature. If it’s too cold, the buttercream will curdle; if too warm, it will be soupy.
- ✓Level your cakes if they dome, though the reverse creaming method usually produces flat tops.
- ✓Chill the cake before transporting it to ensure the butter in the frosting solidifies and holds the layers firmly.
Substitutions and Variations
If you cannot find cake flour, you can make a substitute by measuring 1 cup of all-purpose flour, removing 2 tablespoons, and replacing them with 2 tablespoons of cornstarch; sift together twice. For the buttermilk, a mixture of whole milk with a tablespoon of white vinegar or lemon juice left to sit for 5 minutes works well as a replacement. If you prefer a dairy-free cake, you can substitute the butter in the cake batter with high-quality vegan butter blocks and use almond milk with vinegar for the buttermilk, though the texture may be slightly less tender. For the frosting, if you are intimidated by Swiss Meringue, a standard American Buttercream (butter and powdered sugar) can be used, but it will be much sweeter and stiffer to pipe. Clear vanilla extract is recommended for the cake to keep the colors pure, but pure vanilla extract can be used if you don’t mind a very slight tint.
Common Mistakes to Avoid
The most common mistake is over-baking the layers. Because the layers are thin, they bake much faster than a standard cake. Over-baking leads to dry, brown edges that ruin the rainbow aesthetic. Another frequent error is not adding enough food coloring; the color lightens slightly as it bakes, so the batter should look a shade darker than you want the final cake to be. In the buttercream stage, many people panic when the mixture looks curdled after adding the butter. This is normal! Keep whipping, and it will come together. Finally, rushing the assembly process without chilling the crumb coat often results in crumbs mixing into the final white layer, ruining the pristine finish.
Serving Suggestions
This cake is a massive centerpiece, so serve it on a pedestal stand to give it the height it deserves. Because it is quite tall, you can cut very thin slices, meaning it feeds a crowd easily. For a clean presentation, dip a sharp chef’s knife in hot water and wipe it dry before each cut. Serve with a side of fresh berries or a dollop of tart raspberry coulis to cut through the richness of the buttercream. It pairs beautifully with champagne, a cold glass of milk, or black coffee.
Storage and Reheating Tips
The cake can be stored at room temperature for up to 2 days if the weather is cool (below 70°F). For longer storage, refrigerate the cake in a cake keeper or lightly covered with plastic wrap for up to 5 days. The buttercream acts as a seal, keeping the inside moist. Bring the cake to room temperature for at least 2-3 hours before serving, as butter-based cakes and Swiss meringue buttercream taste waxy and hard when cold. Slices can be frozen individually: wrap them tightly in plastic wrap, then foil, and freeze for up to 3 months.
Nutrition Facts (Estimated)
| Serving Size | 1 slice |
| Calories | 750 |
| Fat | 42g |
| Saturated Fat | 26g |
| Unsaturated Fat | 14g |
| Trans Fat | 0.5g |
| Cholesterol | 110mg |
| Sodium | 320mg |
| Carbohydrates | 90g |
| Fiber | 1g |
| Sugar | 65g |
| Protein | 6g |
Frequently Asked Questions
Can I make the cake layers ahead of time?
Yes, absolutely. Bake the layers, let them cool completely, wrap each layer tightly in two layers of plastic wrap, and freeze for up to a month. Assemble the cake while the layers are still frozen; it makes them easier to handle.
My buttercream looks like cottage cheese. What happened?
This means the butter was too cold or the meringue was too warm. Don’t throw it out! Just keep whipping on high speed. It can take 5-10 minutes, but it will eventually emulsify into a smooth cream. If it’s really stubborn, microwave 1/4 cup of the mixture for 10 seconds and pour it back in.
Do I need dowels for this cake?
For a 6-layer 8-inch cake, dowels are usually not strictly necessary if you use a stable filling like Swiss Meringue Buttercream and keep it cool. However, if you are transporting it by car or if it’s a hot day, inserting a central wooden dowel is a good safety precaution.
Can I use all-purpose flour instead of cake flour?
You can, but the cake will be denser and more bread-like. Cake flour has lower protein content, which is key to achieving that soft, velvety texture in a layer cake.
How do I get the sides perfectly smooth?
A metal bench scraper and a turntable are essential. Apply more frosting than you think you need, then hold the scraper stationary while spinning the table. Dip the scraper in hot water and wipe dry for the final smoothing pass.
Can I flavor the layers differently?
Technically yes, but with 6 layers, the flavors can get muddled. It is generally best to stick to a high-quality vanilla or almond flavor for the cake and experiment with flavors in the filling if desired.
Why did my cake layers brown too much?
Your oven might be running hot. Use an oven thermometer to check the true temperature. You can also wrap the outside of your cake pans with damp ‘cake strips’ to insulate the edges and prevent browning.
How do I transport this tall cake?
Transport the cake in a tall cake box. Place the box on a flat surface in the car, like the floor of the passenger seat or a flat trunk space—never on a slanted car seat. Ensure the car is air-conditioned.
Conclusion
Creating this Tall Rainbow Layer Cake is a labor of love that pays off in dividends of smiles and awe. It is a project that challenges your baking skills and rewards you with a slice of edible art. From the precise mixing of colors to the meditative process of piping buttercream flowers, every step is an opportunity to create something beautiful. Whether it’s for a child’s birthday, a Pride party, or just to brighten up a gloomy weekend, this cake promises to deliver joy in every colorful bite. So, preheat your oven, grab your gel colors, and get ready to bake the rainbow!