Sky-High Tall Rainbow Layer Cake: The Ultimate Celebration Centerpiece
Tall Rainbow Layer Cake Single Layer Cake Recipe
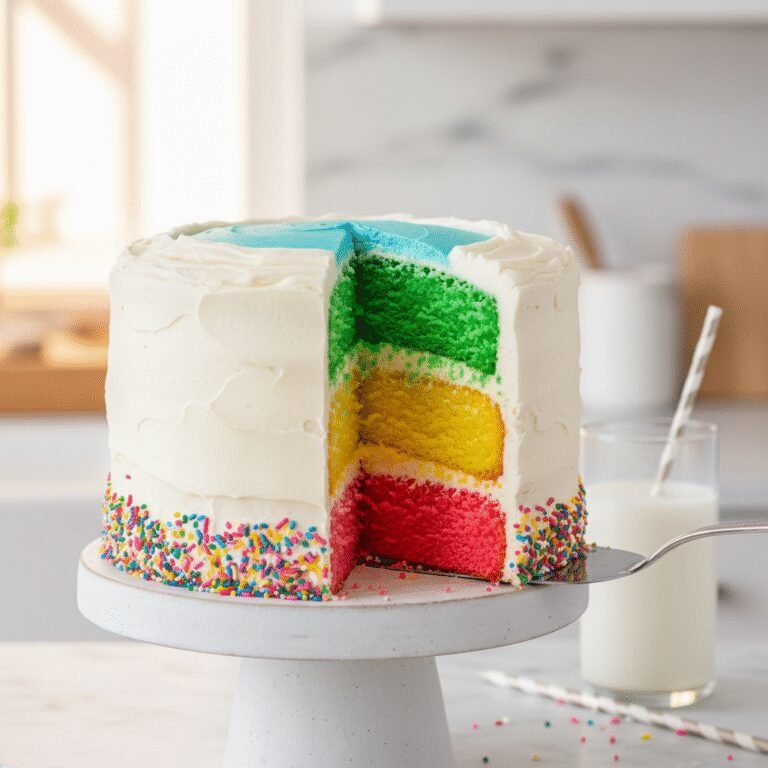
Prepare to dazzle your guests with this show-stopping Tall Rainbow Layer Cake, featuring six vibrant, moist layers of vanilla buttermilk sponge coated in silky Swiss Meringue Buttercream. It is the quintessential birthday cake that tastes just as magical as it looks, perfect for creating unforgettable memories.
1 hour 30 minutes
50 minutes
4 hours
1 8-inch Cake (approx. 20 servings)
Dessert
Baking
American
Vegetarian
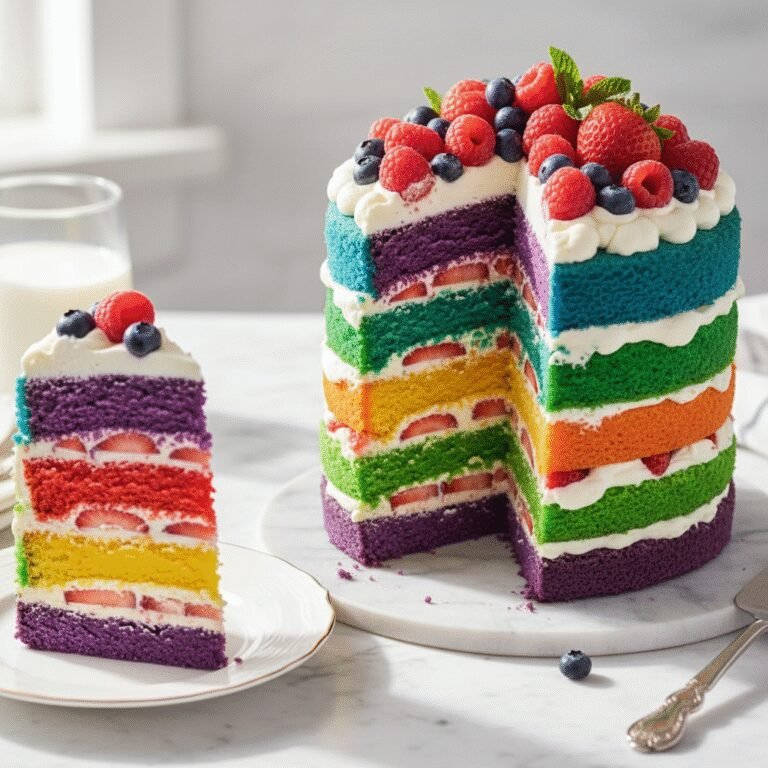
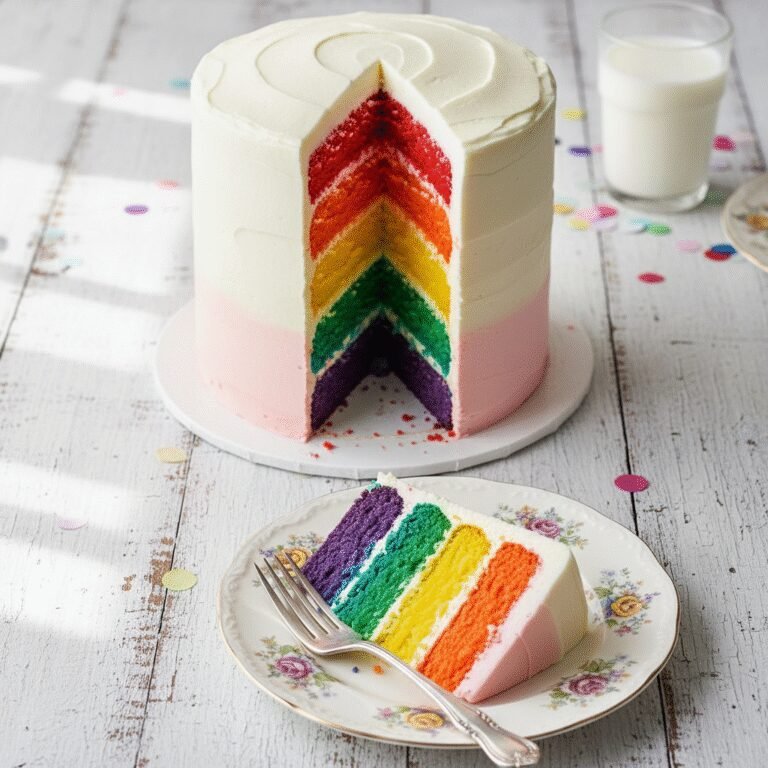
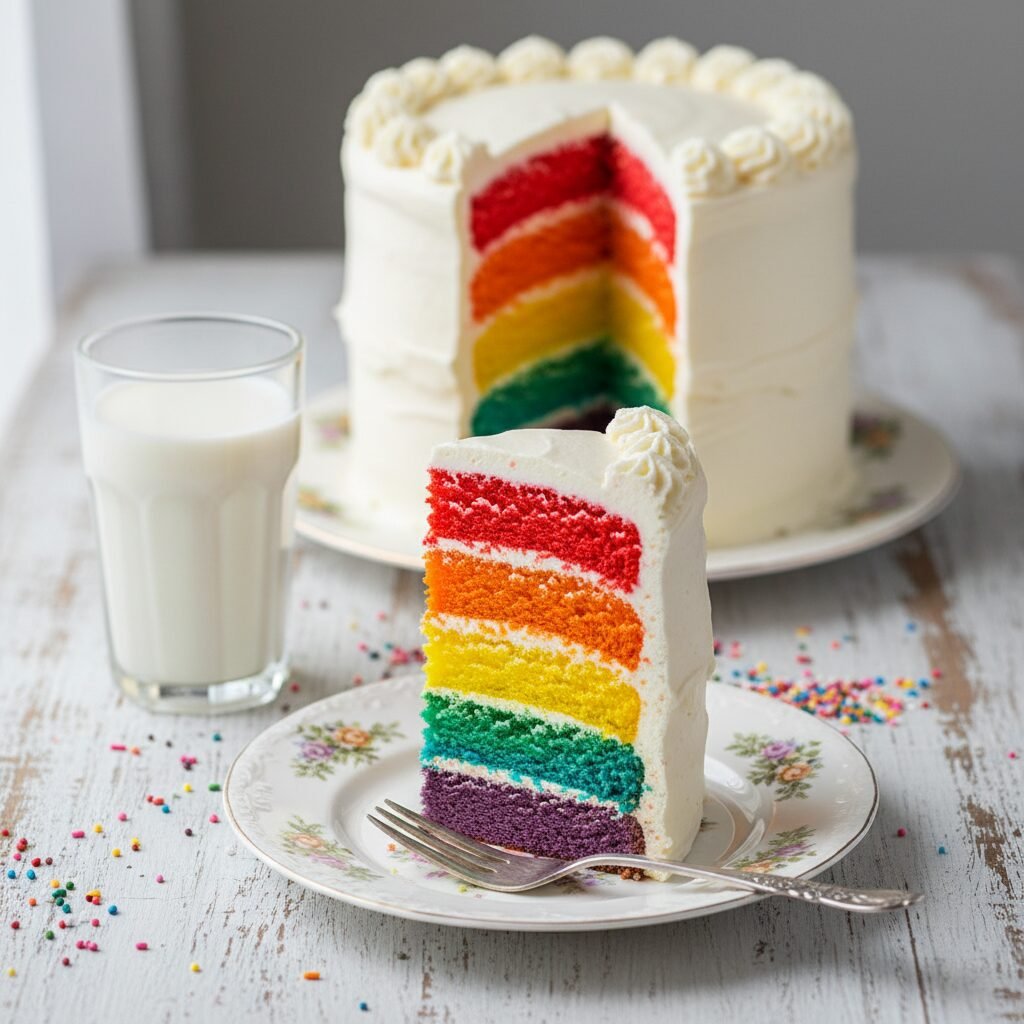
There is something undeniably magical about cutting into a stark white cake to reveal a hidden spectrum of vibrant colors. This Tall Rainbow Layer Cake is not just a dessert; it is an architectural feat of joy and the ultimate centerpiece for any celebration worth its salt. Whether you are planning a whimsical child’s birthday party, a Pride month gathering, or simply want to inject a massive dose of dopamine into your weekend baking, this recipe is your golden ticket. Unlike standard cakes that rely heavily on exterior decoration, the beauty of this masterpiece lies within its towering structure. We are talking about six distinct layers—red, orange, yellow, green, blue, and purple—stacked high to create a visual feast that creates a ‘wow’ moment the second the first slice is lifted.
But let’s be honest, a cake that looks good but tastes like cardboard is a baker’s worst nightmare. That is why this recipe prioritizes flavor and texture just as much as aesthetics. We use a reverse-creaming method and high-ratio shortening-butter blend to ensure the crumb is velvety, tender, and sturdy enough to support the impressive height without becoming dense. The flavor is a nostalgic, pure vanilla bean profile that pairs perfectly with the not-too-sweet, cloud-like texture of homemade Swiss Meringue Buttercream. While it may look intimidating to construct, this guide breaks down the engineering of a tall cake into manageable steps, ensuring your tower of rainbow goodness stands straight and true. Get your gel food coloring ready, because we are about to bake the happiest cake on earth.
History & Origins
The concept of the layer cake, or ‘sandwich cake,’ dates back to the mid-19th century when baking powder was invented, allowing for lighter, fluffier sponges that could be stacked. However, the specific phenomenon of the Rainbow Cake is a much more modern invention, deeply rooted in the visual culture of the internet age. While multi-colored cakes have existed in various forms—such as the checkered Battenberg cake of the late 19th century or the psychedelic tie-dye cakes of the 1960s and 70s—the distinct, horizontal six-layer rainbow stack gained massive viral popularity in the early 2000s and 2010s.
Many food historians and bloggers point to the explosion of ‘mom blogs’ and Pinterest in roughly 2009-2010 as the catalyst for this cake’s ubiquity. Specifically, a feature by Whisk Kid (Kaitlin Flannery) on the Martha Stewart Show in 2010 is often cited as the moment the Rainbow Cake went from a niche novelty to a mainstream baking bucket-list item. It symbolized a shift in home baking towards high-impact, visually driven desserts designed to be photographed and shared. Culturally, the rainbow cake has also been embraced as a symbol of diversity and inclusion, frequently appearing at Pride celebrations worldwide. It represents the intersection of modern food technology (specifically stable gel food colorings) and the age-old desire to use food as a vessel for celebration and storytelling.
Why This Recipe Works
This recipe is engineered specifically to solve the two main problems bakers face with tall rainbow cakes: color muddying and structural collapse. First, regarding the color: standard yellow cake recipes use whole eggs. The yellow yolks, when mixed with blue food coloring, turn green, and when mixed with purple, turn a muddy gray. This recipe utilizes a ‘White Velvet’ base relying solely on egg whites and clear vanilla extract. This provides a neutral, white canvas that allows the gel food coloring to pop with true, vibrant saturation.
Secondly, structural integrity is paramount for a six-layer tower. A standard sponge cake is often too soft to hold up under the weight of five other layers and heavy buttercream. We employ the reverse creaming method (mixing fat into dry ingredients before adding liquid), which coats the flour proteins in fat, limiting gluten development while ensuring a flat, even rise. This results in layers that are perfectly level right out of the oven, reducing the need for trimming and ensuring the stack is stable. Furthermore, we use Swiss Meringue Buttercream rather than American Buttercream. Swiss Meringue sets firm when chilled due to its high butter content, acting like ‘cement’ that holds the tall layers together firmly during transport and slicing, yet melts instantly in the mouth.
Why You’ll Love This Recipe
- ✓Six distinct, vibrant layers that retain their color after baking.
- ✓Sturdy yet tender white velvet crumb designed for stacking.
- ✓Swiss Meringue Buttercream offers superior stability and less sweetness.
- ✓Uses gel food coloring for maximum saturation without altering batter consistency.
- ✓The ultimate Pinterest-worthy centerpiece for birthdays and parties.
Equipment You’ll Need
- ✓Three 8-inch round cake pans (you will bake in two batches)
- ✓Stand mixer with paddle and whisk attachments
- ✓Kitchen scale (crucial for even layers)
- ✓Gel food coloring (Red, Orange, Yellow, Green, Blue, Purple)
- ✓Offset spatula
- ✓Cake turntable
- ✓Bench scraper
- ✓Wire cooling racks
- ✓Parchment paper
Ingredients
- ✓3 3/4 cups (450g) Cake flour, sifted
- ✓2 1/4 cups (450g) Granulated sugar
- ✓1 tablespoon Baking powder
- ✓1 teaspoon Salt
- ✓1 cup (226g) Unsalted butter, room temperature, cut into cubes
- ✓1 1/4 cups (300ml) Buttermilk, room temperature
- ✓1/2 cup (120ml) Vegetable oil
- ✓2 tablespoons Clear vanilla extract
- ✓7 large Egg whites, room temperature
- ✓High-quality Gel Food Coloring (AmeriColor or Wilton recommended)
- ✓FOR THE FROSTING: 10 large Egg whites
- ✓2 1/2 cups (500g) Granulated sugar
- ✓3 cups (680g) Unsalted butter, slightly cool but pliable
- ✓1 tablespoon Vanilla bean paste
- ✓Pinch of salt
Instructions
- Preheat your oven to 335°F (168°C). Grease three 8-inch cake pans, line the bottoms with parchment paper, and grease the paper. You will bake the 6 layers in two batches of 3.
- In the bowl of a stand mixer fitted with the paddle attachment, mix the cake flour, sugar, baking powder, and salt on low speed for 30 seconds to combine.
- Add the cubed butter and mix on low speed until the mixture resembles coarse sand or breadcrumbs. This is the reverse creaming method.
- In a separate jug, whisk together the egg whites, buttermilk, oil, and clear vanilla extract.
- With the mixer on low, slowly pour in about 1/2 of the liquid mixture. Increase speed to medium-high and beat for 2 minutes to build structure.
- Scrape down the sides of the bowl. Reduce speed to low and add the remaining liquid in two batches, mixing just until combined after each addition. Do not overmix.
- Weigh your total batter and divide it evenly into 6 separate small bowls (approx. 14-16oz per bowl depending on total yield).
- Tint each bowl a different color of the rainbow using gel food coloring. Be generous with the color as it fades slightly during baking. Fold gently to avoid deflating the batter.
- Pour the Red, Orange, and Yellow batters into the three prepared pans. Tap pans on the counter to release air bubbles.
- Bake for 22-25 minutes, or until a toothpick inserted into the center comes out clean. Do not overbake or the colors will brown.
- Let cakes cool in pans for 10 minutes, then turn out onto wire racks to cool completely. Wash, re-grease, and line the pans, then bake the Green, Blue, and Purple layers.
- While cakes cool, make the Swiss Meringue Buttercream. Whisk egg whites and sugar in a heatproof bowl over a pot of simmering water until sugar dissolves and temp reaches 160°F.
- Transfer to stand mixer with whisk attachment. Whip on high speed until stiff peaks form and the bowl feels cool to the touch (about 10-15 minutes).
- Switch to paddle attachment. Add butter one cube at a time on medium speed. Once all butter is incorporated, add vanilla and salt. Whip on high until silky.
- To assemble, level the tops of any domed cakes. Smear a dab of frosting on a cake board. Place the Purple layer down first. Top with 3/4 cup frosting and spread evenly.
- Repeat with Blue, Green, Yellow, Orange, and finally Red on top (bottom side up for a flat top).
- Apply a thin crumb coat of frosting over the entire tall cake. Chill in the fridge for 30 minutes to set.
- Apply the final thick layer of frosting and smooth with a bench scraper. Top with sprinkles if desired.
- Chill the cake for at least 1 hour before slicing to ensure clean, distinct layers.
Expert Cooking Tips
- ✓Use a kitchen scale to divide the batter. Even layers are critical for the visual effect of a rainbow cake.
- ✓Do not use liquid food coloring. Liquid coloring adds too much water to the batter, which can alter the chemistry and result in a dense or gummy texture. Gel paste is concentrated and maintains the batter’s integrity.
- ✓Keep your butter ‘cool room temperature’. If the butter is too soft or oily, the cake will be greasy. It should leave a thumbprint when pressed but still hold its shape.
- ✓Use clear vanilla extract for the cake batter. Brown vanilla extract will tint the batter slightly beige, which can make the blue and purple layers look muddy.
- ✓Chill the cake layers before stacking. Handling six layers of warm or room-temperature cake is a recipe for a leaning tower. Cold cake is firmer and easier to stack straight.
- ✓If your buttercream looks curdled while adding butter, keep whipping! It will come together. If it’s too soupy, pop the bowl in the fridge for 15 minutes then whip again.
Substitutions and Variations
If you cannot find cake flour, you can make a DIY substitute by removing 2 tablespoons of All-Purpose flour from every cup and replacing it with 2 tablespoons of cornstarch; sift together three times to aerate. For the buttermilk, a mixture of whole milk with a tablespoon of white vinegar or lemon juice (let sit for 5 minutes) works well. If you prefer not to use egg whites only, you can use whole eggs, but be aware that the yellow yolks will affect the vibrancy of the blue and purple layers (blue may turn teal, purple may turn grayish). For the frosting, if Swiss Meringue is too technical, an American Buttercream or a Cream Cheese Frosting (providing it is stiff enough) can be used, though they will be much sweeter. Vegetable oil can be swapped for melted coconut oil or canola oil.
Common Mistakes to Avoid
The most common mistake is over-baking the layers. Because the layers are thinner than a standard cake, they bake faster. If you over-bake, the edges will turn brown, ruining the seamless rainbow look when sliced. Start checking at 20 minutes. Another mistake is rushing the cooling process. If you try to frost warm cakes, the butter in the frosting will melt, causing the layers to slide off one another. A ‘Leaning Tower of Pisa’ effect usually happens because the layers weren’t leveled properly; use a serrated knife to cut off any domes so each layer is perfectly flat. Finally, under-coloring the batter is a regret many bakers have; the color lightens as the batter expands, so tint it a shade darker than you want the final result to be.
Serving Suggestions
This cake is exceptionally tall, making standard slices very large. For a party, it is best served by cutting the cake in half down the center first, then slicing rectangular portions from the flat side (the ‘catering style’ cut). This yields about 30-40 sensible portions rather than 16 massive wedges. Serve with a dollop of unsweetened whipped cream or fresh berries to cut through the sweetness. It pairs beautifully with a glass of cold milk or a dark roast coffee to balance the sugar. Since the cake is a showstopper, bring it out whole to the table before slicing so everyone can admire the height.
Storage and Reheating Tips
The high sugar and fat content of this cake means it keeps well. Store the frosted cake in the refrigerator for up to 5 days. The Swiss Meringue Buttercream acts as a seal, keeping the inside moist. However, you must bring the cake to room temperature (at least 2-3 hours on the counter) before eating; cold butter cake feels dry and hard, but it softens beautifully at room temp. Slices can be wrapped tightly in plastic wrap, then foil, and frozen for up to 3 months. To thaw, place the wrapped slices in the fridge overnight.
Nutrition Facts (Estimated)
| Serving Size | 1 slice |
| Calories | 650 |
| Fat | 35g |
| Saturated Fat | 22g |
| Unsaturated Fat | 11g |
| Trans Fat | 0.5g |
| Cholesterol | 95mg |
| Sodium | 320mg |
| Carbohydrates | 80g |
| Fiber | 1g |
| Sugar | 45g |
| Protein | 6g |
Frequently Asked Questions
Can I make the cake layers ahead of time?
Absolutely. In fact, it’s recommended. You can bake the layers, let them cool completely, wrap each layer individually in plastic wrap, and freeze them for up to a month. Assemble the cake with the frozen layers; they are easier to handle and will thaw quickly once frosted.
Do I need dowels for this cake?
For a 6-layer 8-inch cake, dowels are usually not strictly necessary if you use a stable filling like Swiss Meringue Buttercream and keep it chilled. However, if you plan to transport the cake in a car or keep it in a warm room for hours, inserting a central wooden dowel is a great safety net to prevent sliding.
Why did my blue layer turn green?
This usually happens if the batter was too yellow to begin with (from butter or egg yolks) or if the baking powder had aluminum in it, which can react with acidic ingredients and blue dye. Using a ‘white’ batter base and aluminum-free baking powder helps prevent this.
Can I use 9-inch pans instead?
Yes, but the layers will be thinner and will bake faster (check around 15-18 minutes). The cake will be wider and shorter, so it won’t have the same dramatic ‘tower’ effect, but it will still be delicious.
How do I get the frosting so smooth?
The secret is a hot metal bench scraper. Dip your metal scraper in hot water, wipe it dry, and then glide it around the cake. The heat slightly melts the outer layer of butter, creating a glass-like finish.
Can I flavor the layers differently?
Technically yes, but it is a lot of work to make 6 different flavored batters. It is better to keep the cake vanilla and experiment with flavored fillings between the layers, like fruit jams, lemon curd, or chocolate ganache, though this may impact stability.
What if I only have two cake pans?
That is fine! The batter holds up well at room temperature. Bake the first two colors, let them cool slightly, remove, wash the pans, and repeat. Just cover the remaining batter bowls with plastic wrap so they don’t dry out.
Is Swiss Meringue Buttercream safe to eat?
Yes. During the process, you heat the egg whites and sugar to 160°F (71°C), which pasteurizes the eggs and makes them safe to consume.
Conclusion
Creating a Tall Rainbow Layer Cake is a labor of love, but the reward is incomparable. There is a unique joy in seeing the eyes of your friends and family widen as you lift that first slice, revealing the perfect spectrum of colors hidden beneath the snowy white frosting. It is a dessert that demands attention and delivers on every promise of flavor and fun. While it requires patience and a bit of precision, the result is a professional-quality bakery cake right from your own kitchen. So, embrace the flour mess, have fun with the colors, and get ready to serve a slice of pure happiness. Happy baking!