The Ultimate Moist Apple Snack Cake: The Perfect Office Party Crowd-Pleaser
Moist Apple Snack Cake For Office Party Recipe
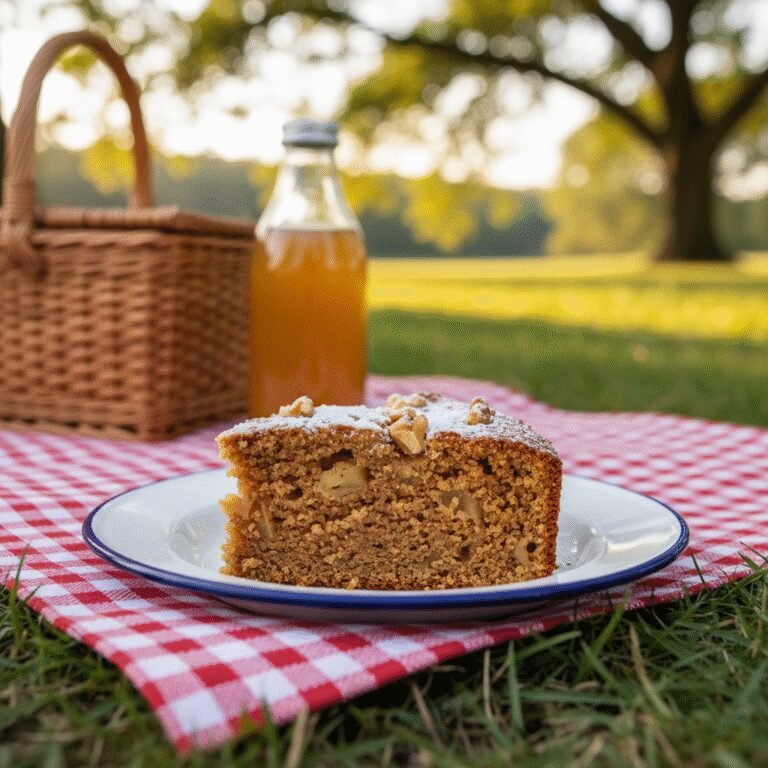
This incredibly moist apple snack cake is the unsung hero of office potlucks and midday celebrations. Packed with tender apple chunks and warm autumn spices, it travels perfectly and stays fresh for days, making it the ideal treat to share with coworkers.
20 minutes
45 minutes
1 hour 5 minutes
16-20 squares
Dessert
Baking
American
Vegetarian
There is a specific kind of magic required for the perfect office party treat. It cannot be too fragile, lest it crumble during the commute. It cannot be overly fussy or messy; no one wants to be the person dropping buttercream frosting onto the conference room carpet. It needs to be comforting, universally appealing, and, most importantly, it needs to taste incredible even if it has been sitting on the breakroom table for a few hours. Enter the Moist Apple Snack Cake. This recipe is specifically engineered to be the ultimate crowd-pleaser for professional gatherings, school bake sales, or cozy autumn afternoons.
What sets this cake apart is its incredible texture. Unlike dry coffee cakes that require a beverage to wash them down, this snack cake boasts a dense, pudding-like crumb that remains moist for days, thanks to a specific ratio of oil to flour and the natural pectin released by the apples. The flavor profile is a nostalgic embrace of cinnamon, nutmeg, and caramelized brown sugar, elevating the humble apple into something sophisticated yet approachable. Whether you are celebrating a colleague’s birthday, marking a project milestone, or simply trying to boost morale on a rainy Tuesday, this apple snack cake delivers. It requires no mixer, comes together in one bowl, and fills the office with an aroma that is guaranteed to draw people out of their cubicles. It is rustic enough to feel homemade but delicious enough to rival any bakery offering.
History & Origins
The concept of the ‘snack cake’ is deeply rooted in American home baking traditions, distinct from the elaborate layer cakes reserved for birthdays or weddings. Historically, snack cakes—often referred to as ‘pan cakes’ or ‘sheet cakes’—emerged as practical, everyday treats that could be whipped up quickly for unexpected guests or family desserts. They gained immense popularity in the mid-20th century with the rise of convenience cooking and the suburban boom, where housewives sought reliable recipes that were economical and easy to transport to community gatherings.
Apple cakes, specifically, trace their lineage back to European fruit cakes and puddings, but they took on a distinct American identity as apple orchards flourished across the United States. In regions like New England and the Pacific Northwest, apple season dictated the dessert menu. During the Great Depression, eggless and butterless apple cakes became staples because apples were cheap and plentiful, while dairy was scarce. This resourcefulness cemented the apple cake as a symbol of comfort and resilience.
The transition of the apple cake into the ‘office party’ staple aligns with the evolution of corporate culture in the 1980s and 90s, where potlucks became a common way to build team camaraderie. The snack cake was the perfect vessel: sturdy, sliceable into small squares, and needing no refrigeration. Today, it stands as a testament to the enduring power of simple, honest ingredients bringing people together, proving that you don’t need fondant or gold leaf to make a lasting impression.
Why This Recipe Works
This recipe succeeds where many others fail due to three critical factors: moisture retention, apple distribution, and structural integrity. First, we use vegetable oil instead of butter as the primary fat. While butter offers flavor, it is 20% water and solidifies at room temperature, often leading to a drier crumb over time. Oil remains liquid, coating the flour proteins (gluten) more effectively to prevent toughness and ensuring the cake stays soft and moist for days—perfect for an office setting where the cake might sit out. We supplement the flavor lost from skipping butter by using a high proportion of dark brown sugar and a generous splash of vanilla extract.
Secondly, the choice of apples and their preparation is paramount. We use a mix of Granny Smith for tartness and structure, and Honeycrisp for sweetness. Instead of grating them, which can make the batter gummy, or slicing them, which makes cutting the cake difficult, we dice them into small, uniform cubes. This ensures every bite has a burst of fruit without compromising the cake’s stability. Finally, the batter is thick enough to suspend the apples, preventing them from sinking to the bottom, a common pitfall in fruit cakes. The addition of a small amount of yogurt or sour cream interacts with the baking soda to create a tender lift, resulting in a cake that is dense but not heavy.
Why You’ll Love This Recipe
- ✓Stays moist for up to 4 days at room temperature.
- ✓No mixer required; simple one-bowl preparation.
- ✓Sturdy structure makes it easy to transport without damage.
- ✓Perfect balance of sweet and tart apples.
- ✓Can be eaten by hand without messy frosting.
- ✓Freezer-friendly for make-ahead convenience.
Equipment You’ll Need
- ✓9×13 inch baking pan
- ✓Large mixing bowl
- ✓Medium mixing bowl
- ✓Whisk
- ✓Rubber spatula
- ✓Peeler
- ✓Chef’s knife
- ✓Measuring cups and spoons
Ingredients
- ✓2 1/2 cups All-Purpose Flour
- ✓2 cups Granulated Sugar (can split 50/50 with Brown Sugar)
- ✓1 tsp Baking Soda
- ✓1/2 tsp Salt
- ✓2 tsp Ground Cinnamon
- ✓1/2 tsp Ground Nutmeg
- ✓1/4 tsp Ground Allspice
- ✓3 large Eggs, room temperature
- ✓1 cup Vegetable Oil (or Canola Oil)
- ✓1/2 cup Plain Greek Yogurt or Sour Cream
- ✓2 tsp Pure Vanilla Extract
- ✓3 cups Apples (Granny Smith and Honeycrisp), peeled, cored, and diced into 1/2 inch cubes
- ✓1 cup Chopped Walnuts or Pecans (Optional)
- ✓Powdered sugar for dusting (Optional)
Instructions
- Preheat your oven to 350°F (175°C). Grease a 9×13 inch baking pan generously with non-stick spray or butter, or line it with parchment paper for easy removal.
- In a medium bowl, whisk together the flour, baking soda, salt, cinnamon, nutmeg, and allspice until well combined and no lumps remain. Set aside.
- In a large mixing bowl, whisk together the vegetable oil, sugar (and brown sugar if using), eggs, yogurt (or sour cream), and vanilla extract. Whisk vigorously for about 1-2 minutes until the mixture is smooth and slightly emulsified.
- Gradually add the dry ingredients to the wet ingredients. Switch to a rubber spatula and fold gently. Stop mixing when there are still a few streaks of flour visible.
- Add the diced apples and chopped nuts (if using) to the batter. Fold them in until just combined and the flour is fully incorporated. Do not overmix, or the cake will become tough.
- Pour the thick batter into the prepared baking pan. Use the spatula to spread it evenly into the corners and smooth the top.
- Bake in the preheated oven for 40-50 minutes. Check at the 40-minute mark. The cake is done when a toothpick inserted into the center comes out clean or with just a few moist crumbs attached (no wet batter).
- Remove the cake from the oven and place the pan on a wire cooling rack. Let it cool completely in the pan before slicing. This allows the structure to set.
- Once cool, dust with powdered sugar if desired, slice into squares, and serve.
Expert Cooking Tips
- ✓Dice the apples uniformly to ensure even baking and consistent texture in every bite.
- ✓Do not overmix the batter once the flour is added; this activates gluten and leads to a tough cake.
- ✓Room temperature eggs and yogurt incorporate better into the oil, creating a smoother emulsion.
- ✓If the top is browning too quickly but the center is raw, tent the pan loosely with aluminum foil.
- ✓Use a serrated knife to cut the cake for clean edges that look professional on a platter.
- ✓Tossing the apple chunks in a tablespoon of the flour mixture before adding them prevents them from sinking, though this batter is generally thick enough to hold them.
Substitutions and Variations
This recipe is quite forgiving and adaptable to various dietary needs or pantry limitations. If you are out of vegetable oil, melted coconut oil or applesauce can be used, though applesauce will result in a softer, more cake-like texture rather than the dense snack cake crumb. For a gluten-free version, swap the all-purpose flour for a high-quality 1:1 gluten-free baking flour blend that contains xanthan gum. If you prefer to avoid refined white sugar, coconut sugar is an excellent alternative that adds a caramel-like depth. The Greek yogurt can be replaced with sour cream, buttermilk, or even a dairy-free yogurt for a lactose-free option. Regarding the fruit, while apples are the star, firm pears hold up beautifully in this batter as well. Finally, the nuts are entirely optional; if your office has a nut-free policy, simply omit them or replace them with pumpkin seeds for a bit of crunch.
Common Mistakes to Avoid
The most common mistake with apple cake is using the wrong type of apple. Avoid Red Delicious or other soft, mealy apples that will turn into mush during baking; stick to firm varieties like Granny Smith, Fuji, or Honeycrisp. Another error is underbaking. Because this cake is moist and dense, it can be tricky to tell when it is done. Rely on the toothpick test—if it comes out with wet batter, it needs more time. Don’t be afraid to bake it for the full time listed. Additionally, cutting the cake while it is still warm is a recipe for disaster. The steam needs to escape and the crumb needs to set; cutting it too early will result in crumbling squares that look messy on a serving platter. Lastly, avoid peeling the apples perfectly; a little bit of skin adds texture and nutrition, though fully peeled is best for a uniform look.
Serving Suggestions
For an office party, presentation is key. Slice the cake into uniform squares and arrange them on a large platter. You can dust them with powdered sugar just before serving for a snowy, professional finish. If you want to elevate the experience, provide a side bowl of whipped cream or a jar of salted caramel sauce that colleagues can drizzle over their slices. For a warm, cozy vibe, serve alongside a carafe of hot coffee or spiced apple cider. If serving this at home for a dinner party, warm the slices slightly and top with a scoop of vanilla bean ice cream.
Storage and Reheating Tips
One of the best features of this cake is its shelf life. It can be stored at room temperature in an airtight container or covered tightly with plastic wrap for up to 4 days. In fact, many find that the flavor improves on the second day as the moisture from the apples redistributes. For longer storage, you can refrigerate the cake for up to a week, though this may dry it out slightly, so bring it back to room temperature before eating. This cake also freezes exceptionally well. Wrap individual squares in plastic wrap and then place them in a freezer-safe bag for up to 3 months. Thaw on the counter for a quick snack.
Nutrition Facts (Estimated)
| Serving Size | 1 square |
| Calories | 245 |
| Fat | 11g |
| Saturated Fat | 1.5g |
| Unsaturated Fat | 9g |
| Trans Fat | 0g |
| Cholesterol | 25mg |
| Sodium | 180mg |
| Carbohydrates | 34g |
| Fiber | 2g |
| Sugar | 18g |
| Protein | 3g |
Frequently Asked Questions
Can I make this cake ahead of time?
Absolutely! In fact, this cake tastes even better the next day. Making it the night before your office party allows the flavors to meld and the moisture to distribute evenly.
What are the best apples to use?
A mix of tart and sweet-crisp apples works best. Granny Smith provides a nice tart contrast and holds its shape, while Honeycrisp or Fuji adds natural sweetness.
Can I reduce the sugar in this recipe?
Yes, you can reduce the sugar by about 1/2 cup without ruining the texture, though the cake will be less moist and have a shorter shelf life. The sugar contributes to the moisture retention.
Do I have to peel the apples?
It is recommended for the best texture, especially for a crowd-pleasing office cake. However, if you enjoy a more rustic texture, you can leave the skins on.
Can I bake this in a Bundt pan?
Yes, but you will need to adjust the baking time. A Bundt pan usually requires 55-65 minutes. Be sure to grease and flour the pan thoroughly to prevent sticking.
Why did my cake sink in the middle?
This usually happens if the cake was underbaked or if the oven door was opened too early, causing a temperature drop. Ensure the toothpick comes out clean before removing it.
Is this recipe dairy-free?
It can easily be made dairy-free by swapping the yogurt/sour cream for a dairy-free yogurt alternative or simply using applesauce instead.
How do I transport this without ruining it?
Leave the cake in the baking pan and cover it with the pan’s lid or foil. Slice it once you arrive at the office to keep it as fresh as possible.
Conclusion
The Moist Apple Snack Cake is more than just a recipe; it is a reliable tool in your social arsenal. It bridges the gap between a casual snack and a decadent dessert, making it appropriate for virtually any occasion. Its robust flavor, ease of preparation, and incredible staying power make it the undisputed champion of office parties and potlucks. By following the tips and techniques outlined above, you are guaranteed a result that will have your coworkers asking for the recipe before the crumb is even cleared from their plates. So, grab those apples, preheat your oven, and get ready to become the most popular person in the breakroom.